
GlideAggregate
Recently, I gave an interview, where I was asked to write a script in scripts - background to print priority-wise count of all incident records. And I could not do it. Primarily because I did never use this API for anything else but getting the COUNT. So this is the time for doing what I did not do and probably you do not as well. So let us dig what this API is.
If you did not get what exactly I was asked to do, follow this steps:
- Navigate to Incident > All

- Right-click the column Priority and select Group By Priority.

- Your window will display something like this:

Here, You will notice:
- Groups are named for the values of the field selected for grouping. For example, in our case, since we grouped by Priority, each group is a Priority's display name.
- The record count for each group appears next to the group name/Priority.
- The total number of items in the list (all groups/Priorities combined) appears near the paging controls in the list.
I had to write a script to print the output as shown in the last screenshot above. If you want to read more about "Grouped lists" you can find it here.
What is GlideAggregate
GlideAggregate is an extension of GlideRecord. It provides the capability to do aggregation (COUNT, SUM, MIN, MAX, AVG). These operations can be done with regular GlideRecord use, but with GlideAggregate, they are optimized around these use cases and offer significant efficiencies.
Getting the number of records for GlideRecord query
One of the frequently used use case is finding number of records for a a GlideRecord query. This can be achieved using getRowCount for a GlideRecord query, which is not a efficient solution if no operation is performed with the returned records. Alternatively, use of GlideAggreggate can improve the performance significantly. Let us see how to script both the ways:
getRowCount
- Copy the below script to scripts - background, and click Run script button:
var grInc = new GlideRecord("incident")
grInc.query()
gs.info(grInc.getRowCount())

- You should see the output similar to the following:

- Now, Navigate to Incident > All

- Right-click the value New for column State and select Show Matching.

- Your window will display something like below, Observe that the condition State = New has been added to the filter and the total number of records with this filter:

- Right-click the end of the filter breadcrumb and select Copy query from the context menu:

- Now, let us modify the script as below to use encoded query copied above to filter the records:
var grInc = new GlideRecord("incident")
grInc.addEncodedQuery("state=1")
grInc.query()
gs.info(grInc.getRowCount())
- Copy the above script to scripts - background, and click Run script button:

- You should see the output similar to the following:

This is the traditional way of getting number of records for a specific filter. You can dig documentation to know more about Copy query & Quick filters.
GlideAggregate
There is alternate way of scripting the same using GlideAggregate that can improve the performance significantly and is more efficient:
- Copy the below script to scripts - background, and click Run script button:
var grInc = new GlideAggregate("incident")
grInc.addEncodedQuery("state=1")
grInc.addAggregate("COUNT")
grInc.query()
if (grInc.next()) {
  gs.info(grInc.getAggregate("COUNT"))
}

- You should see the output similar to the following:

In the above script,
- addAggregate() method is used to ask needed information.
- getAggregate() method gets the value of an aggregate from the current record.
Group records
Now, we can get back to our initial requirement:
-
Navigate to Incident > All

-
Right-click the column Priority and select Group By Priority.

-
Your window will display something like this:

-
Copy the below script to scripts - background, and click Run script button:
var grInc = new GlideAggregate("incident")
grInc.groupBy("priority")
grInc.addAggregate("COUNT")
grInc.query()
while (grInc.next()) {
  gs.info("Priority: {0} ({1})", [
    grInc.getDisplayValue("priority"),
    grInc.getAggregate("COUNT"),
  ])
}

- You should see the output similar to the following:

In the above script, groupBy() provides the name of a field to use in grouping the aggregates. Alternatively, we can use the second parameter of addAggregate() method to achieve the same result:
- Copy the below script to scripts - background, and click Run script button:
var grInc = new GlideAggregate("incident")
grInc.addAggregate("COUNT", "priority")
grInc.query()
while (grInc.next()) {
  gs.info("Priority: {0} ({1})", [
    grInc.getDisplayValue("priority"),
    grInc.getAggregate("COUNT", "priority"),
  ])
}

- You should see the output similar to the following:

getTotal()
Let us modify our script to introduce another method, getTotal(), which returns the number of records by summing an aggregate:
- Copy the below script to scripts - background, and click Run script button:
var grInc = new GlideAggregate("incident")
grInc.addAggregate("COUNT", "priority")
grInc.query()
while (grInc.next()) {
  gs.info("Priority: {0} ({1})", [
    grInc.getDisplayValue("priority"),
    grInc.getAggregate("COUNT", "priority"),
  ])
}
gs.info(grInc.getTotal("COUNT"))

- You should see the output similar to the following:

groupBy() and COUNT
At this point you should ask if there are two ways to group, what is the difference between them? Let us modify the script a bit to use both groupBy() and COUNT together:
- Copy the below script to scripts - background, and click Run script button:
var grInc = new GlideAggregate("incident")
grInc.groupBy("priority")
grInc.groupBy("state")
grInc.addAggregate("COUNT", "priority")
grInc.query()
while (grInc.next()) {
  gs.info("Priority: {0} & State: {1} ({2})", [
    grInc.getDisplayValue("priority"),
    grInc.getDisplayValue("state"),
    grInc.getAggregate("COUNT", "priority"),
  ])
}
gs.info(grInc.getTotal("COUNT"))

- You should see the output similar to the following:

Here We did print number of records for each priority grouped by state. Let us verify the results:
- Navigate to Incident > All

- Right-click the column Priority and select Group By Priority.

- Your window will display something like this:

- Now, click the arrow icon next to the Priority 'Critical' to expand the group

- Right-click the value In Progress for column State and select Show Matching.

- You should see the output similar to the following:


Sorting the result
orderBy()
Let us introduce another method called orderBy(), which provides the name of a field that should be used to order the aggregates.:
- Copy the below script to scripts - background, and click Run script button:
var grInc = new GlideAggregate("incident")
grInc.groupBy("priority")
grInc.groupBy("state")
grInc.addAggregate("COUNT", "priority")
grInc.orderBy("priority")
grInc.orderBy("state")
grInc.query()
while (grInc.next()) {
  gs.info("Priority: {0} & State: {1} ({2})", [
    grInc.getDisplayValue("priority"),
    grInc.getDisplayValue("state"),
    grInc.getAggregate("COUNT", "priority"),
  ])
}
gs.info(grInc.getTotal("COUNT"))

- You should see the output similar to the following:

In the above example, we did sort the list by Priority and state.
orderByAggregate()
Another variation of orderBy() is orderByAggregate(), which orders the aggregates based on the specified aggregate and field. Let us slightly modify our script:
- Copy the below script to scripts - background, and click Run script button:
var grInc = new GlideAggregate("incident")
grInc.groupBy("priority")
grInc.groupBy("state")
grInc.addAggregate("COUNT", "priority")
grInc.orderByAggregate("count", "priority")
grInc.query()
while (grInc.next()) {
  gs.info("Priority: {0} & State: {1} ({2})", [
    grInc.getDisplayValue("priority"),
    grInc.getDisplayValue("state"),
    grInc.getAggregate("COUNT", "priority"),
  ])
}
gs.info(grInc.getTotal("COUNT"))

- You should see the output similar to the following:

You might have already noticed that the result is now sorted by the number of records.
Count isn't the only function
So far we have seen some examples that utilizes COUNT for understanding GlideAggregate APIs, But Count is not the only thing that we can do with it. We can also use SUM, MAX, MIN, and AVG to get the total sum, maximum number, minimum number, and average, respectively. I would like to quote Andrew Barnes as is from his exteremely useful ServiceNow blog post "Understanding GlideAggregate" which can be found here:
Count isn’t the only function we can perform with GlideAggregate. Average, Sum, Max, Min are handy when dealing with numbers. Our favorite example table incident has several useful fields that pure counts isn’t wildly useful. Our service desk might want to know the average number of times incidents were modified sys_mod_count or reassigned reassignment_count. The service desk owner can use this information to set a baseline, and then run this every month to see if changes have been an improvement or not.
- Copy the below script to scripts - background, and click Run script button:
var grInc = new GlideAggregate("incident")
grInc.groupBy("priority")
grInc.addAggregate("AVG", "reassignment_count")
grInc.addAggregate("AVG", "sys_mod_count")
grInc.query()
while (grInc.next()) {
  gs.info(
    "Incidents with priority {0} had {1} average modifications and {2} average reassignments",
    [
      grInc.priority.getDisplayValue(),
      grInc.getAggregate("AVG", "sys_mod_count"),
      grInc.getAggregate("AVG", "reassignment_count"),
    ]
  )
}

- You should see the output similar to the following:

addHaving()
addHaving() adds a "having" element to the aggregate. This method is extermely useful when you want to trigger something if record count crosses the defined threshold or to find duplicate records. You can find the awesome post on snprotips blog by Tim Woodruff here regarding same.
- Copy the below script to scripts - background, and click Run script button:
var grInc = new GlideAggregate("incident")
grInc.groupBy("priority")
grInc.addAggregate("COUNT", "sys_mod_count")
grInc.addHaving("COUNT", "sys_mod_count", ">", "10")
grInc.query()
while (grInc.next()) {
  gs.info("Incidents with priority {0} had {1} total modifications", [
    grInc.priority.getDisplayValue(),
    grInc.getAggregate("COUNT", "sys_mod_count"),
  ])
}

- You should see the output similar to the following:

The above script outputs the total number of times particular priority incidents modified, if modification count is greater than 10. Feel free to change the value to something less like 1 or more like 30 and re-execute the script to observe the output.
addTrend()
addTrend() method adds a trend for a field. Let us modify the script to display number of incidents by months.
- Copy the below script to scripts - background, and click Run script button:
var grInc = new GlideAggregate("incident")
grInc.addTrend("opened_at", "month")
grInc.addAggregate("COUNT")
grInc.query()
while (grInc.next()) {
  gs.info("{0}: {1}", [grInc.getValue("timeref"), grInc.getAggregate("COUNT")])
}

- You should see the output similar to the following:

getQuery()
getQuery() method retrieves the query necessary to return the current aggregate.
- Copy the below script to scripts - background, and click Run script button:
var grInc = new GlideAggregate("incident")
grInc.addTrend("opened_at", "month")
grInc.addAggregate("COUNT")
grInc.query()
while (grInc.next()) {
  gs.info("{0}: {1}, Query: {2}", [
    grInc.getValue("timeref"),
    grInc.getAggregate("COUNT"),
    grInc.getQuery(),
  ])
}

- You should see the output similar to the following:

How can you learn more?
The best way to learn anything is hands-on exercises. Here is some of the resources which will help provide examples and use cases to furthur enhance your understanding:
- Observations When Using GlideAggregate with Steven Bell
- Community Code Snippets: Pondering the GlideAggregate Object (Advanced) by Steven Bell
- Understanding GlideAggregate by Andrew Barnes
- Counting with GlideAggregate by Ben Sweetser
- Detecting Duplicate Records with GlideAggregate by Tim Woodruff
- How to get the Top 10 values from a table using the GlideAggregate function
- ServiceNow API documentation
- ServiceNow product documentation
- GlideAggregate Examples by GarrettNow
- Find duplicate user email (or anything else)
- Advance glide script in ServiceNow
- Faster API than GlideRecord?
- GlideAggregate Examples
- Easily identifying duplicate records in ServiceNow
- Background Scripts by snowscrip
GlideExcelParser
Recently, we did recieve a requirement to build a catalog item for Asset managers, to auto-import asset information in the platform based on attached excel sheet. Additionally, we had to reject the request if the data is missing or does not have referenced records available yet in the system.
While exploring a bit, I found this amazing API called GlideExcelParser documented here. If you haven't used it yet like me, Let's explore together.
If you are not a nerdy kind of guy, who can read the whole big article below; you might want to check short youtube video GlideExcelParser by Saikiran Guduri instead.
What is GlideExcelParser
GlideExcelParser parses .xlsx formatted Excel files and access file data in a script.
Although, GlideExcelParser methods can be used in both global and scoped scripts, you need to use the sn_impex namespace identifier to create a GlideExcelParser object.
What it means is, to creates an instance of GlideExcelParser, we need to use the following syntax:
var parser = new sn_impex.GlideExcelParser();
Creating a demo data sheet
Though, ServiceNow documentation is very clear and pretty self-explanatory (along with the awesome, easy to understand examples), what lacks for this API documentation is a demo data sheet to visualize it better. So before proceeding furthur, Let's create a demo data sheet for ourselves:
-
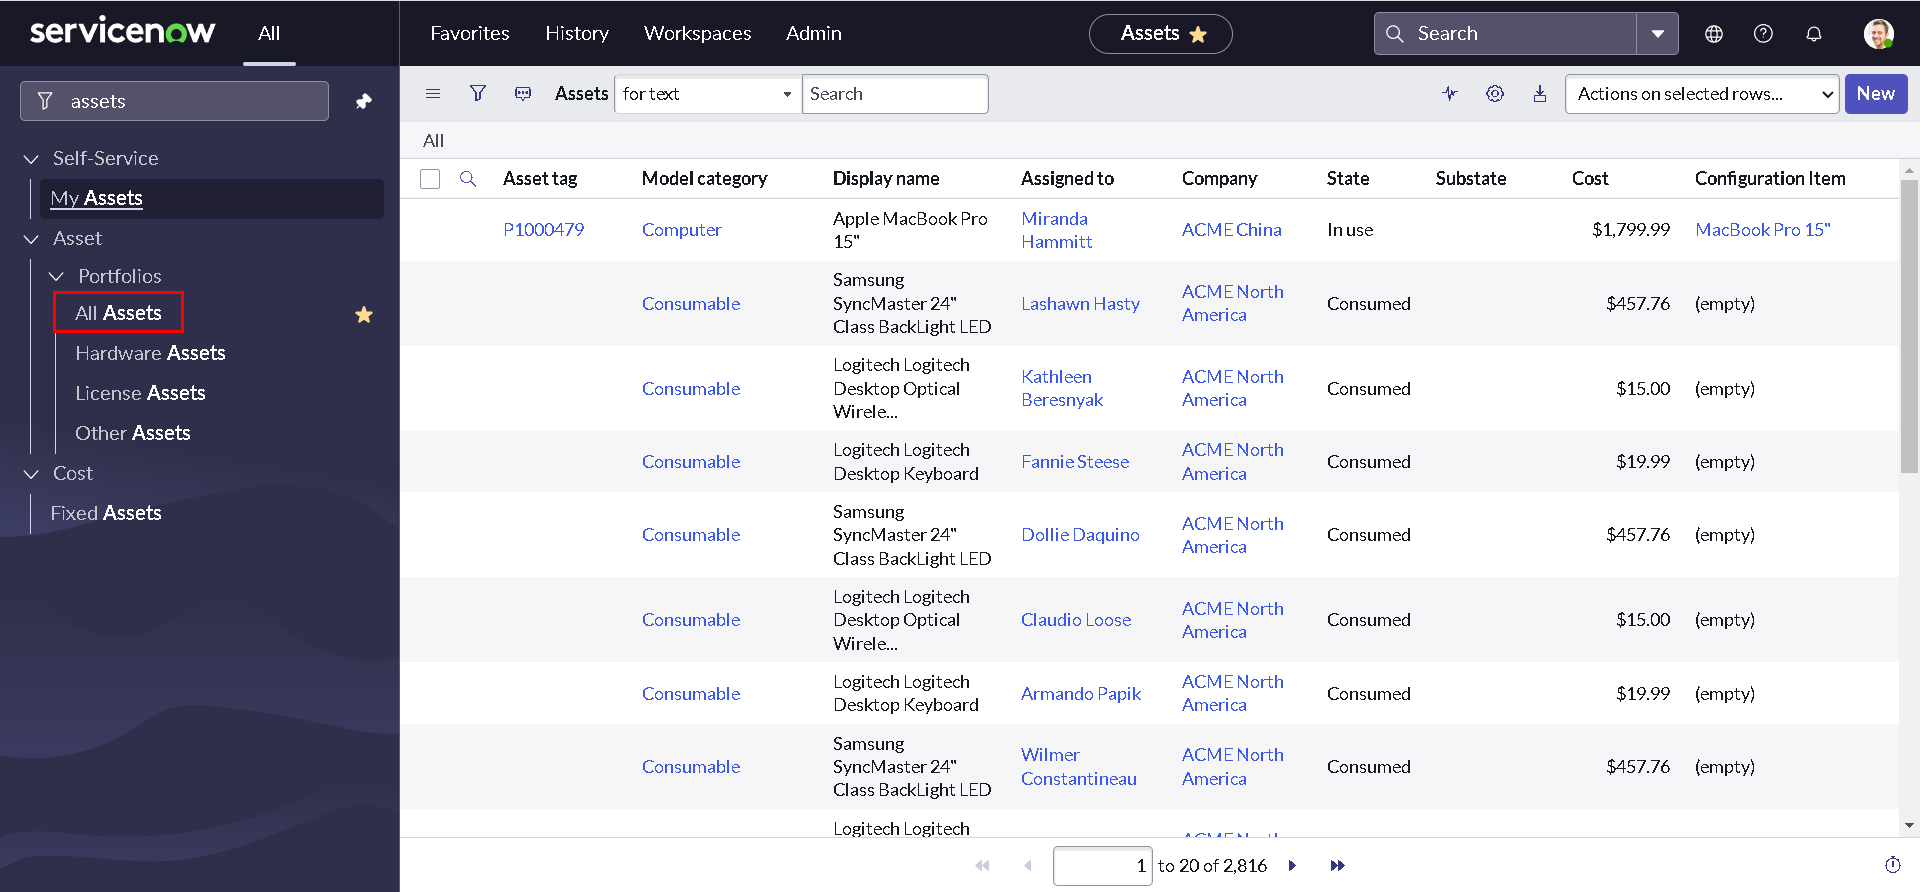
Navigate to All > Asset > Portfolios > All Assets.
-
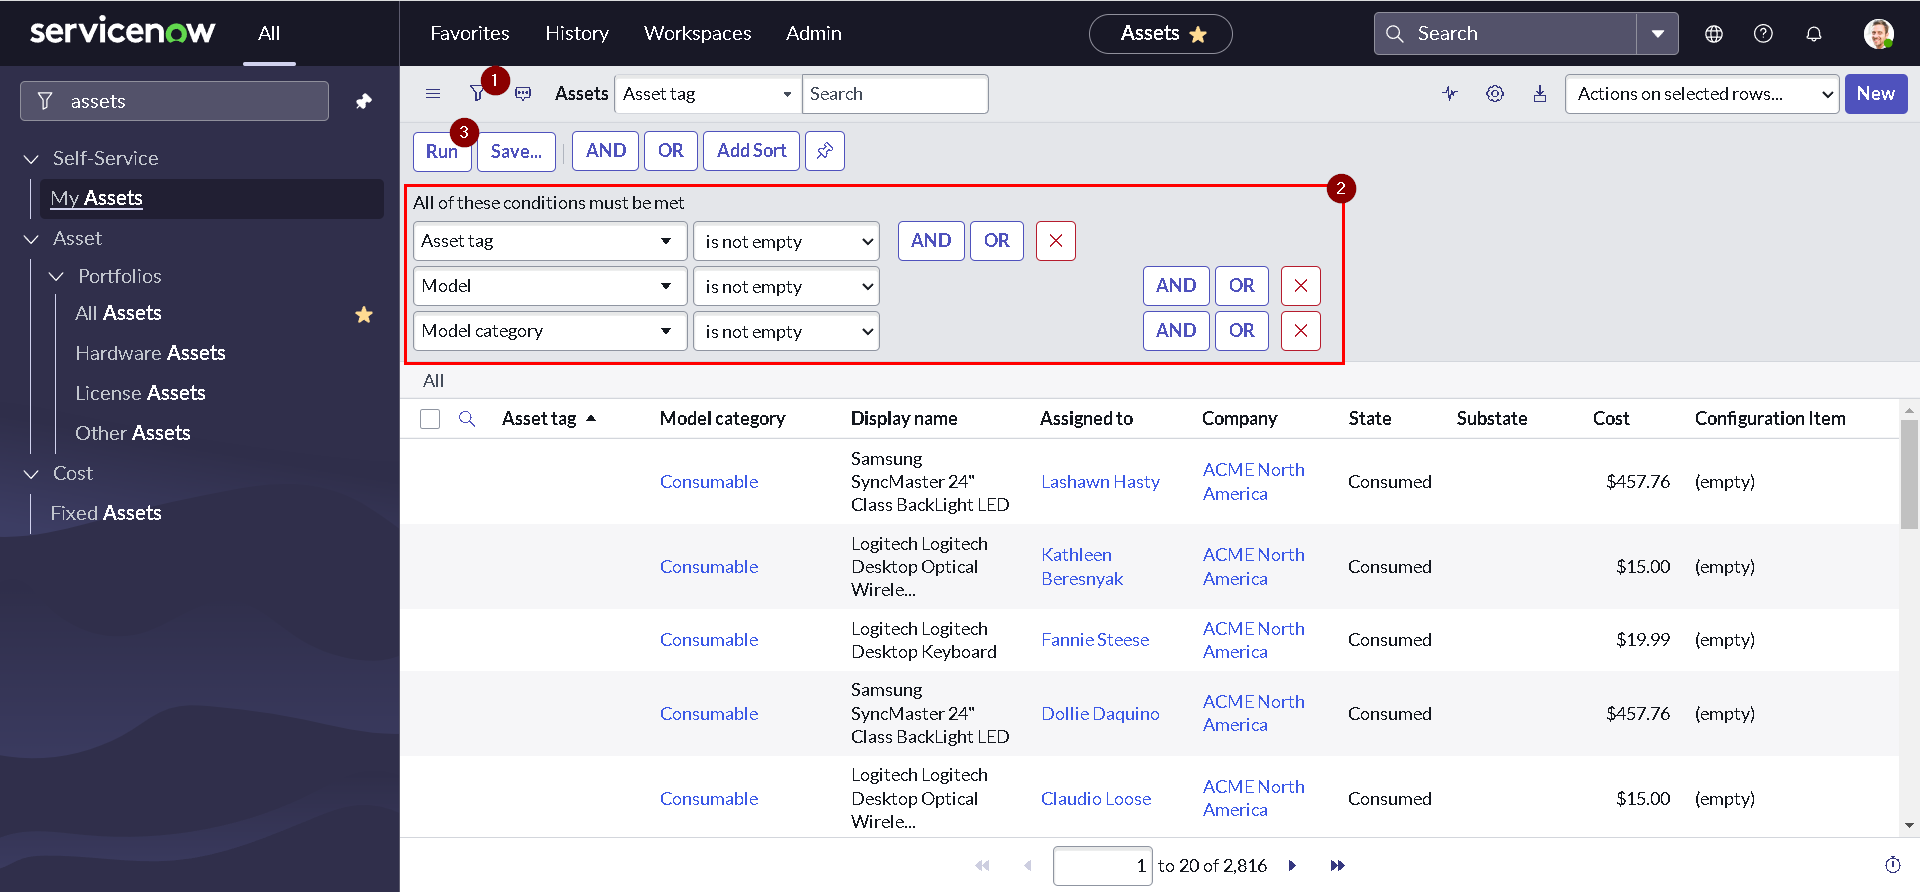
Open the condition builder by clicking the show/hid filter icon; Build a condition as shown below and Click Run to apply the filter.
-
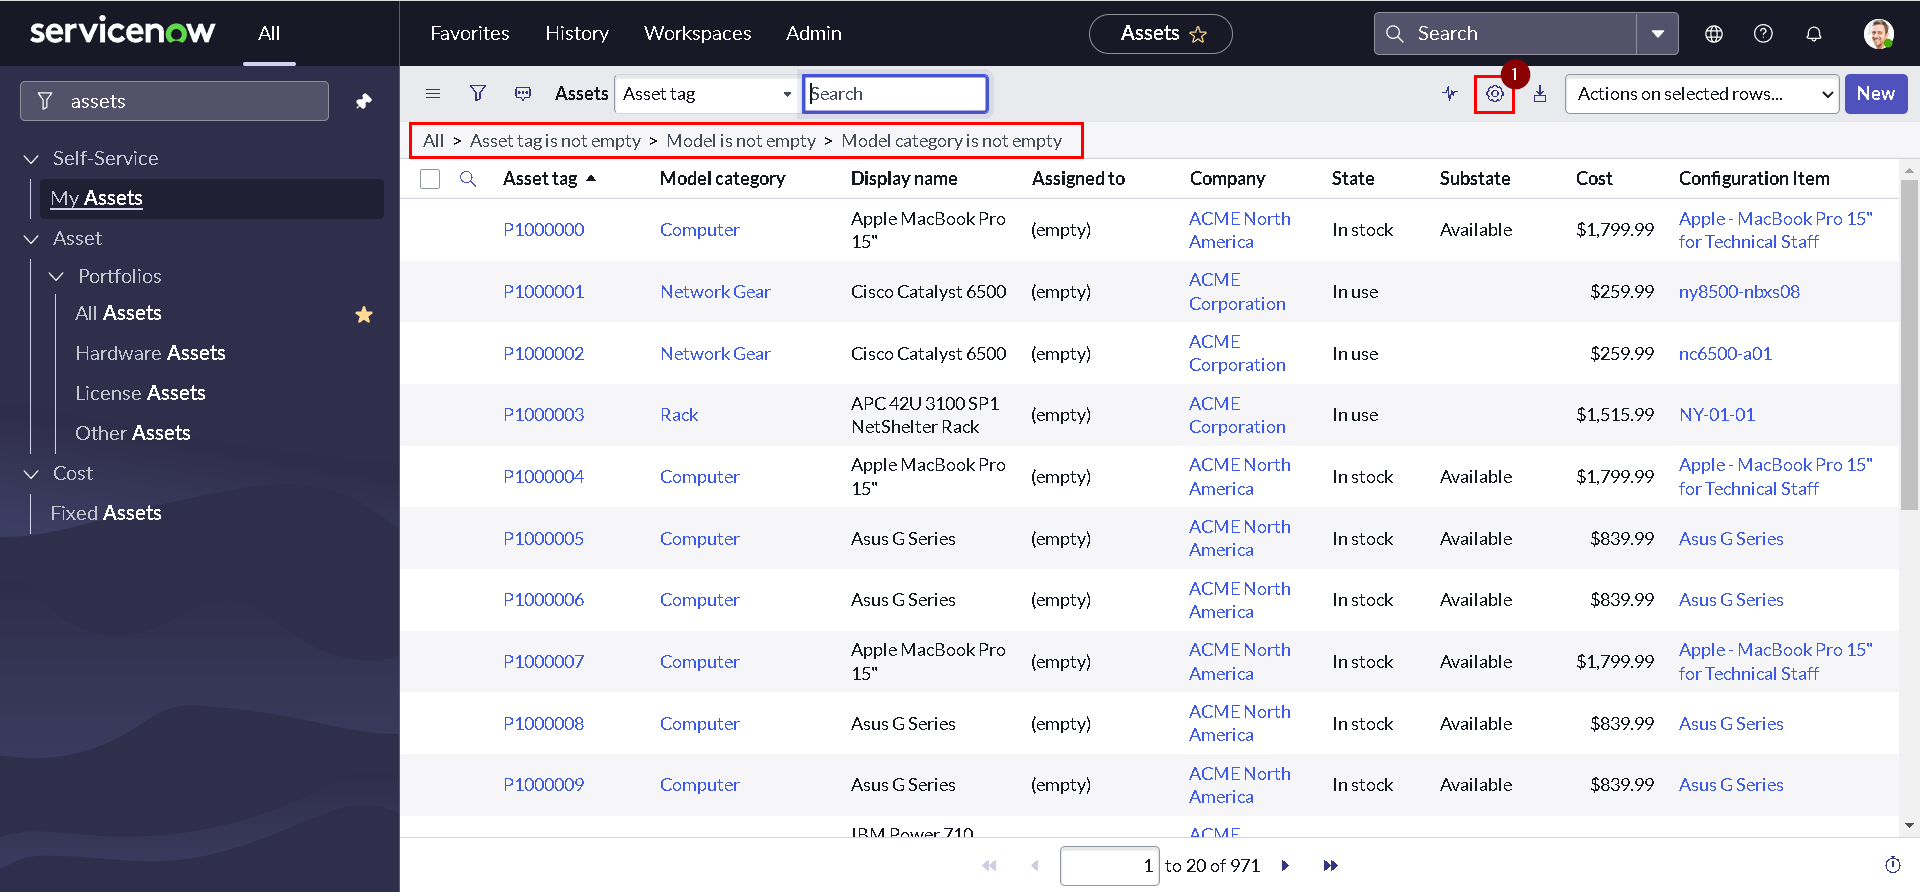
Click the personalize list icon in the upper left corner.
-
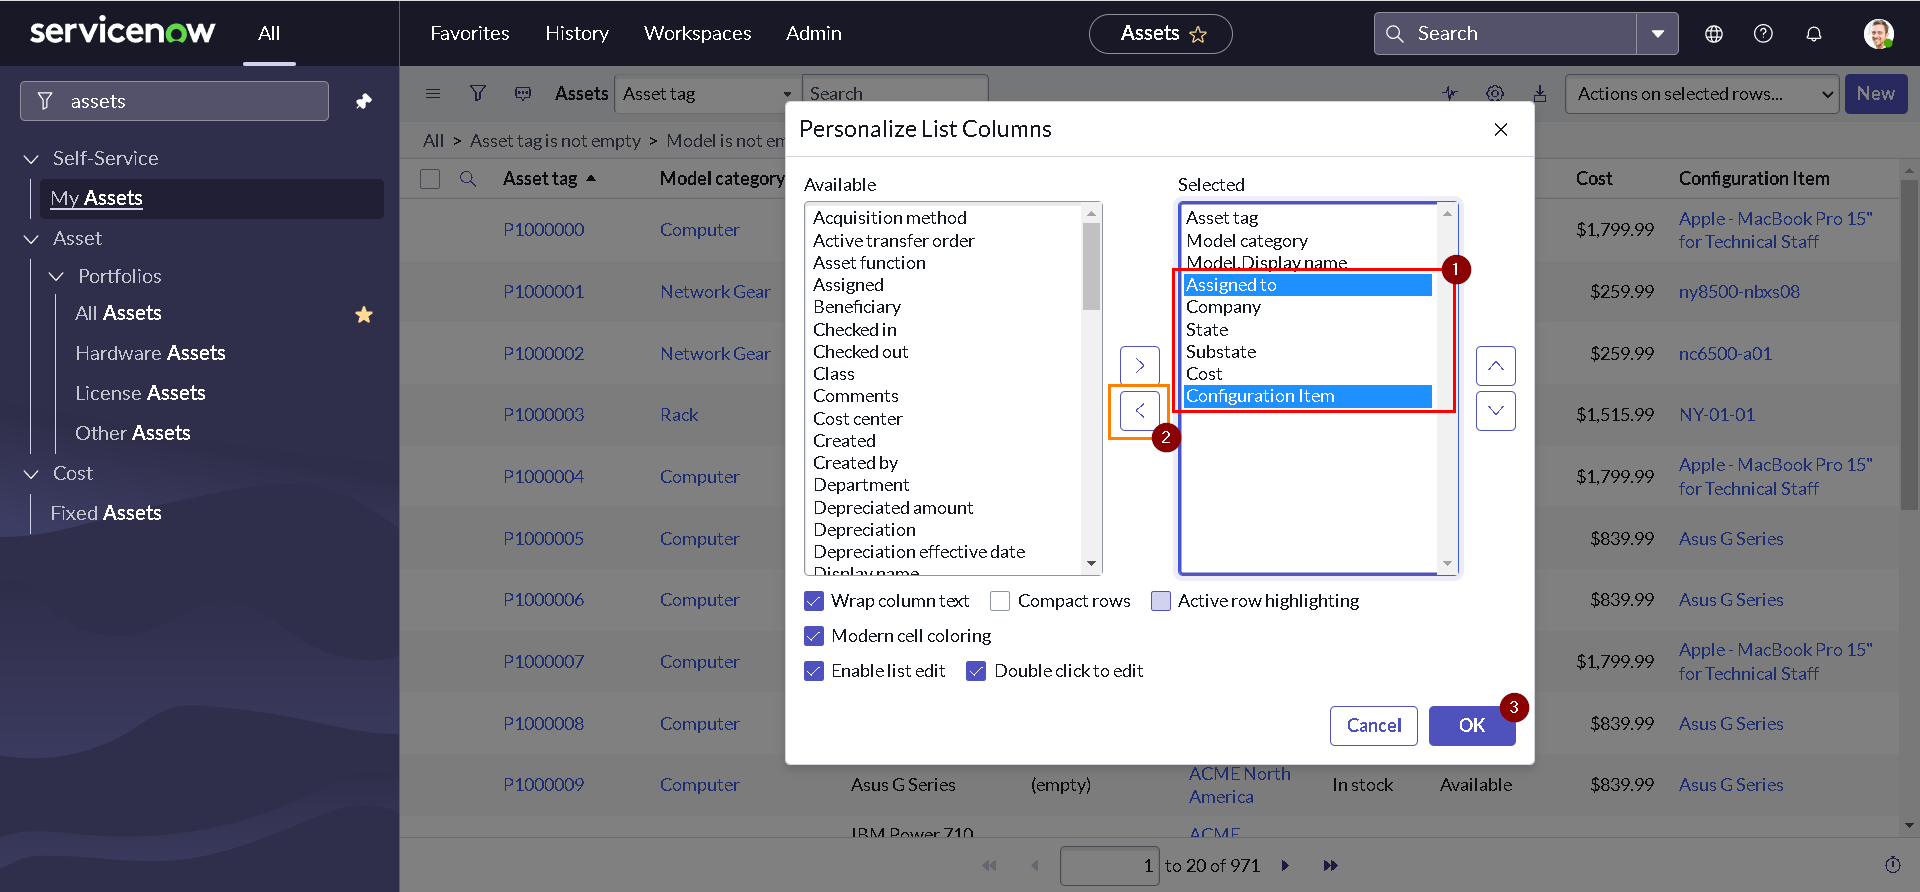
Remove the columns Assigned to and Configuration item.
-
To export a list report as an Excel spreadsheet, right-click any column heading and select Export > Excel.
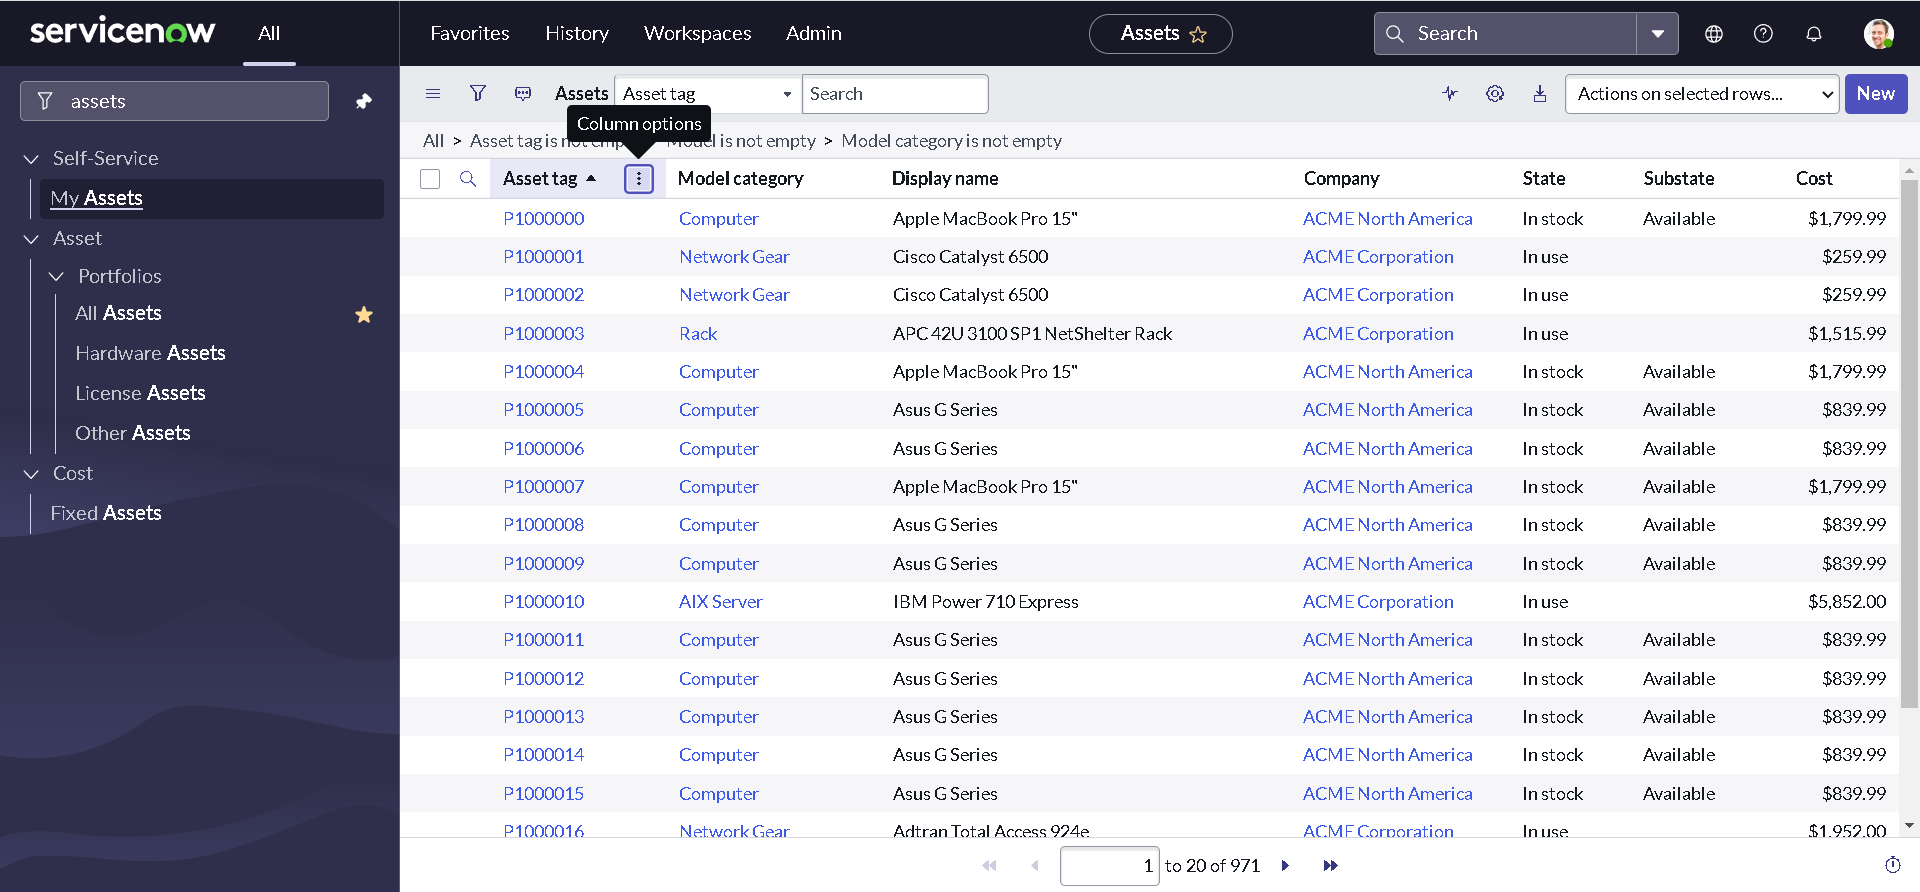
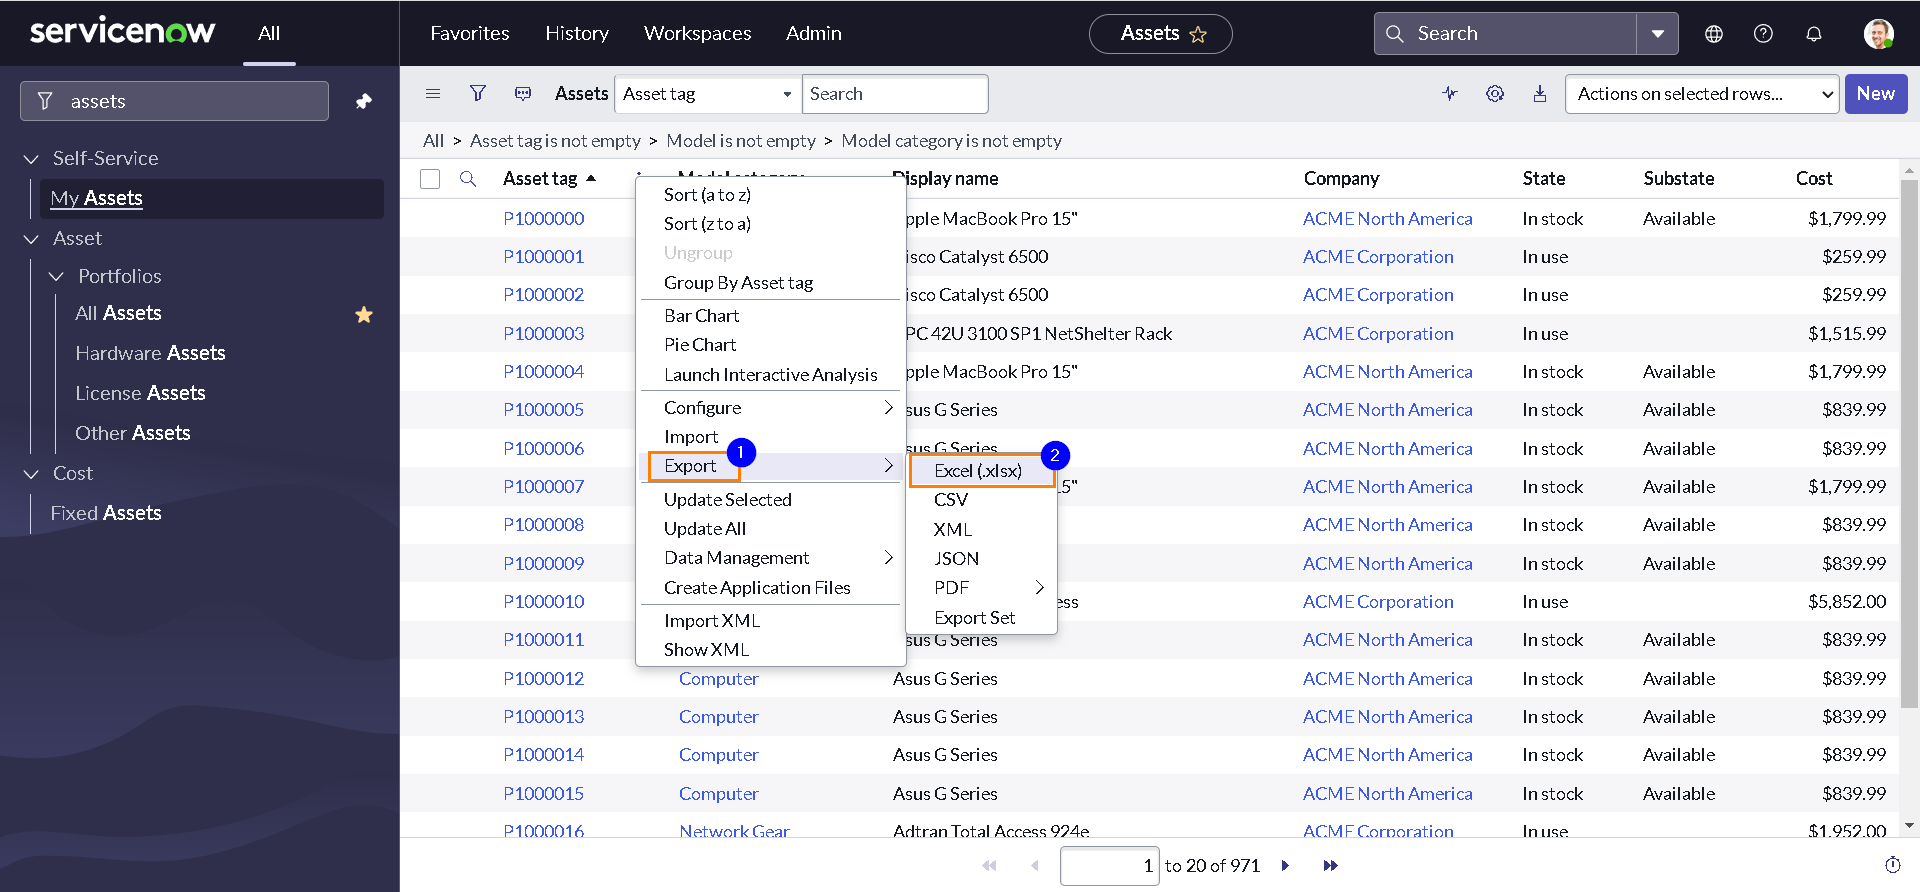
-
Click Download.
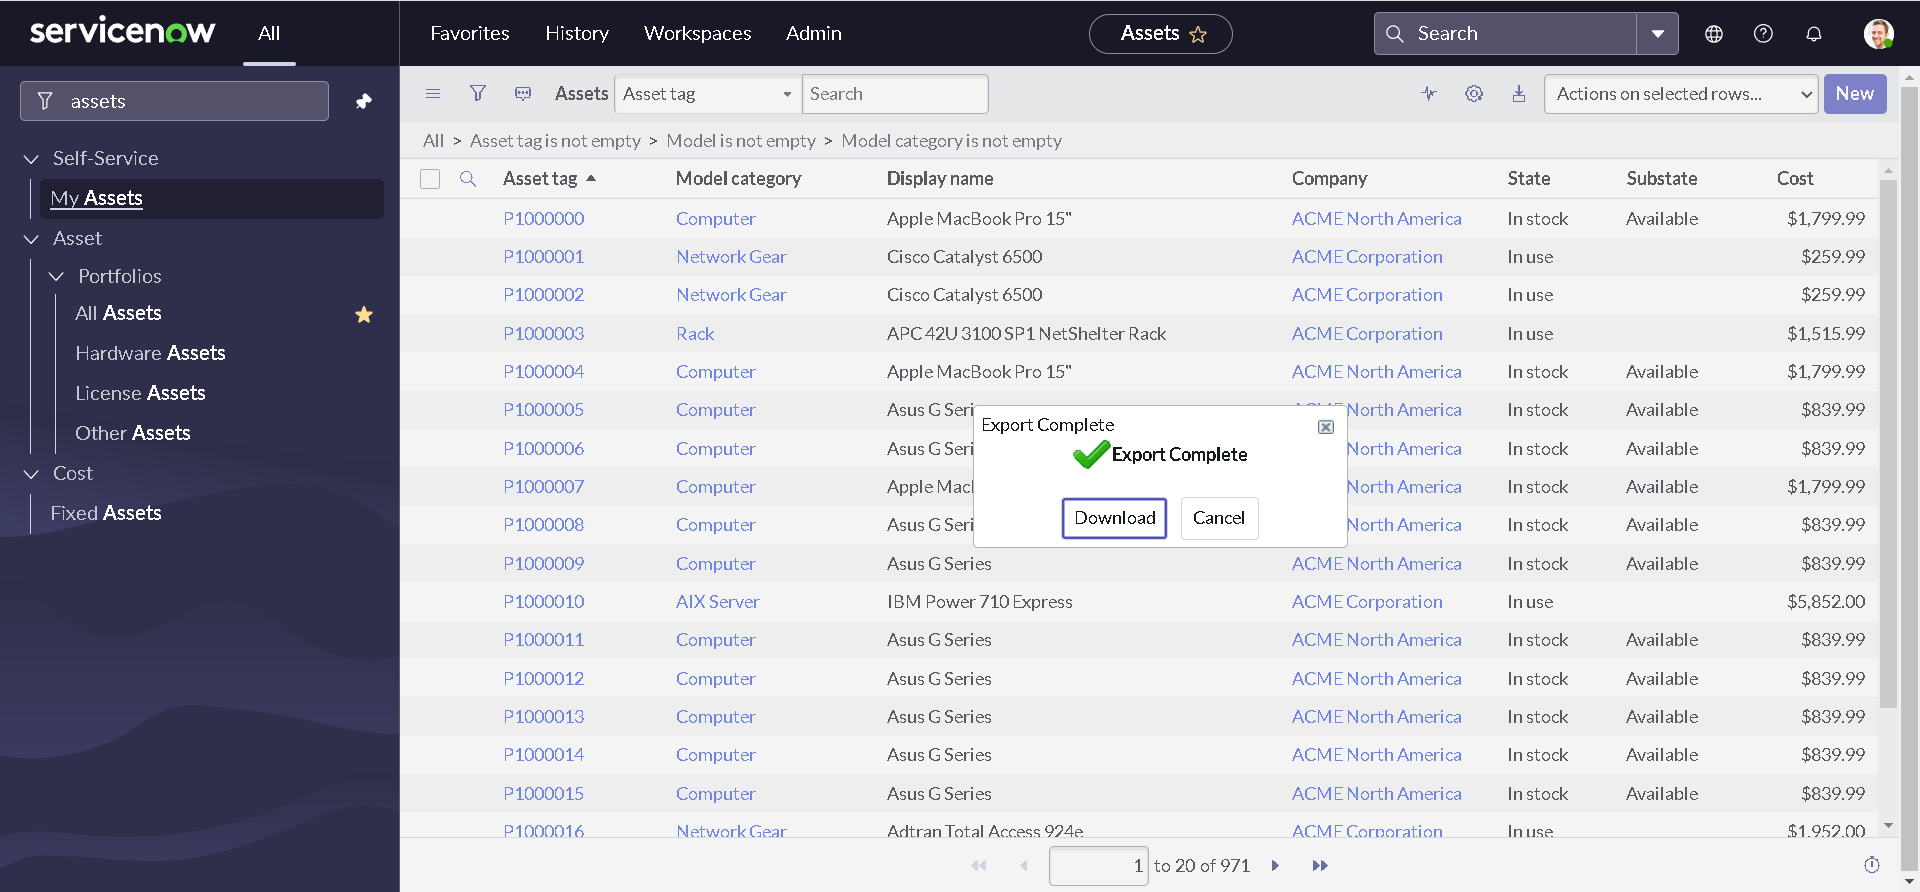
-
Open the downloaded excel sheet.
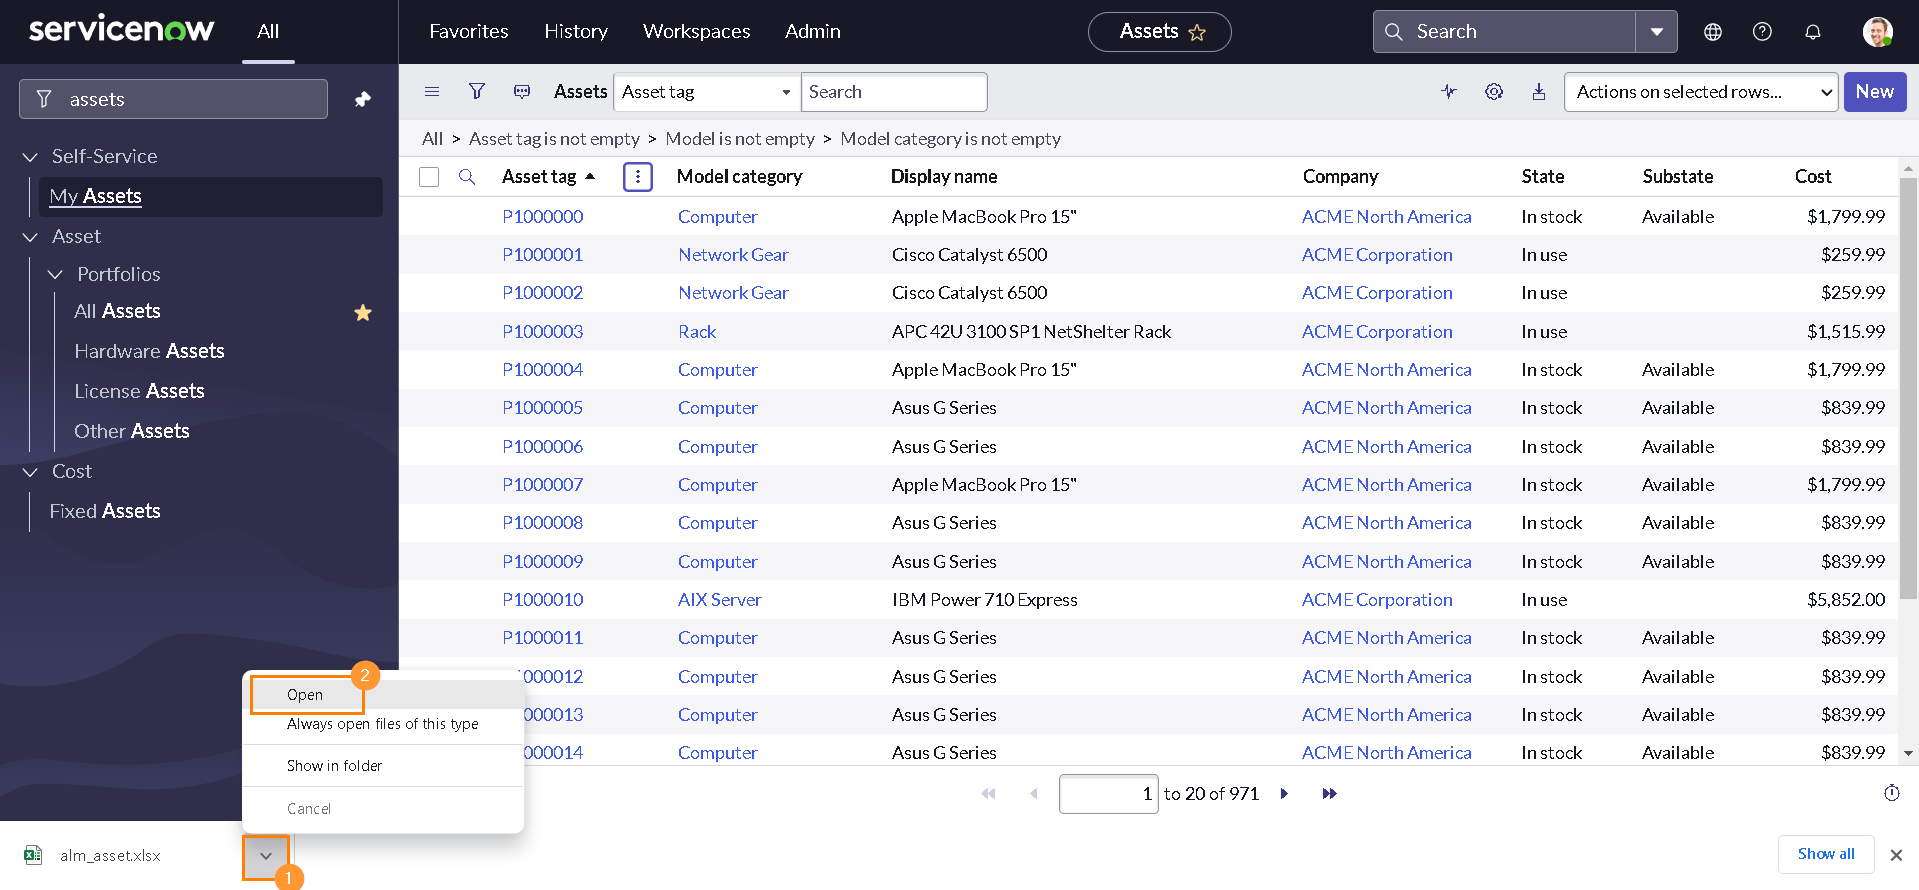
-
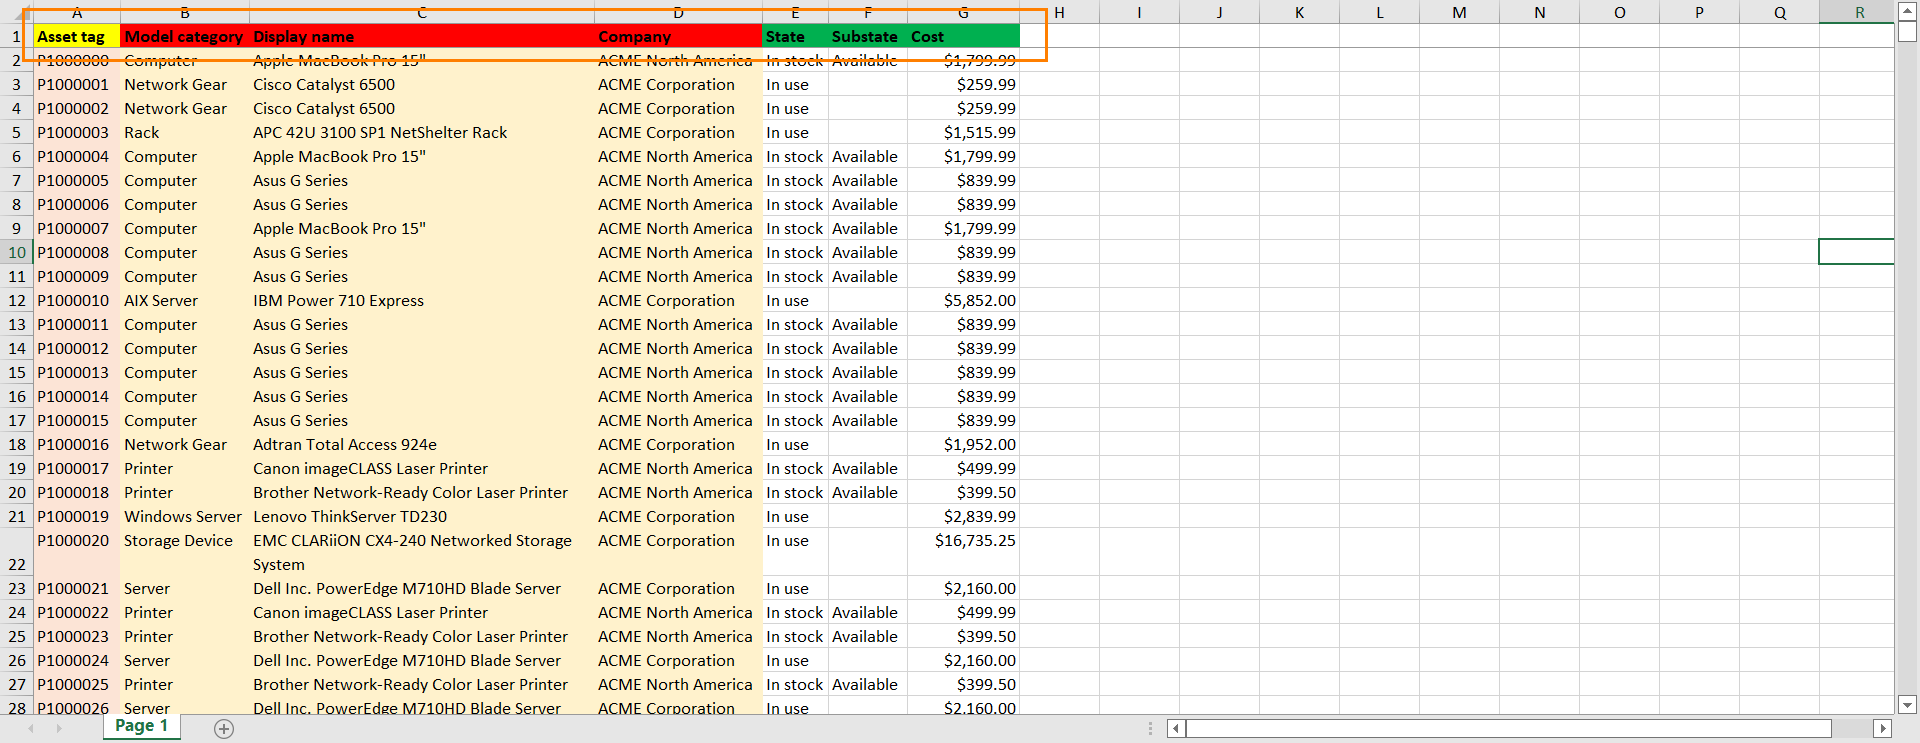
Notice the column headings.
-
Let us apply some formatting to the excel sheet. However, it is not manadatory.
I have marked Asset tag as Yellow to indicate it is a mandatory field. similarly, Model category, Display name (indicating Model) & Company are marked in Red to indicate they are both mandatory and reference fields. State, Substate & Cost are not mandatory and hence marked in Green.
Creating a fix script
It is not necessary to create a fix script for our use case. But, it is always a good idea to test if our code is working as expected. And Fix script always seems to be a better choice than Background script cause of it's capabilities. Also, In order to test our APIs with the demo sheet that we did create, It needs to be in the platform as an attachment. Fix script can also solve that purpose in this case.
If you haven't work with fix script earlier, please go and check out Community Live Stream - Topical Deep Dive - Fix scripts by Chuck Tomasi. If you did, let's go ahead and create a fix script and attach our demo sheet to it:
-
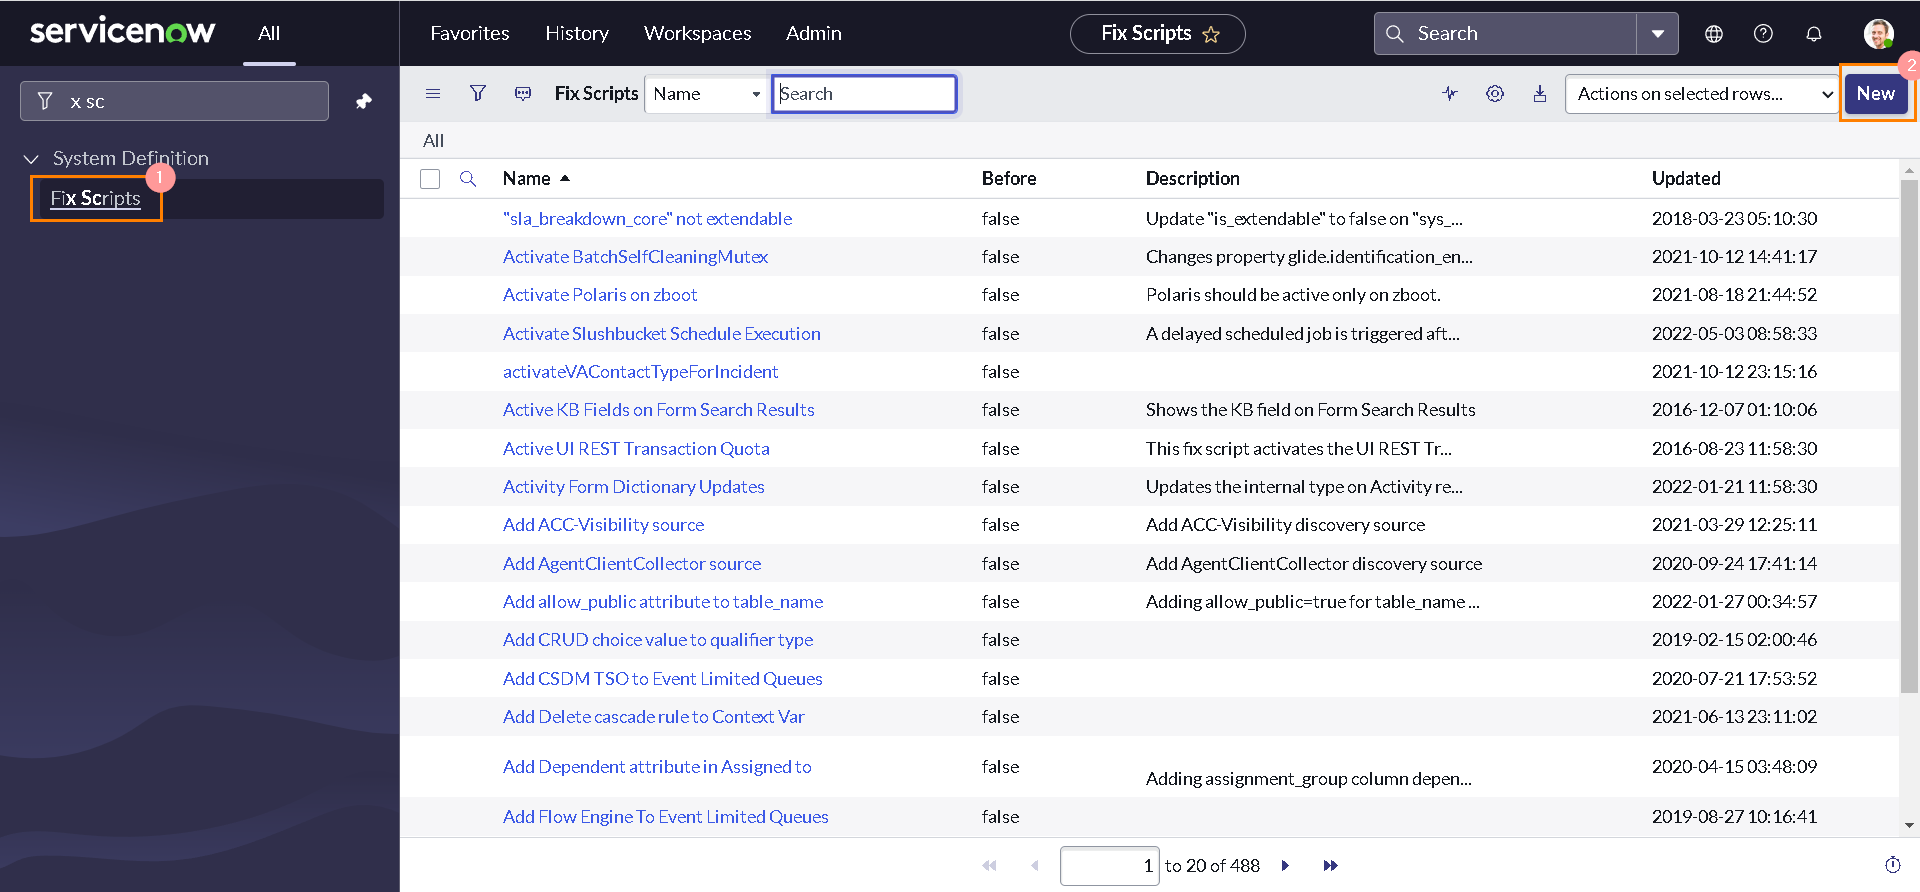
Navigate to All > System Definition > Fix Scripts & Click New.
-
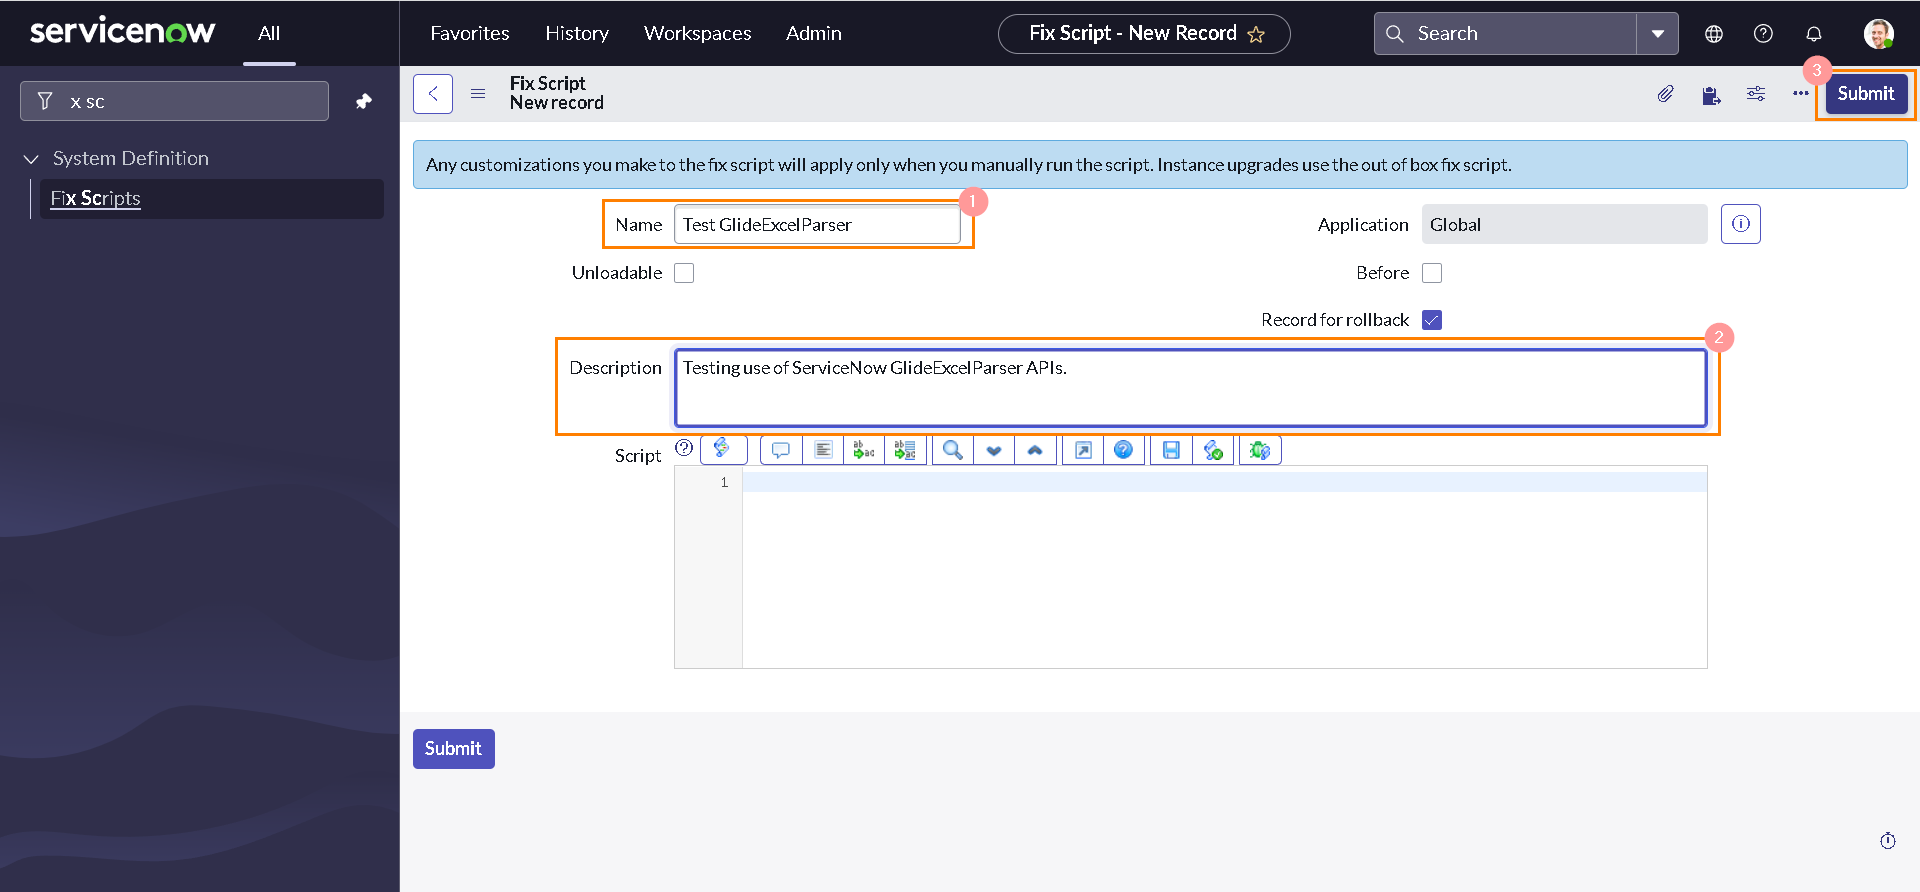
Provide some meaningful Name & Description and Click Submit.
-
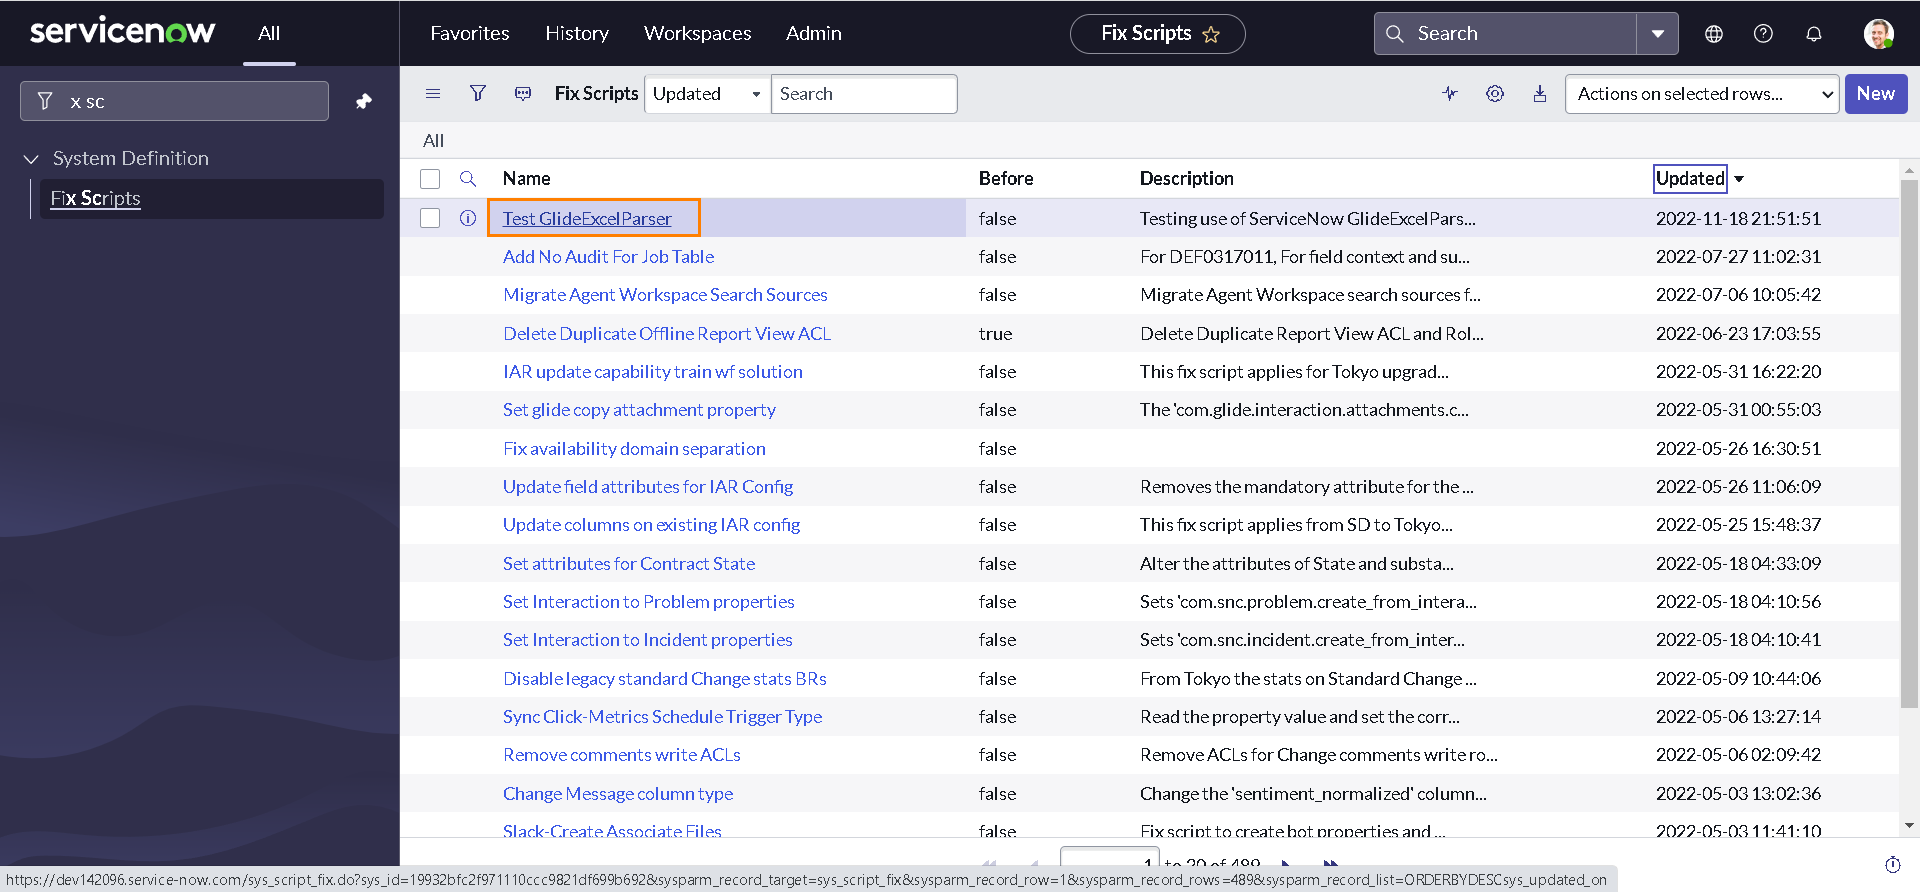
You will be redirected back to list view. Open the recently created fix script.
-
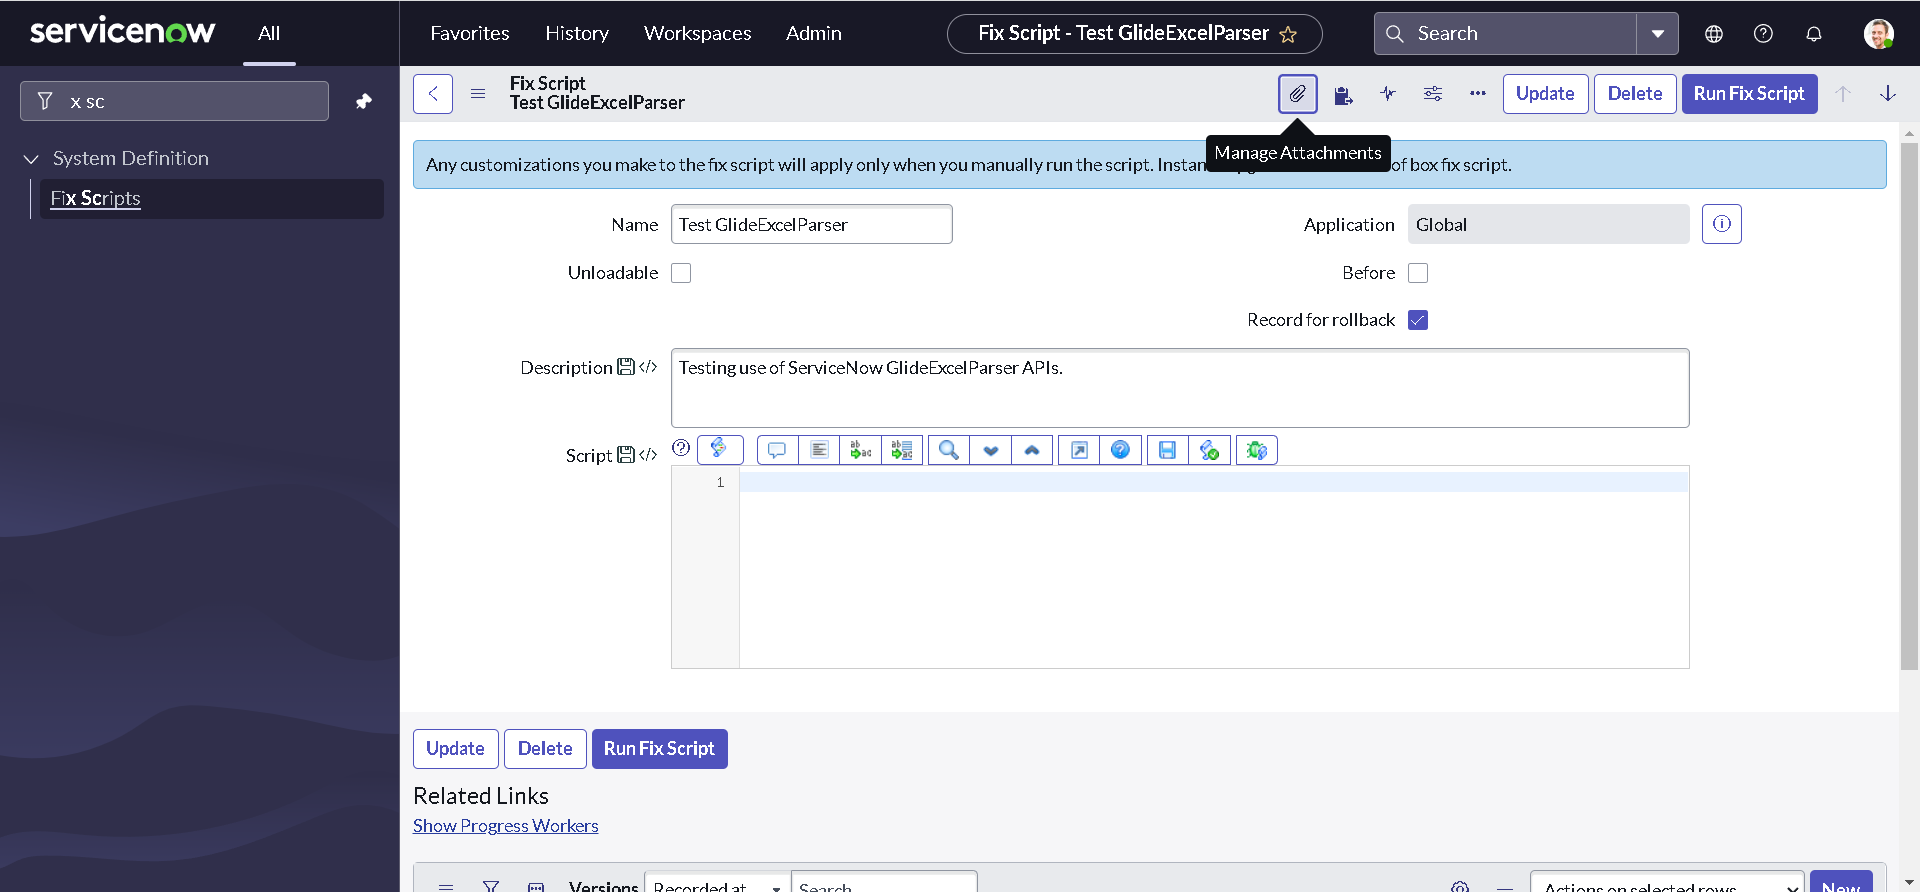
Click the attachments icon.
-
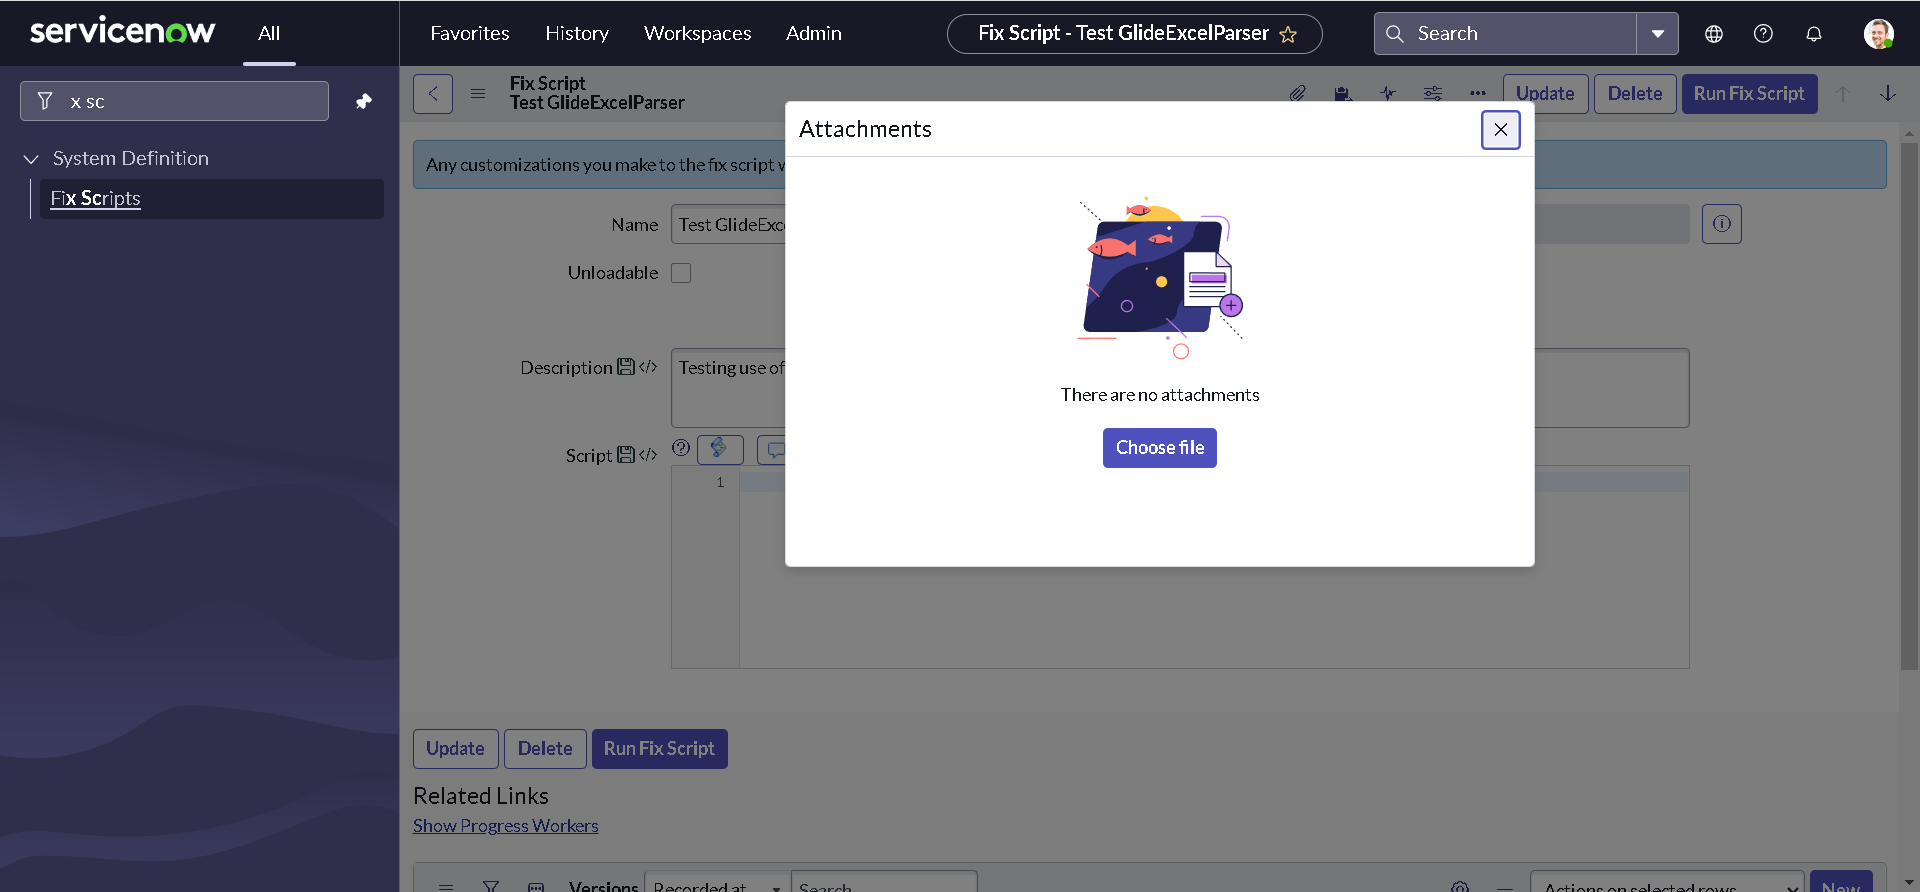
Click Choose Files or Browse, depending on your browser, and navigate to a file. Then, Click Attach.
-
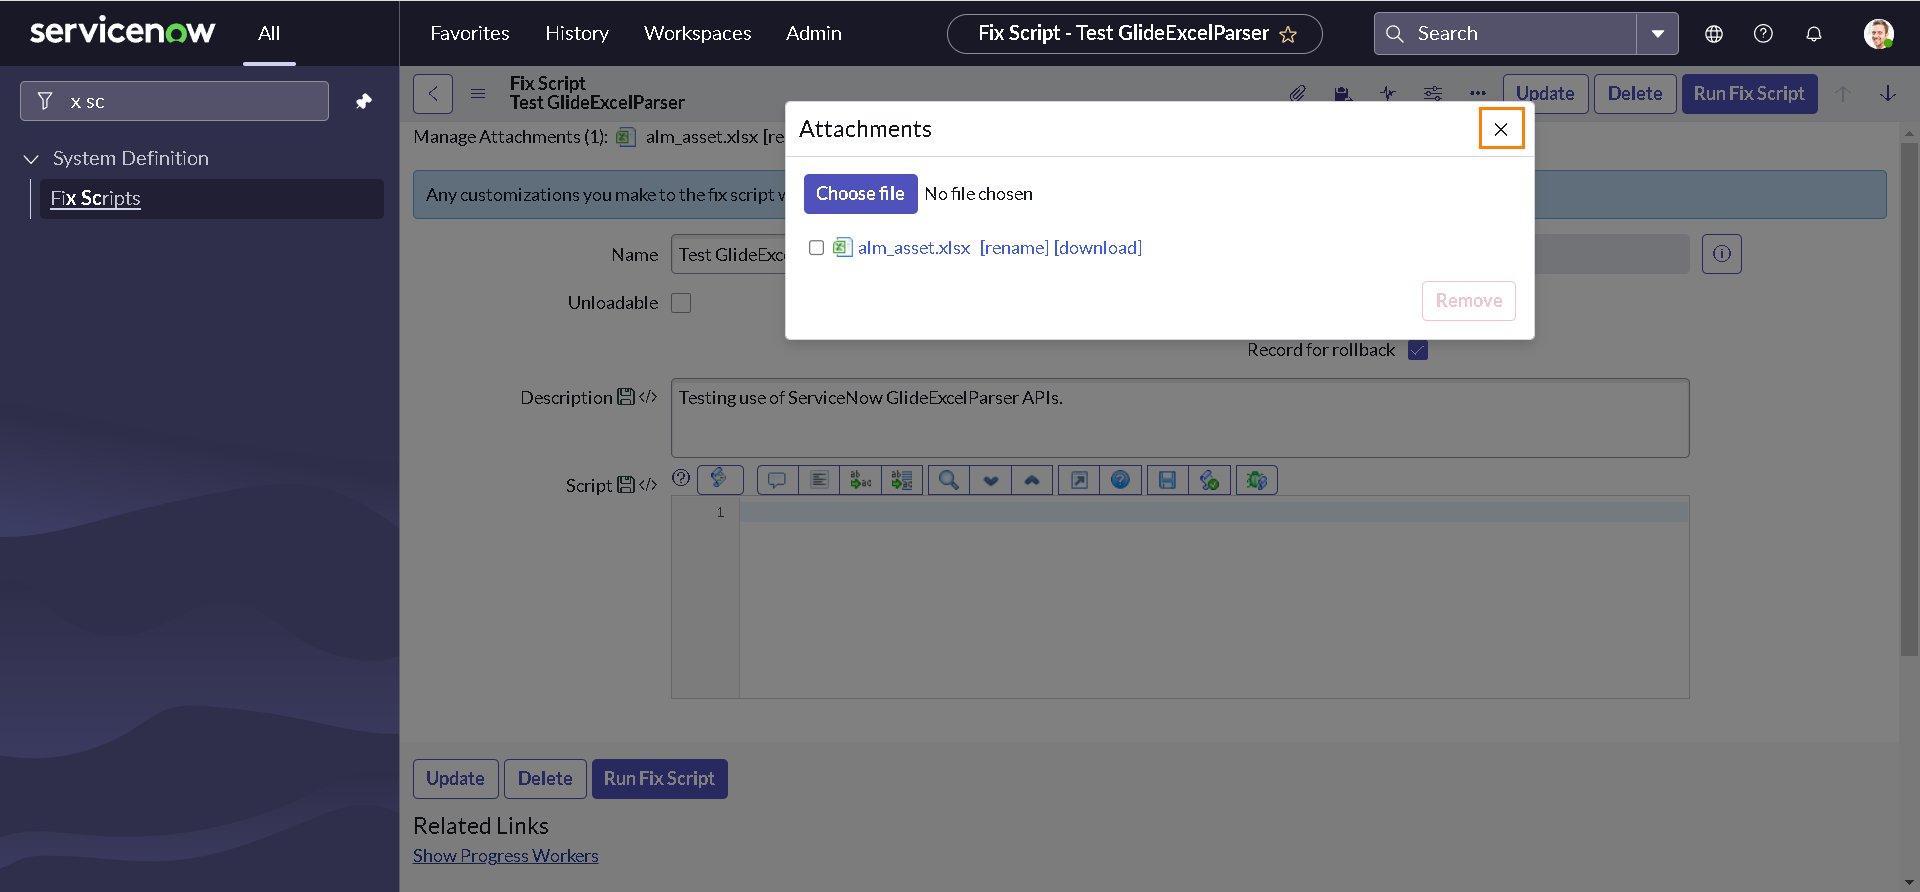
Notice that our demo data sheet appears in the Current file attachments list; Close the dialog box.
-
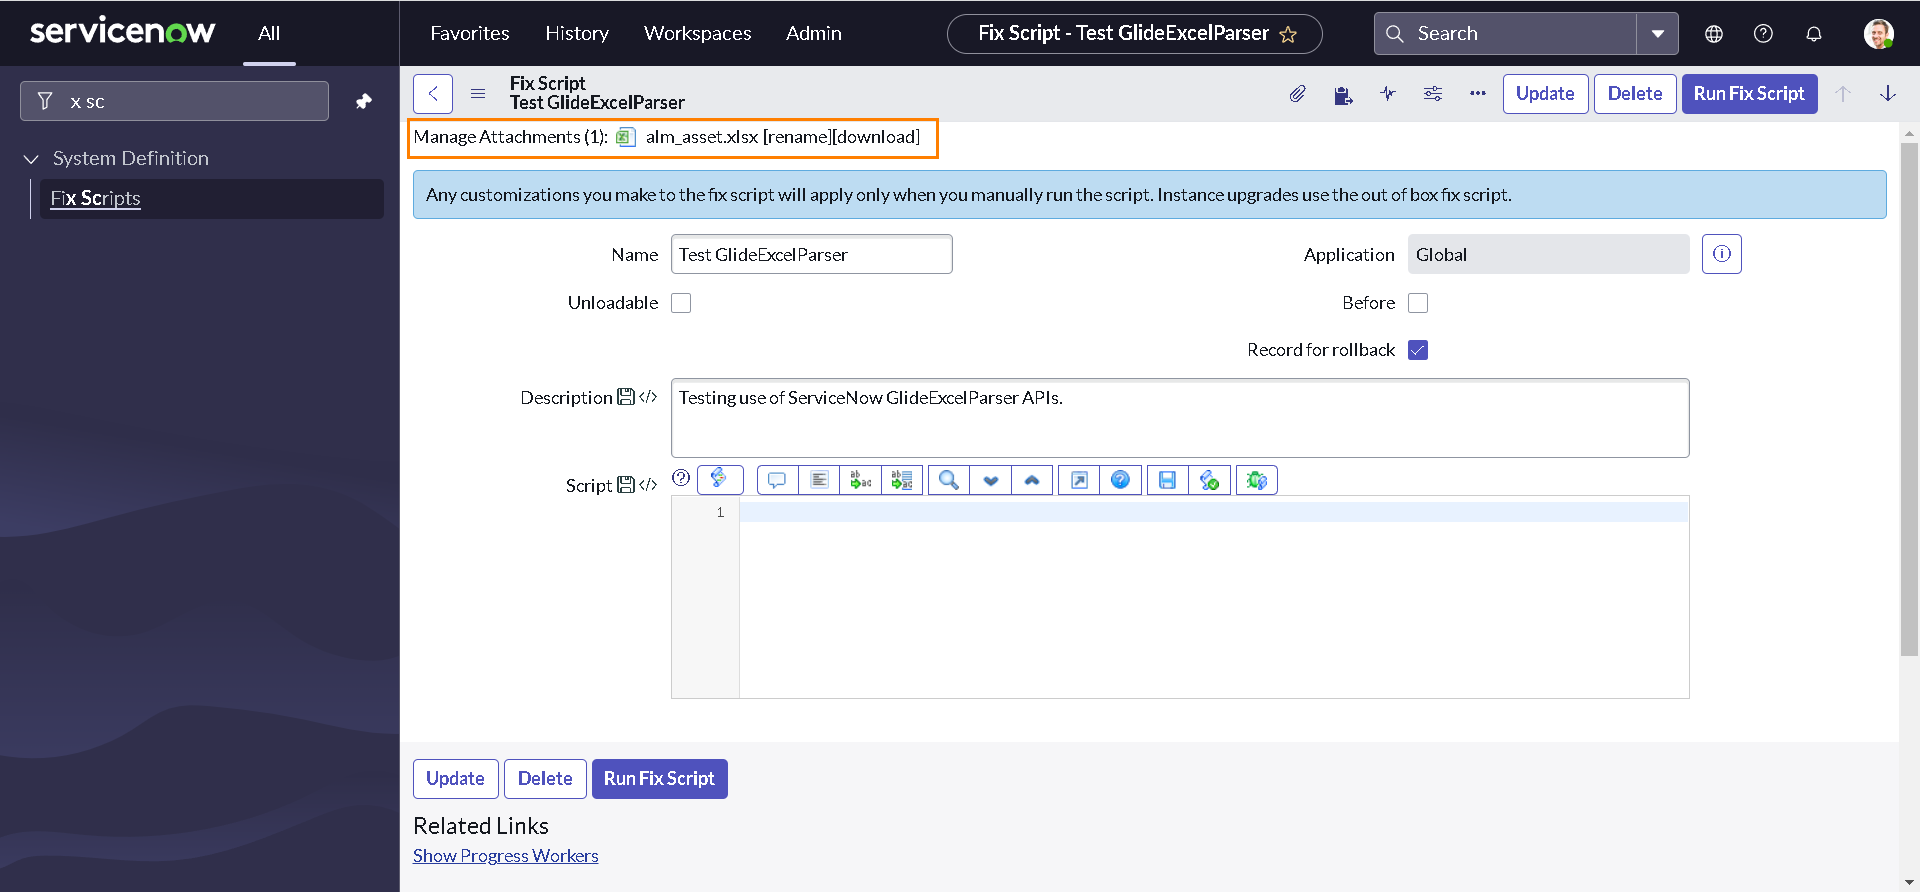
Our demo data sheet also appears at the top of the form.
Testing GlideExcelParser APIs
Now that we have our Fix script and demo data sheet attached to it, we are good to explore GlideExcelParser APIs. But, the very first thing that we need to test our APIs is the SysID of our demo data sheet attachment. Let's write the below code to our fix script to fetch the attachment SysID:
//Get attachment SysID

var attachmentSysID = "";

var tableName = "sys_script_fix";
var tableSysID = "19932bfc2f971110ccc9821df699b692";

var grAttachment = new GlideRecord("sys_attachment");
grAttachment.addEncodedQuery("table_name=" + tableName + "^table_sys_id=" + tableSysID);
grAttachment.query();
if (grAttachment.next()) {
    attachmentSysID = grAttachment.getUniqueValue();
}

gs.info("attachmentSysID: " + attachmentSysID);
You should replace the value of tableSysID by SysID of your fix script. Right click on the form header and click Save to save your code.

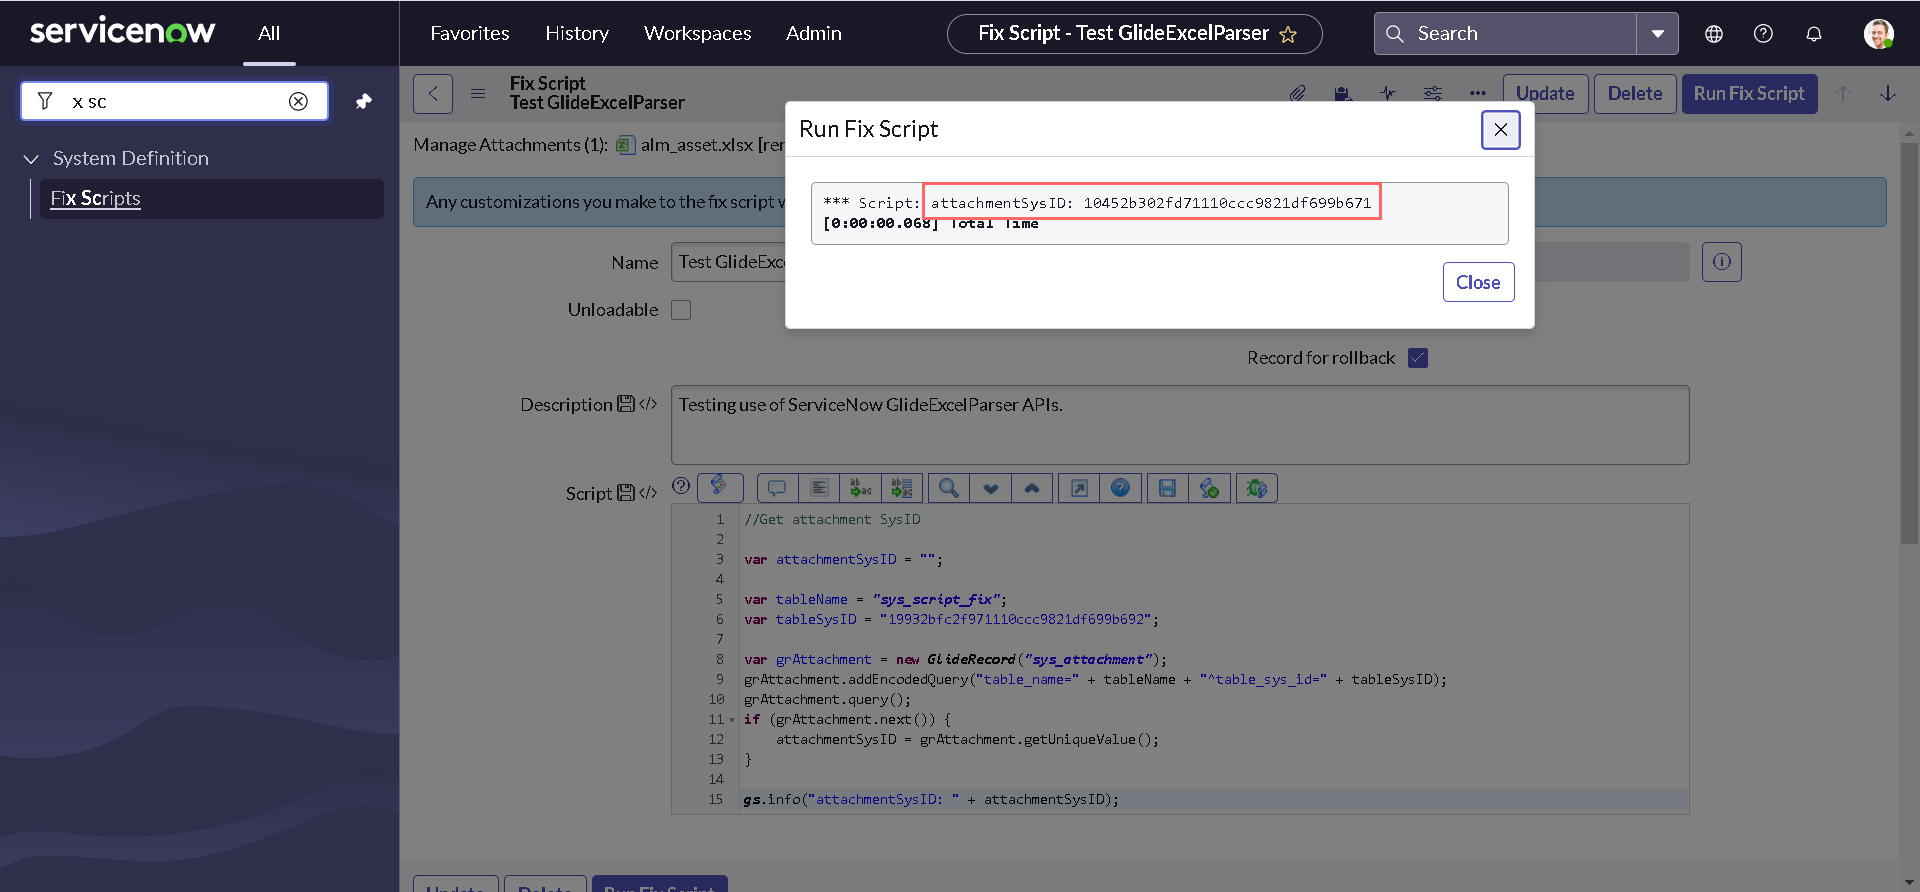
To test if we are getting the SysID of our attachment, Click Run Fix Script button on the header and then select Proceed.


As soon as the code finishes execution, we can see the output with the SysID of our attachment returned. Click Close to close the dialog window.
GlideSysAttachment getContentStream()
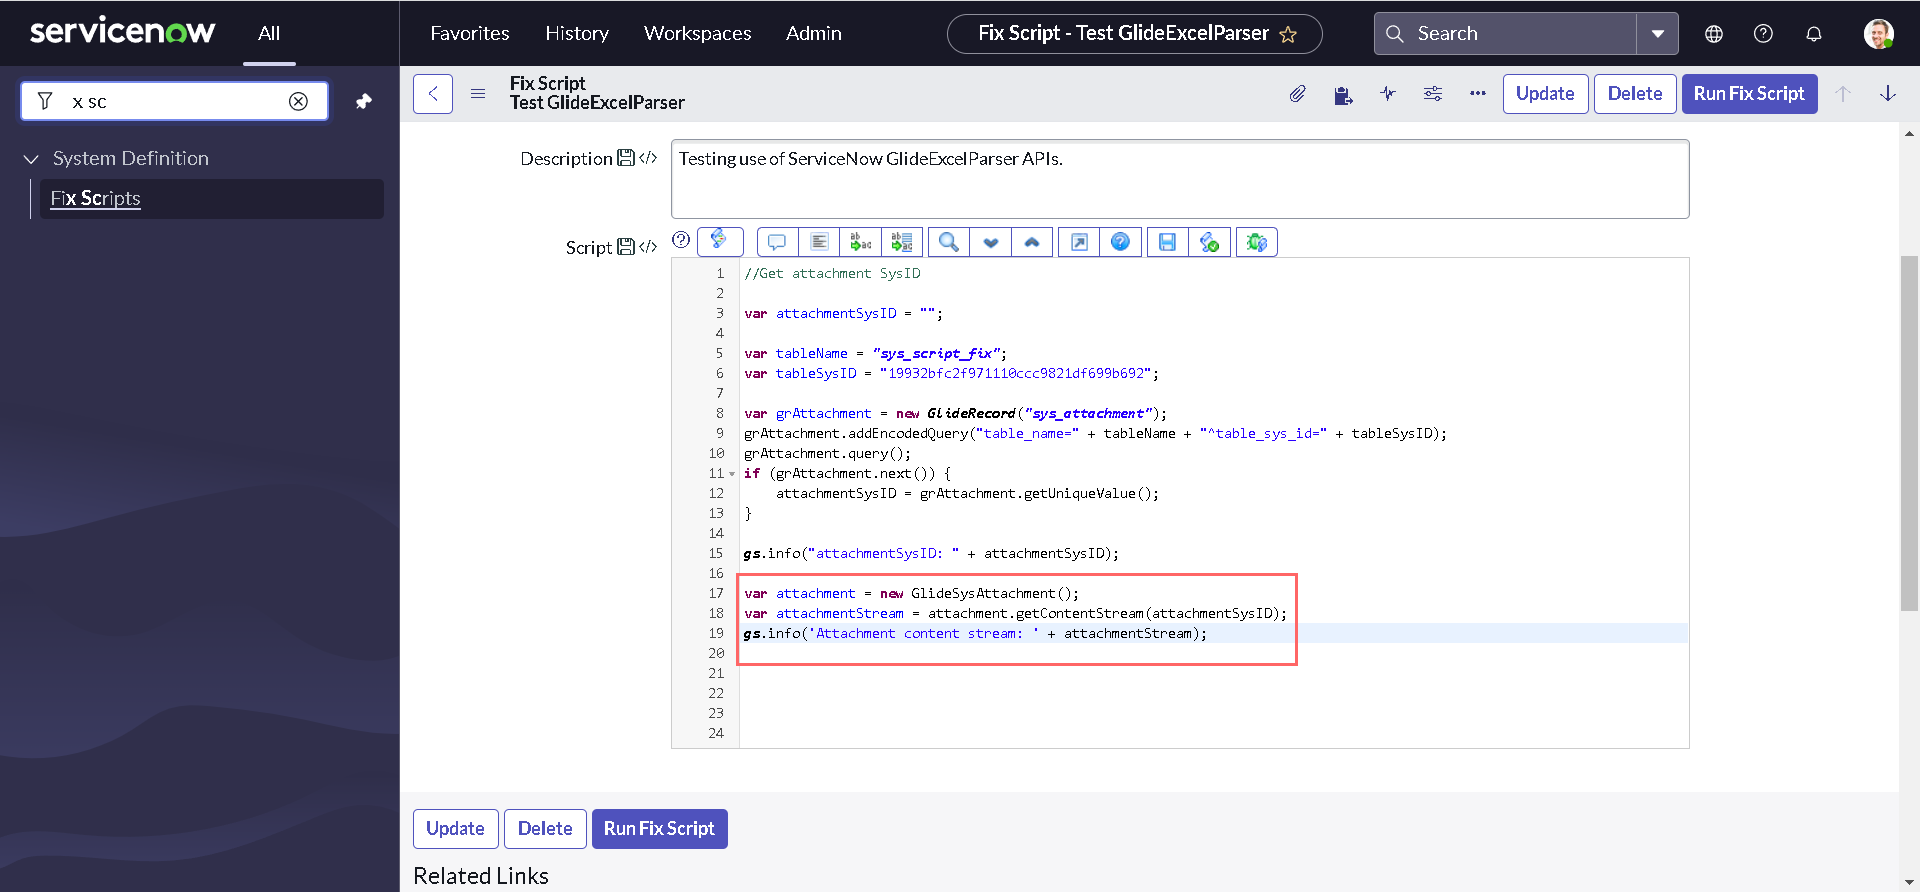
getContentStream() function of GlideSysAttachment accepts attachment sys_id as a parameter and returns a GlideScriptableInputStream object given the sys_id of an attachment that contains the content of an attachment. GlideSysAttachment APIs is a separate topic of discussion and we might talk about it in future articles, but for now, let us add following lines at the end of our script:
var attachment = new GlideSysAttachment();
var attachmentStream = attachment.getContentStream(attachmentSysID);
gs.info('Attachment content stream: ' + attachmentStream);
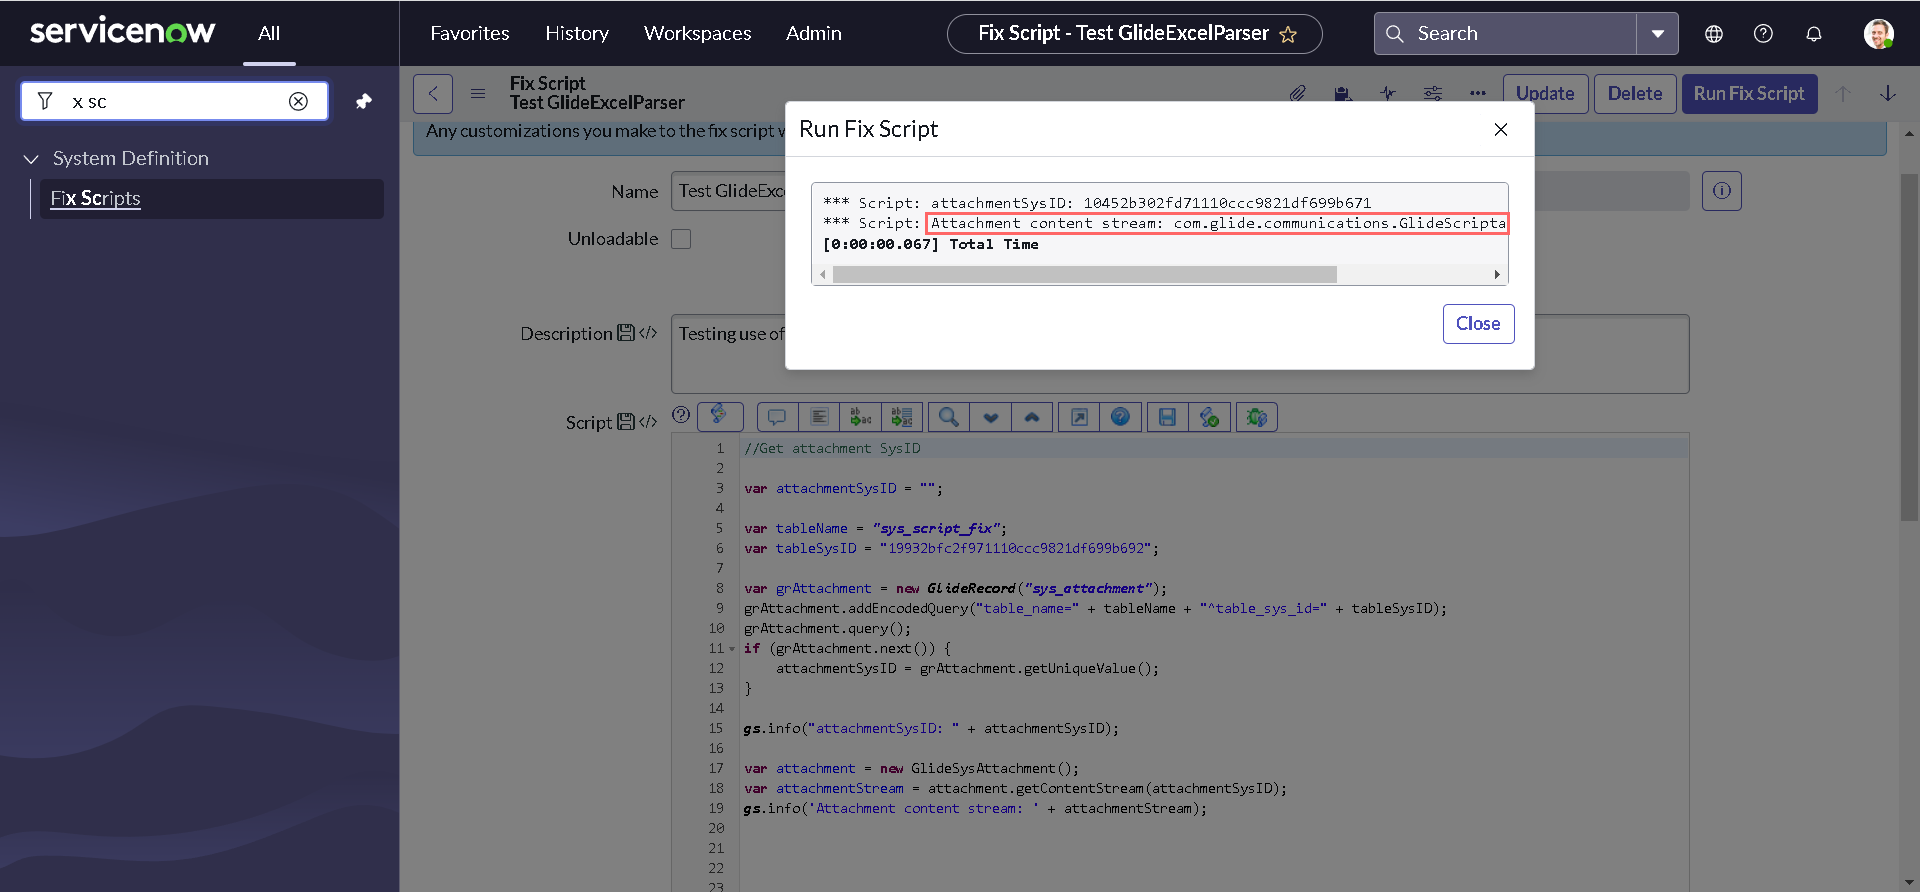
After executing the code again, you should get output similar to this:
parse()
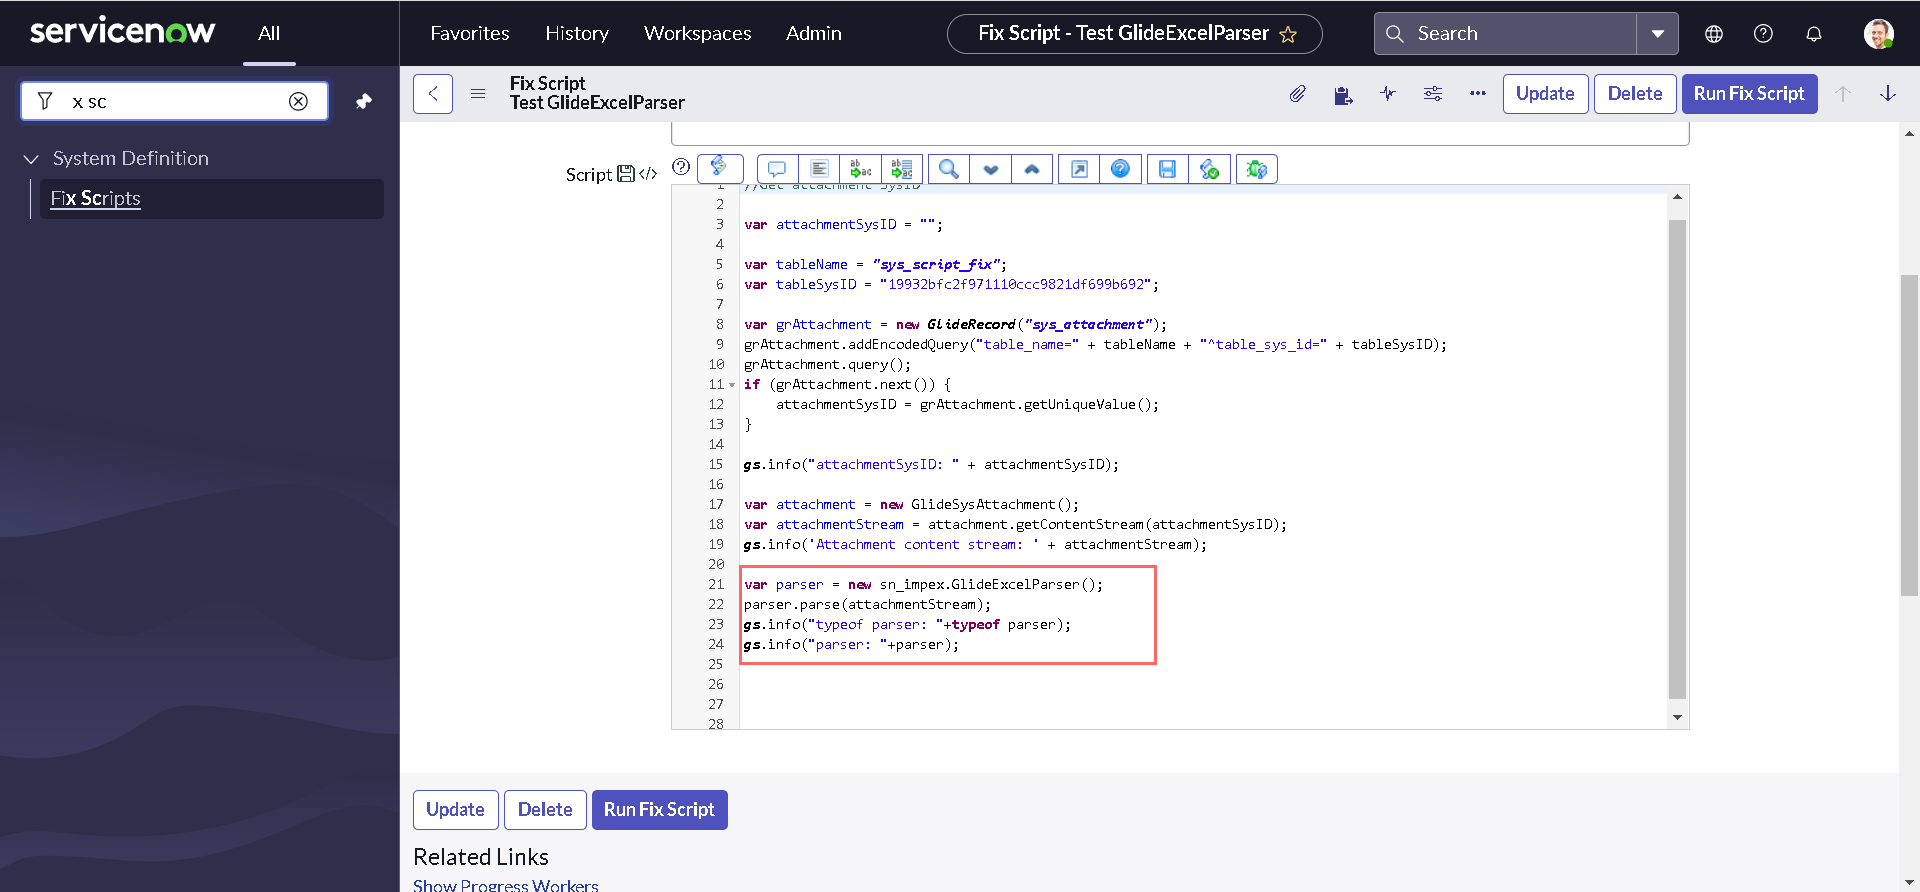
In order to parse our demo data sheet we can use parse() function, that parses an XLSX-formatted Excel document provided as an input stream. let us add following lines at the end of our script:
var parser = new sn_impex.GlideExcelParser();
parser.parse(attachmentStream);
gs.info("typeof parser: "+typeof parser);
gs.info("parser: "+parser);
After executing the code again, you should get output similar to this:
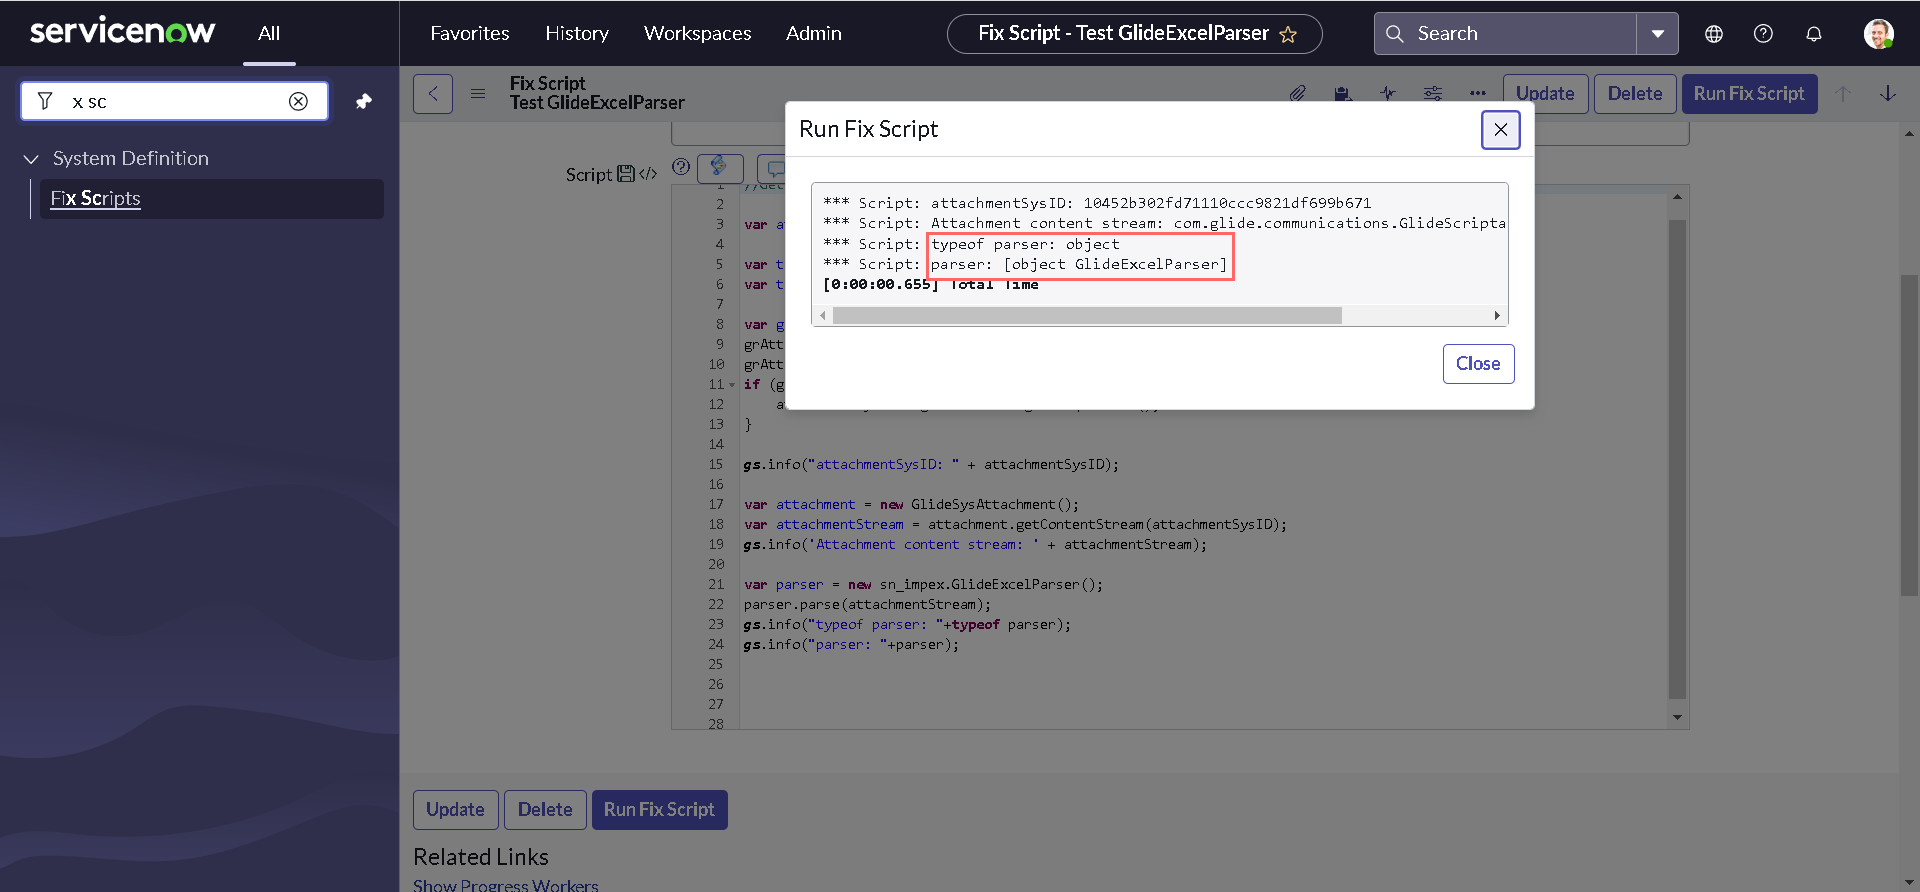
And since now we know that parser is an object of type GlideExcelParser, we can play with this.
getColumnHeaders()
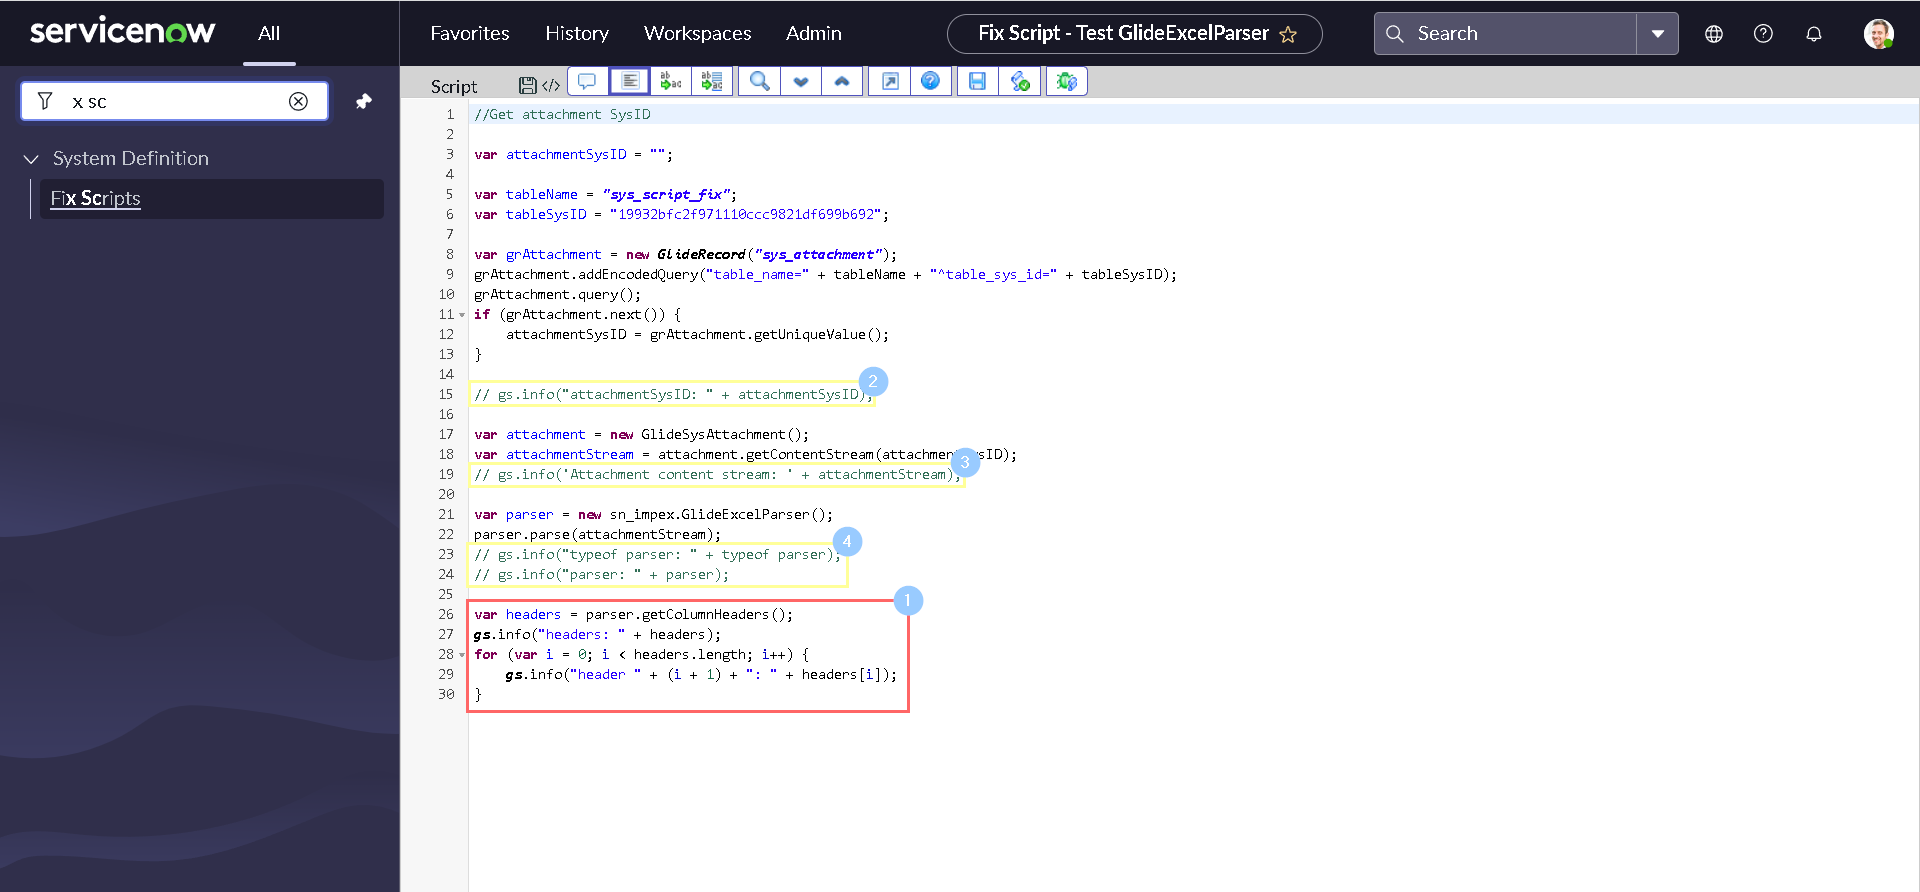
getColumnHeaders() returns a list of column headers from the parsed document as an array of strings. In order to understand this better, let us comment the old log statements and add following lines at the end of our script:
var headers = parser.getColumnHeaders();
gs.info("headers: " + headers);
for (var i = 0; i < headers.length; i++) {
    gs.info("header " + (i + 1) + ": " + headers[i]);
}
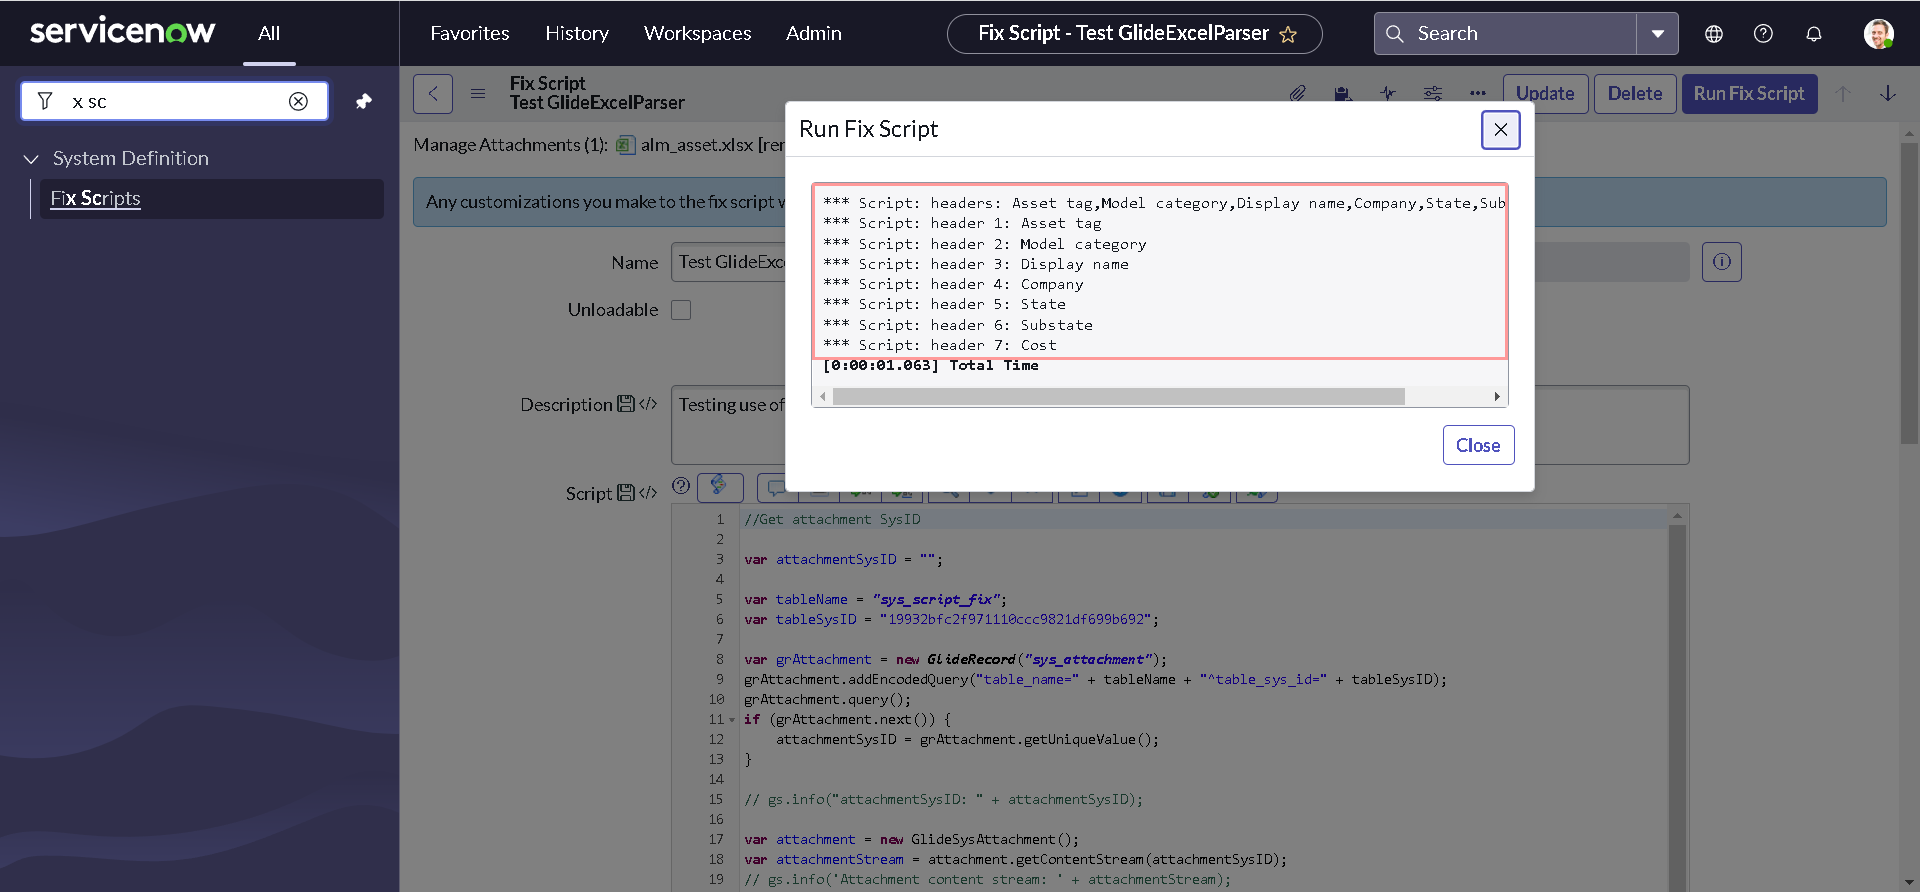
After executing the code again, you should be able to see the list of all column headers from our attachments:
getSheetNames()
getSheetNames() returns a list of all worksheet names, ordered as positioned from left to right in the workbook as an array of strings (including any worksheets marked as hidden). In order to understand this better, let us comment last four statements of our code and add following lines at the end of our script:
var list_sheet_name = parser.getSheetNames();
gs.info(" Sheet Names: " + list_sheet_name.join(", "));
for (var j = 0; j < list_sheet_name.length; j++) {
    gs.info("Sheet " + (j + 1) + ": " + list_sheet_name[j]);
}
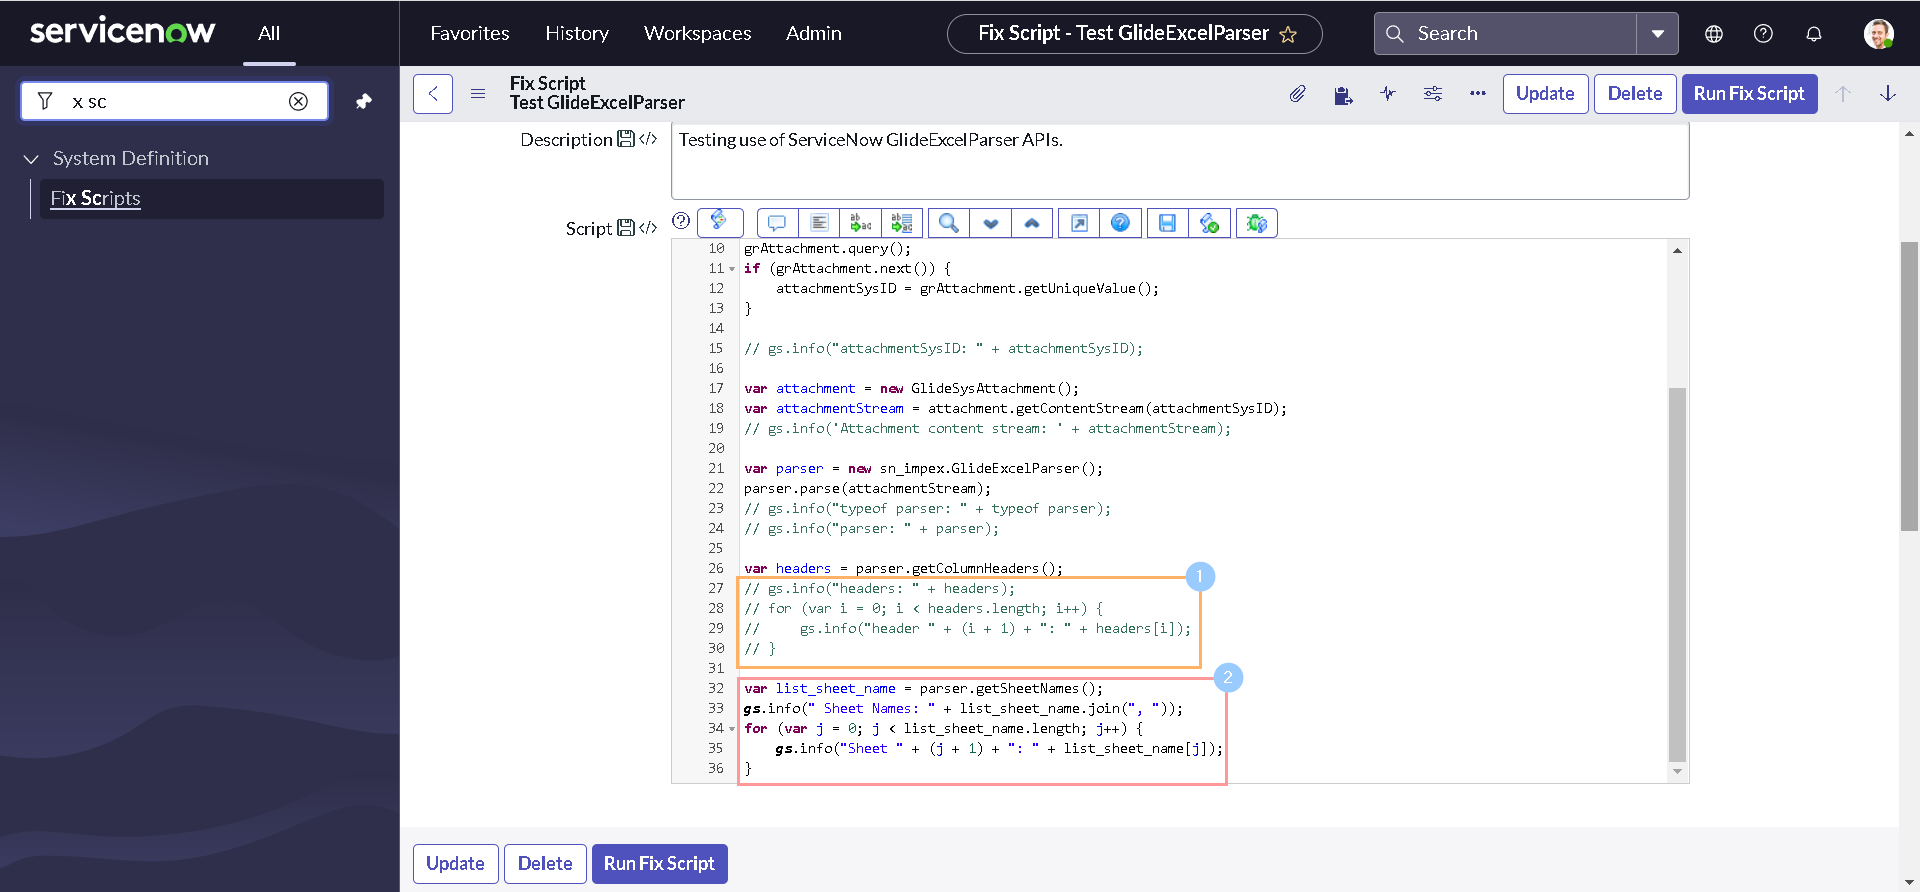
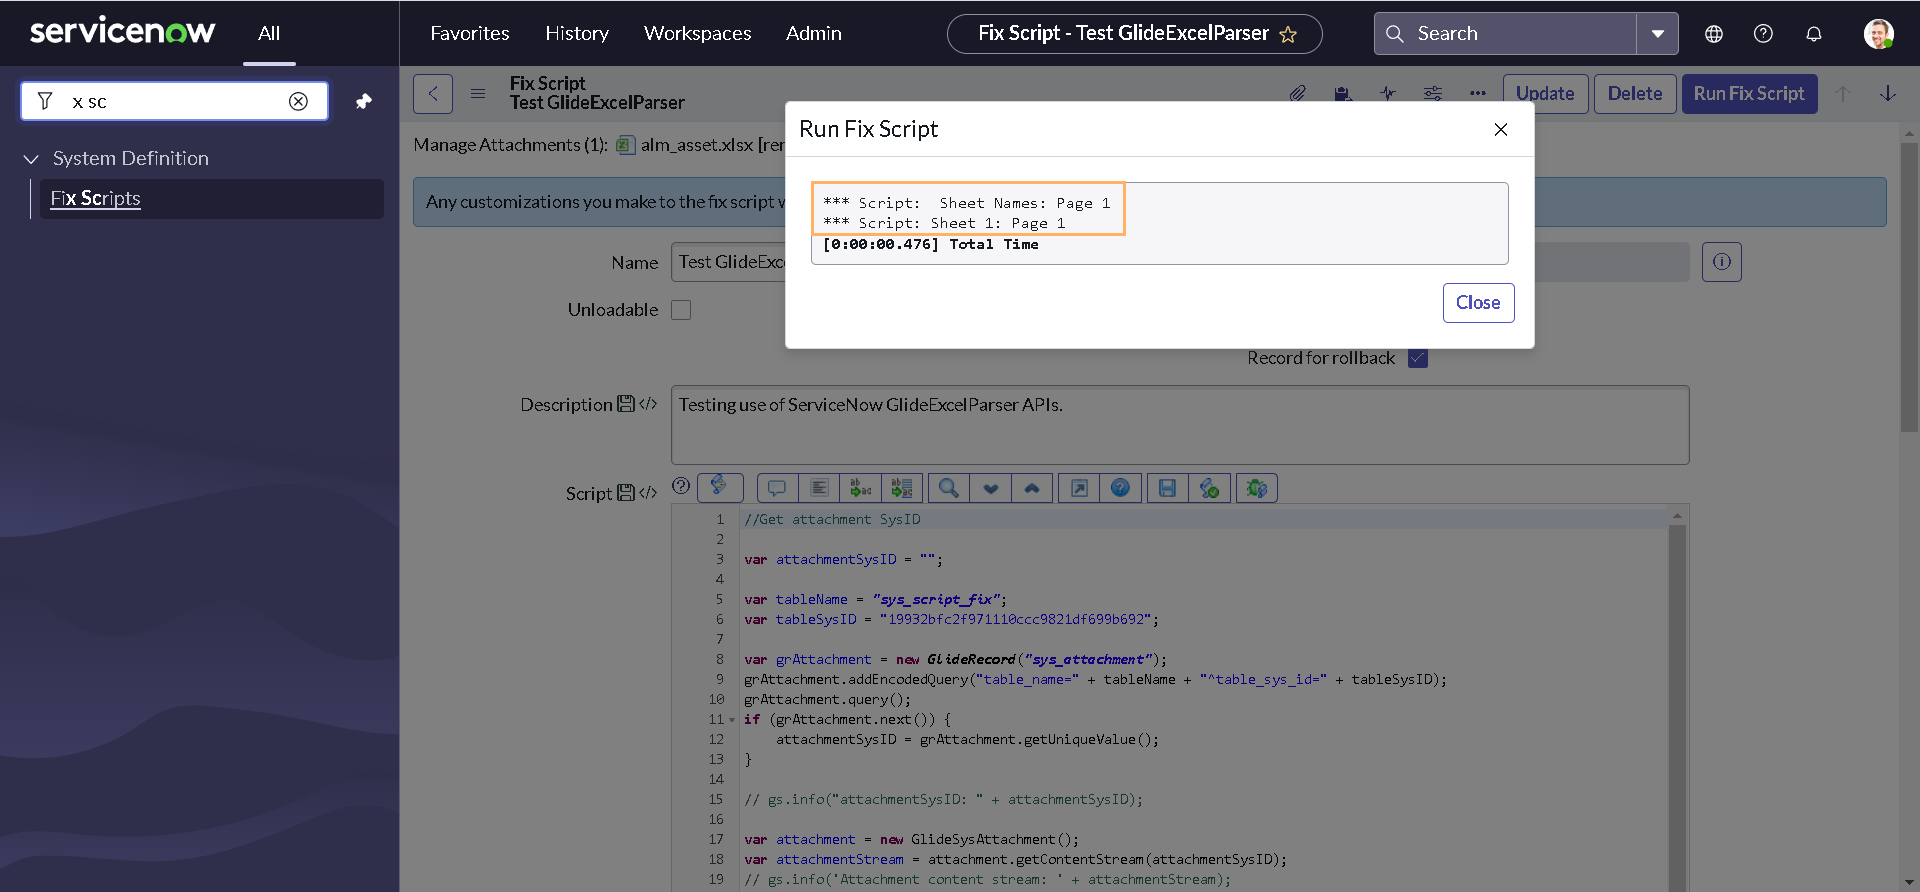
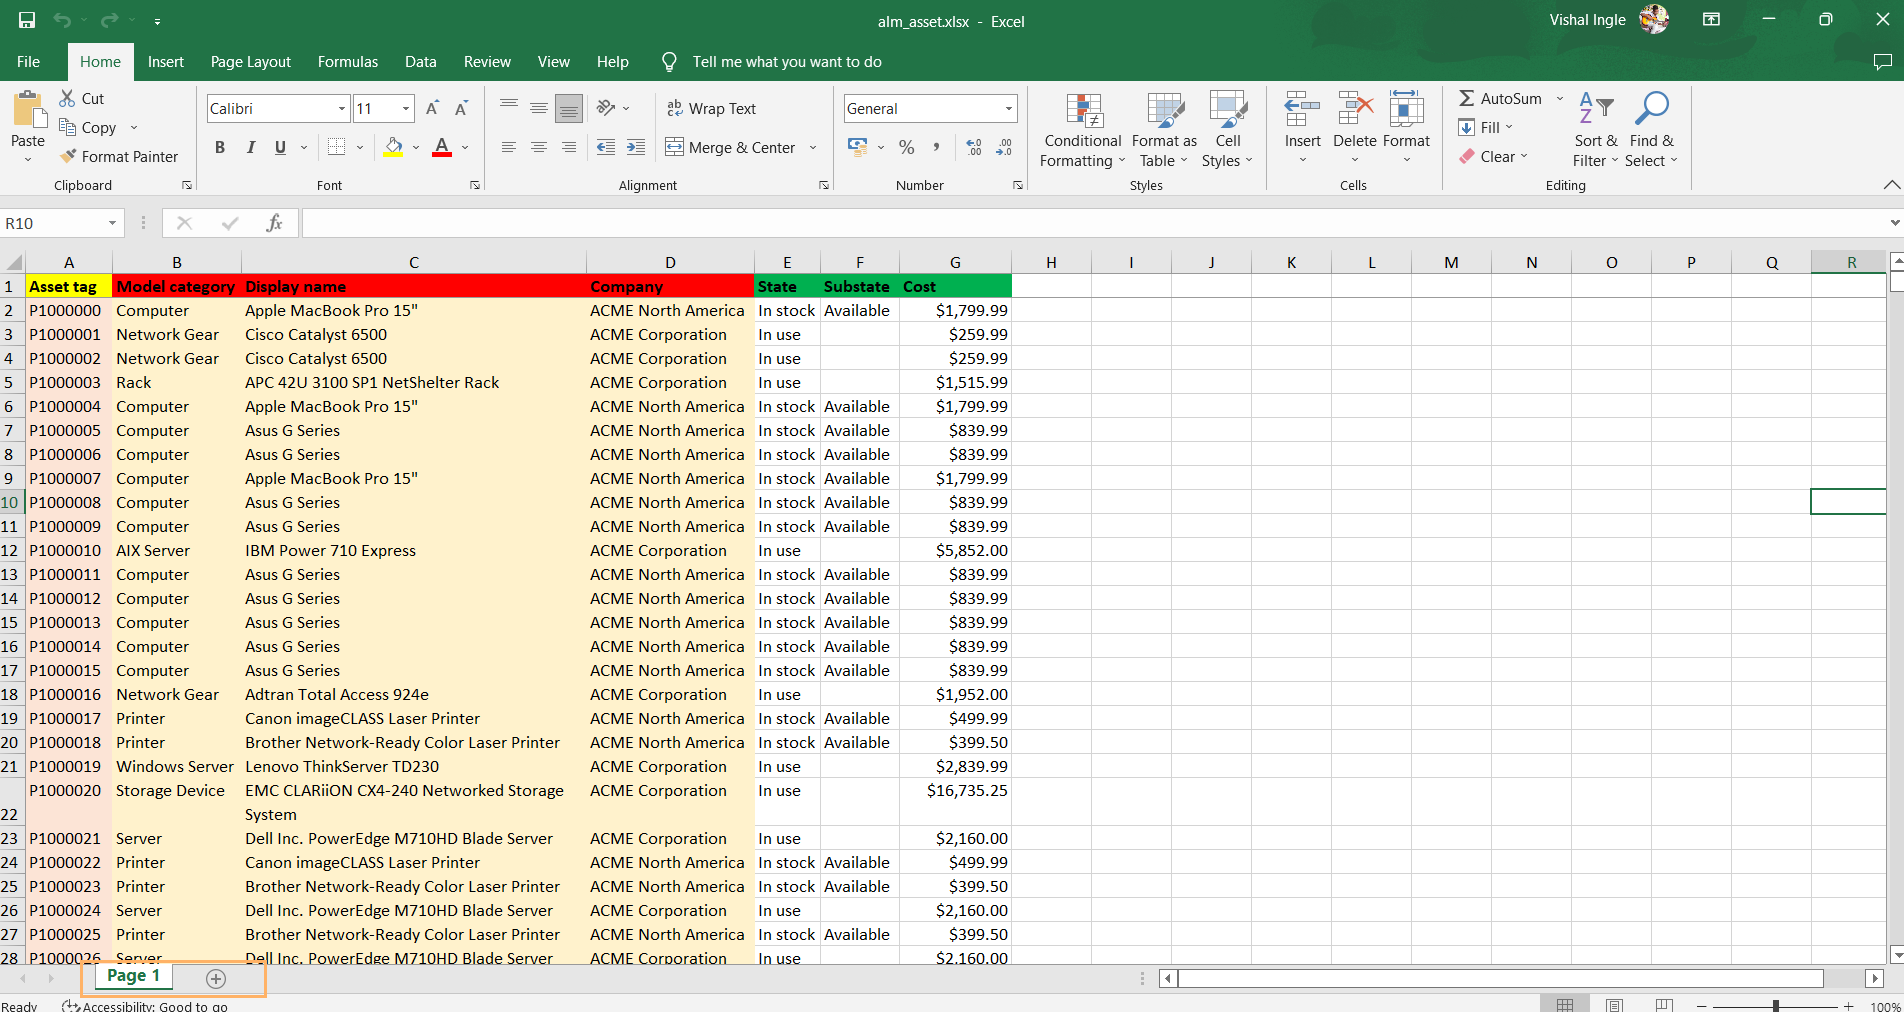
After executing the code again, you should be able to see the list of all worksheets from our attachments. In our demo sheet there is only one worksheet and we can see it logged in our output:
next() & getRow()
Now that we know how to get all column names, lets find out how to retrieve the information for each row. Just like GlideRecord, next() in GlideExcelParser is also used to loop through each of the row in an object. However, It is getRow() that actually returns the current row values and headers as an object. The row headers are stored as property names and the row values are stored as property values.
Let's see this in action by commenting last five statements of our code and add following lines at the end of our script:
while (parser.next()) {
    var row = parser.getRow();
    gs.info("typeof row: " + typeof row);
    gs.info("row: " + row);
    gs.info("row: " + JSON.stringify(row, null, 4));
}
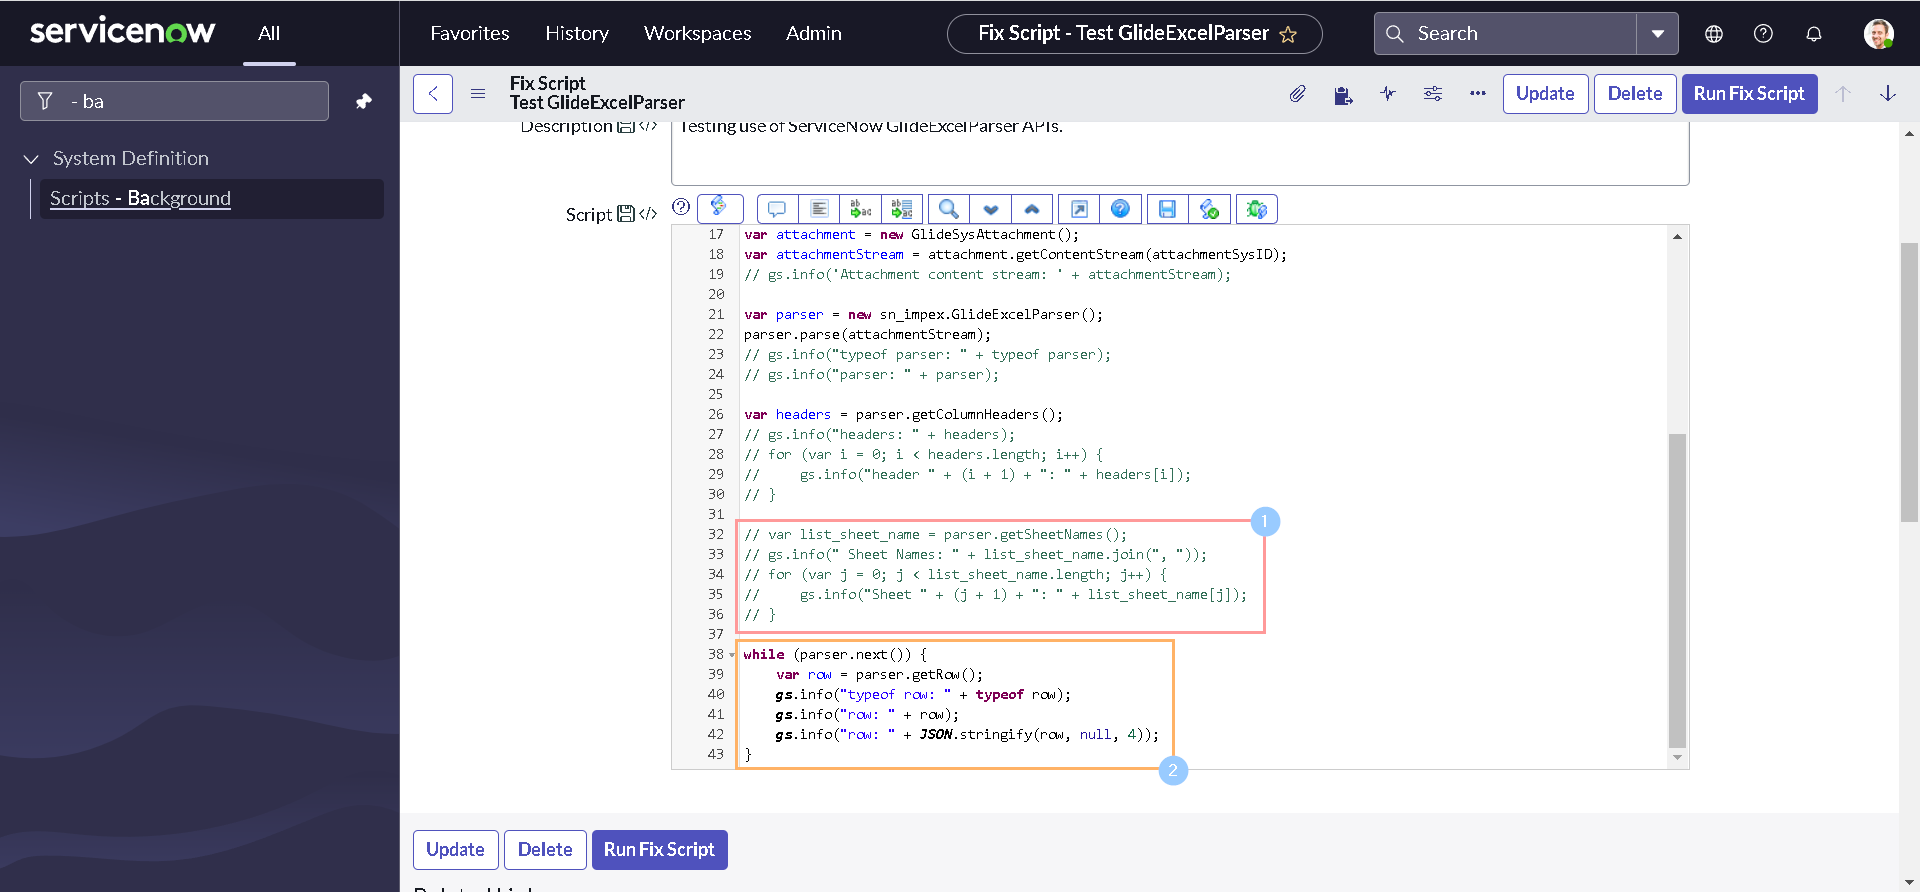
After executing the code again, you should get output similar to this:
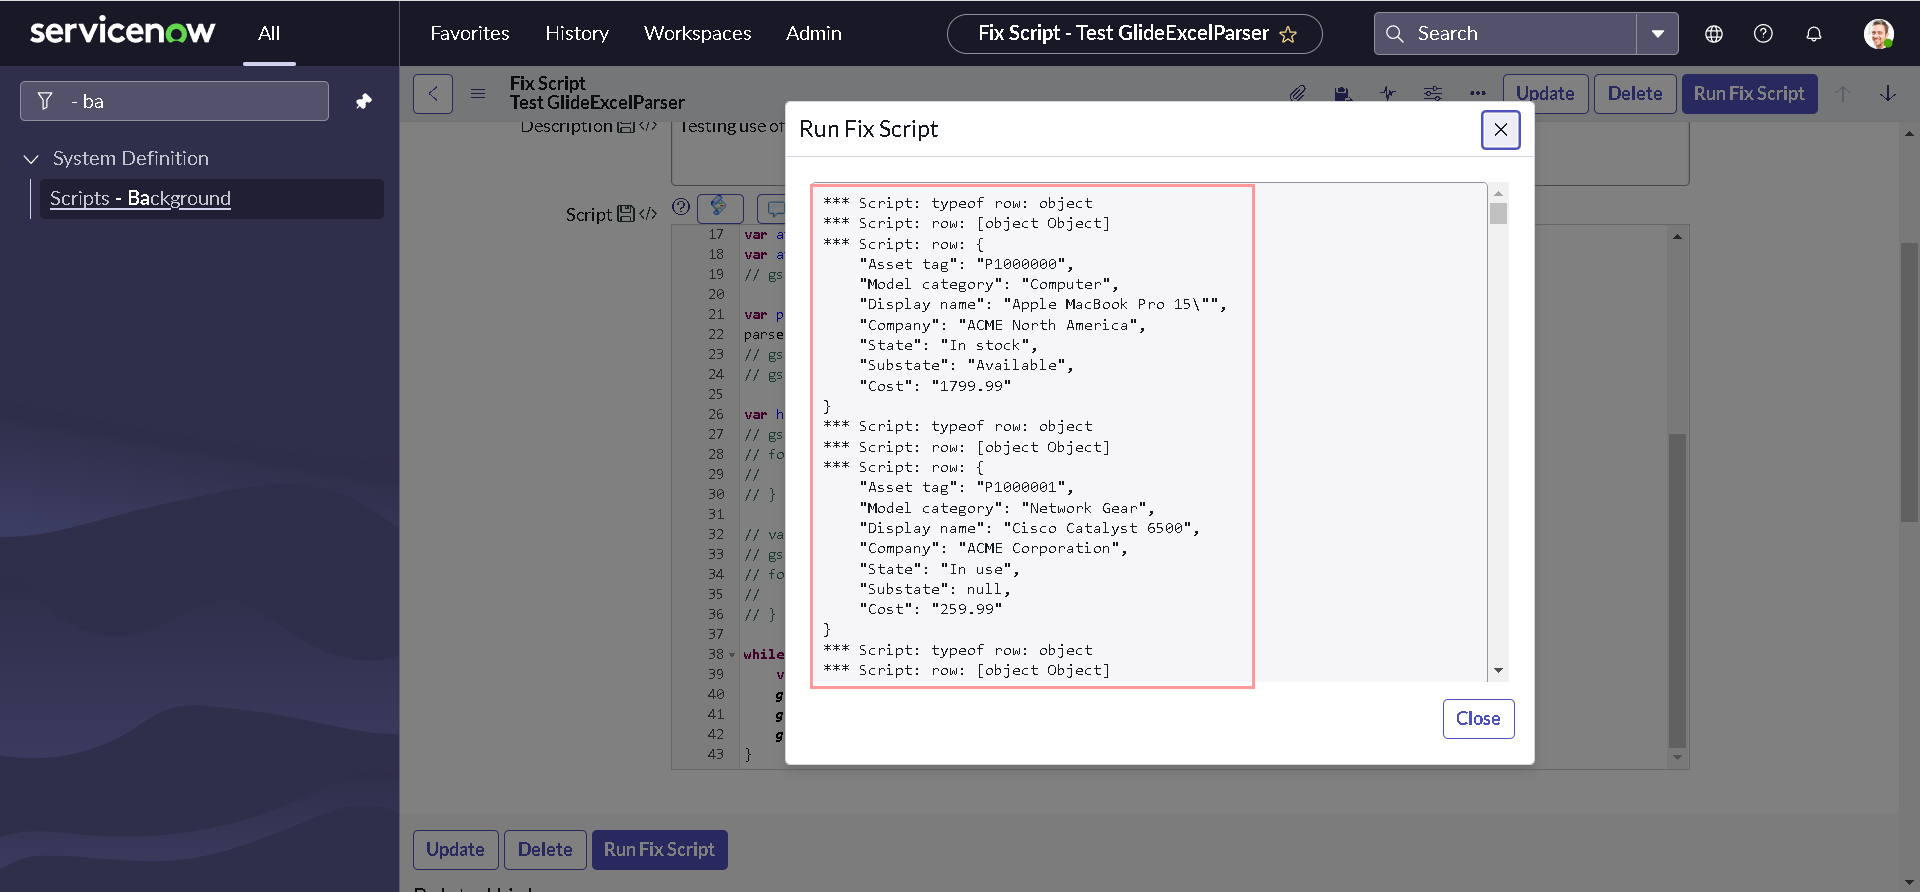
Since we know that row is an javascript object, with column headers as keys and cell data as property values. We can easily retrieve the the sheet data by modifying the code inside while loop as below:
while (parser.next()) {
    var row = parser.getRow();
    //     gs.info("typeof row: " + typeof row);
    //     gs.info("row: " + row);
    //     gs.info("row: " + JSON.stringify(row, null, 4));
    var currentRowCellData = "";
    for (var header in headers) {
        var currentHeader = headers[header];
        currentRowCellData += row[currentHeader] + "\t";
    }
    gs.info("currentRowCellData: " + currentRowCellData);
}
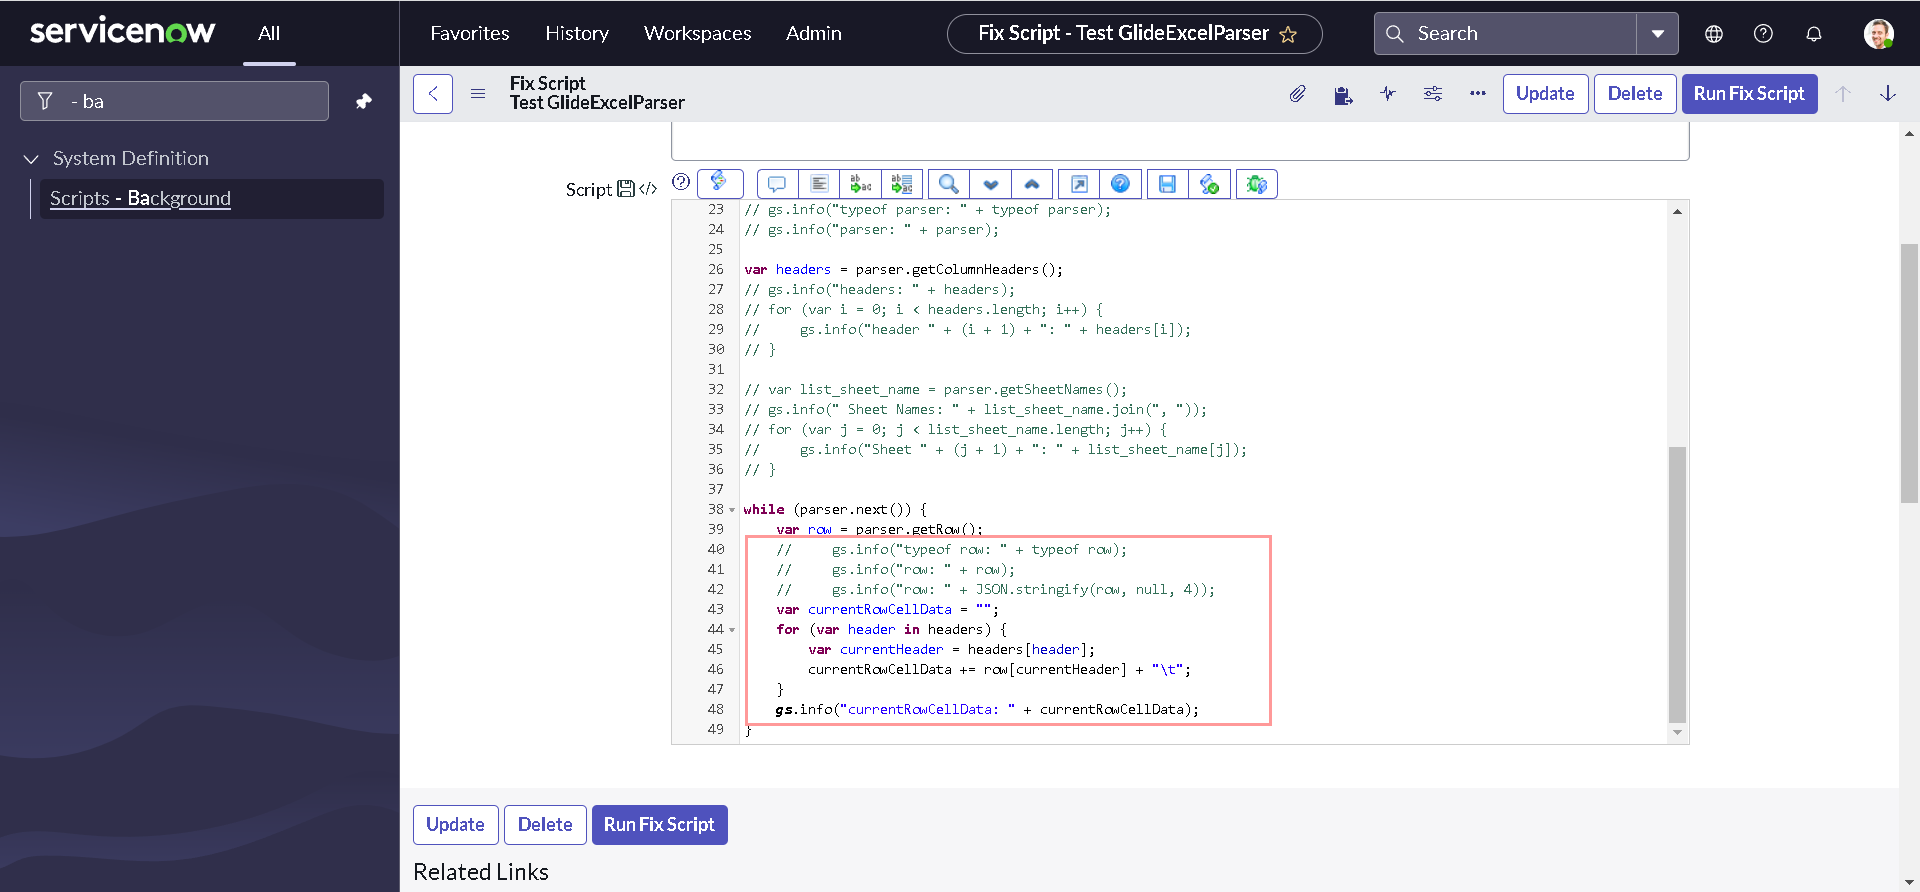
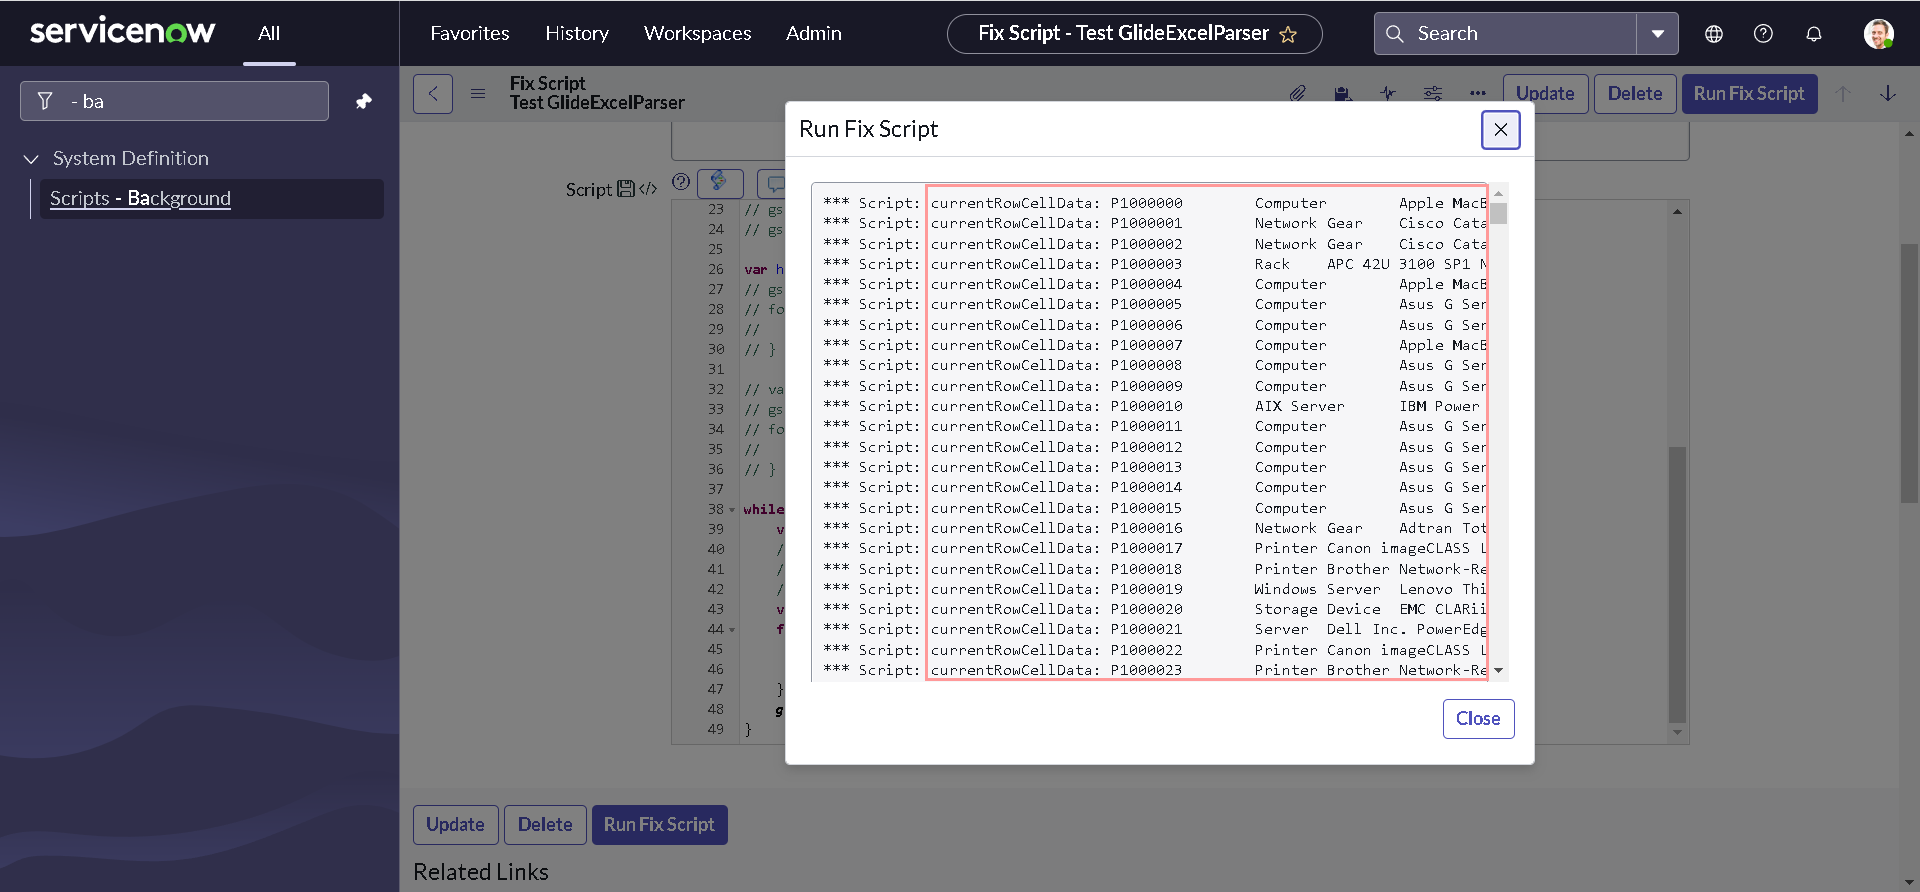
After executing the code again, you should get output with all the cell data from our demo data sheet:
Break Time
Now that we have basic understanding of some of the APIs, It is good time to take a break and get back to our business requirement. Let us modify our code to check if any of the mandatory Asset Tag, Model or Model category is empty:
var mandatoryHeaders = ["Asset tag", "Display name", "Model category"];
while (parser.next()) {
    var row = parser.getRow();

    for (var header in mandatoryHeaders) {
        var currentHeader = mandatoryHeaders[header];

        if (JSUtil.nil(row[currentHeader])) {
            gs.info("No value provided for mandatory column: " + currentHeader);
        }

    }
}
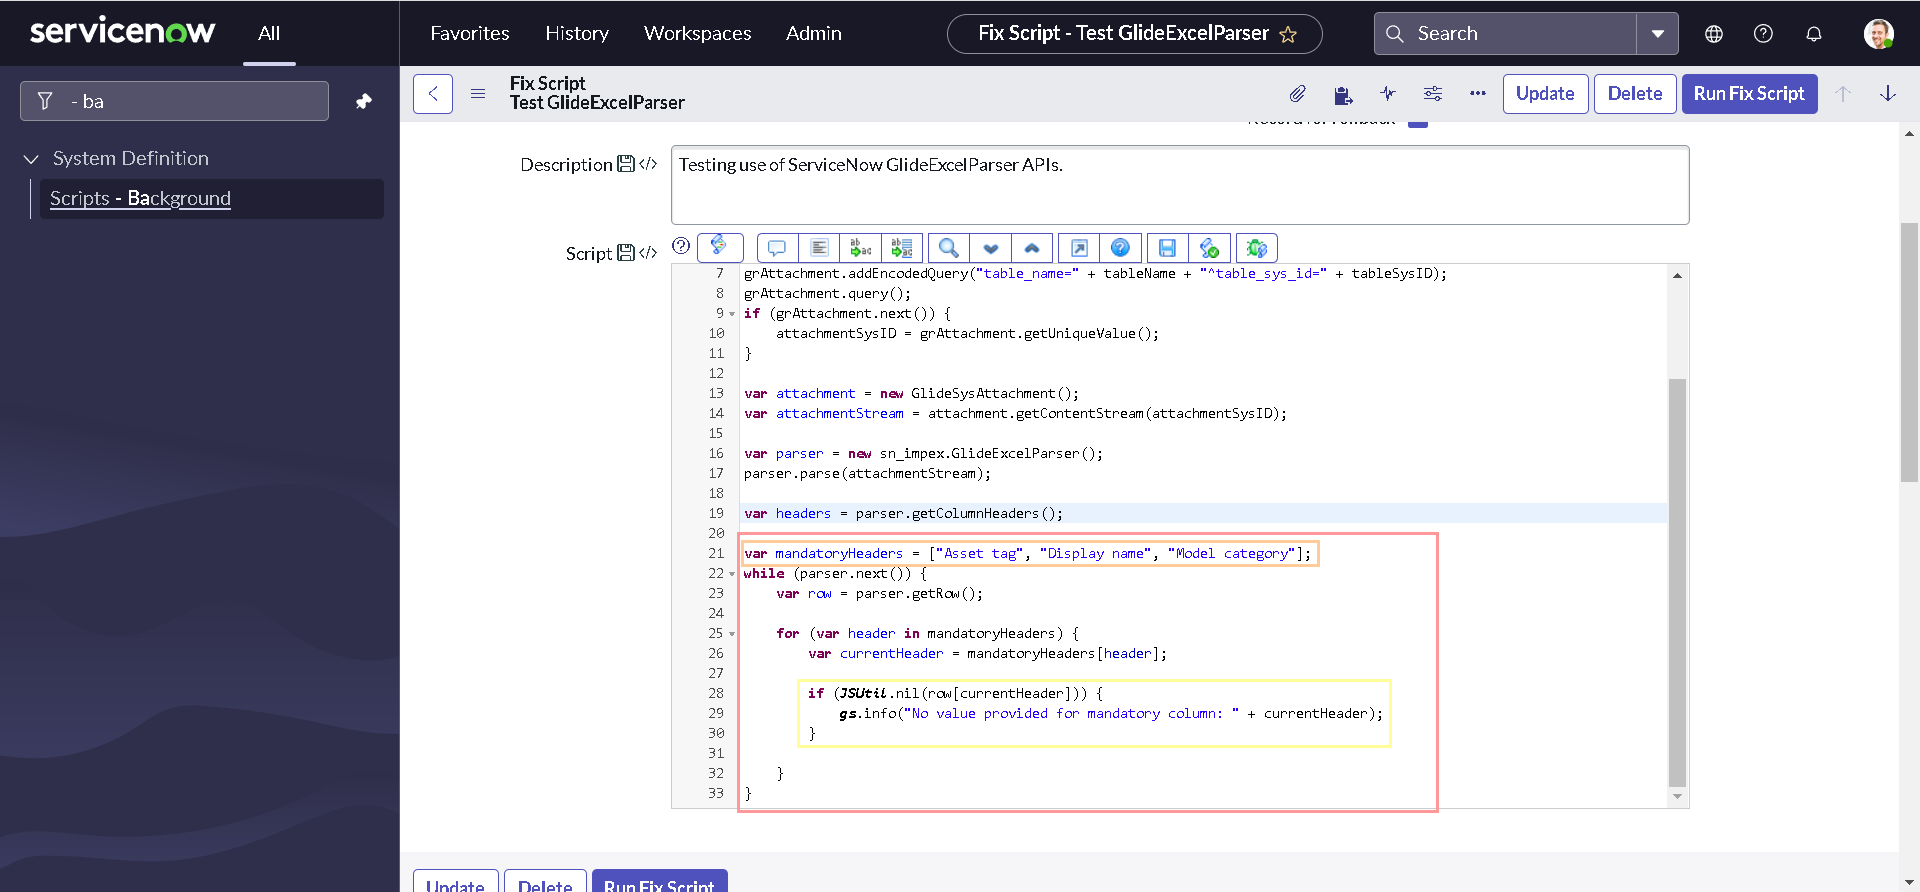
If you have noticed already, I did remove all the comments from the code and modified the script within while loop to perform our validation for empty values of mandatory columns. And I have declared an additional array to store the mandatory column headers which has been used later in the loop. Here's how the whole script looks like:
var attachmentSysID = "";

var tableName = "sys_script_fix";
var tableSysID = "19932bfc2f971110ccc9821df699b692";

var grAttachment = new GlideRecord("sys_attachment");
grAttachment.addEncodedQuery("table_name=" + tableName + "^table_sys_id=" + tableSysID);
grAttachment.query();
if (grAttachment.next()) {
    attachmentSysID = grAttachment.getUniqueValue();
}

var attachment = new GlideSysAttachment();
var attachmentStream = attachment.getContentStream(attachmentSysID);

var parser = new sn_impex.GlideExcelParser();
parser.parse(attachmentStream);

var headers = parser.getColumnHeaders();

var mandatoryHeaders = ["Asset tag", "Display name", "Model category"];
while (parser.next()) {
    var row = parser.getRow();

    for (var header in mandatoryHeaders) {
        var currentHeader = mandatoryHeaders[header];

        if (JSUtil.nil(row[currentHeader])) {
            gs.info("No value provided for mandatory column: " + currentHeader);
        }

    }
}
Now Let us modify our code to to add following lines to check if any of the mandatory Model or Model category is has a reference record existing in the system:
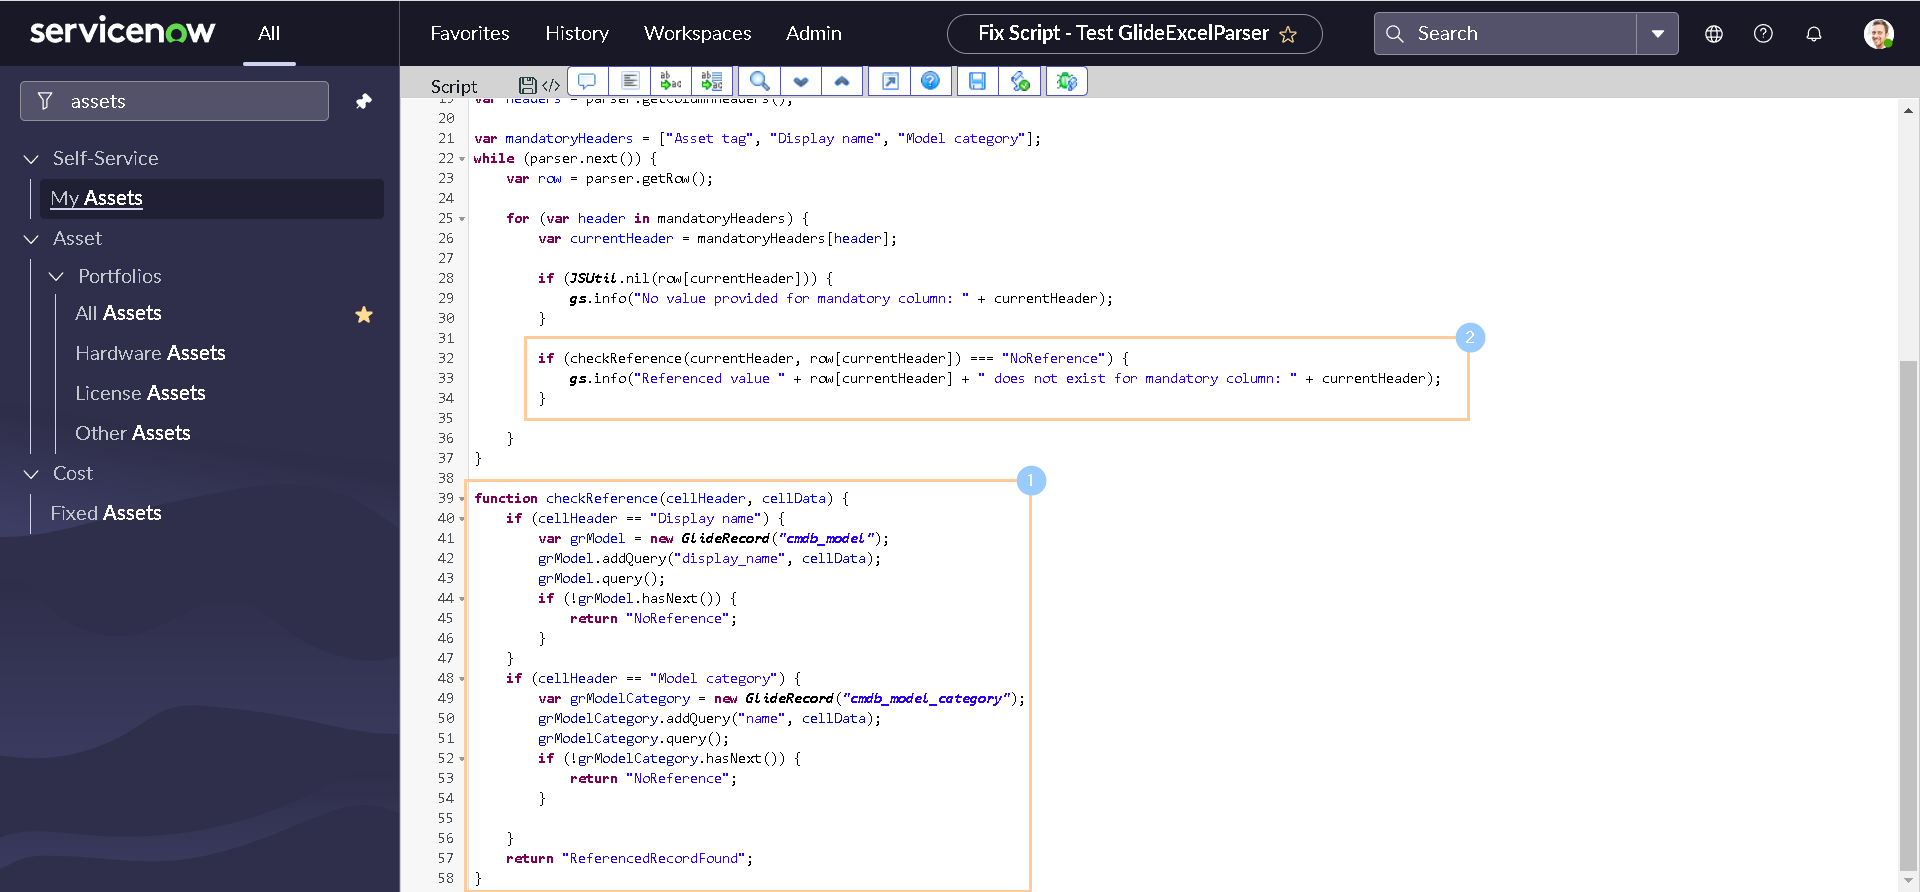
Here's how the whole script looks like:
var attachmentSysID = "";

var tableName = "sys_script_fix";
var tableSysID = "19932bfc2f971110ccc9821df699b692";

var grAttachment = new GlideRecord("sys_attachment");
grAttachment.addEncodedQuery("table_name=" + tableName + "^table_sys_id=" + tableSysID);
grAttachment.query();
if (grAttachment.next()) {
    attachmentSysID = grAttachment.getUniqueValue();
}

var attachment = new GlideSysAttachment();
var attachmentStream = attachment.getContentStream(attachmentSysID);

var parser = new sn_impex.GlideExcelParser();
parser.parse(attachmentStream);

var headers = parser.getColumnHeaders();

var mandatoryHeaders = ["Asset tag", "Display name", "Model category"];
while (parser.next()) {
    var row = parser.getRow();

    for (var header in mandatoryHeaders) {
        var currentHeader = mandatoryHeaders[header];

        if (JSUtil.nil(row[currentHeader])) {
            gs.info("No value provided for mandatory column: " + currentHeader);
        }

        if (checkReference(currentHeader, row[currentHeader]) === "NoReference") {
            gs.info("Referenced value " + row[currentHeader] + " does not exist for mandatory column: " + currentHeader);
        }

    }
}

function checkReference(cellHeader, cellData) {
    if (cellHeader == "Display name") {
        var grModel = new GlideRecord("cmdb_model");
        grModel.addQuery("display_name", cellData);
        grModel.query();
        if (!grModel.hasNext()) {
            return "NoReference";
        }
    }
    if (cellHeader == "Model category") {
        var grModelCategory = new GlideRecord("cmdb_model_category");
        grModelCategory.addQuery("name", cellData);
        grModelCategory.query();
        if (!grModelCategory.hasNext()) {
            return "NoReference";
        }

    }
    return "ReferencedRecordFound";
}
Let us introduce a new variable rowNumber for better logging as below:
var rowNumber=1;
while (parser.next()) {
    var row = parser.getRow();

    for (var header in mandatoryHeaders) {
        var currentHeader = mandatoryHeaders[header];

        if (JSUtil.nil(row[currentHeader])) {
            gs.info("Row "+rowNumber+"1 - No value provided for mandatory column: " + currentHeader);
        }

        if (checkReference(currentHeader, row[currentHeader]) === "NoReference") {
            gs.info("Row "+rowNumber+"1 - Referenced value " + row[currentHeader] + " does not exist for mandatory column: " + currentHeader);
        }

    }
 rowNumber++;
}
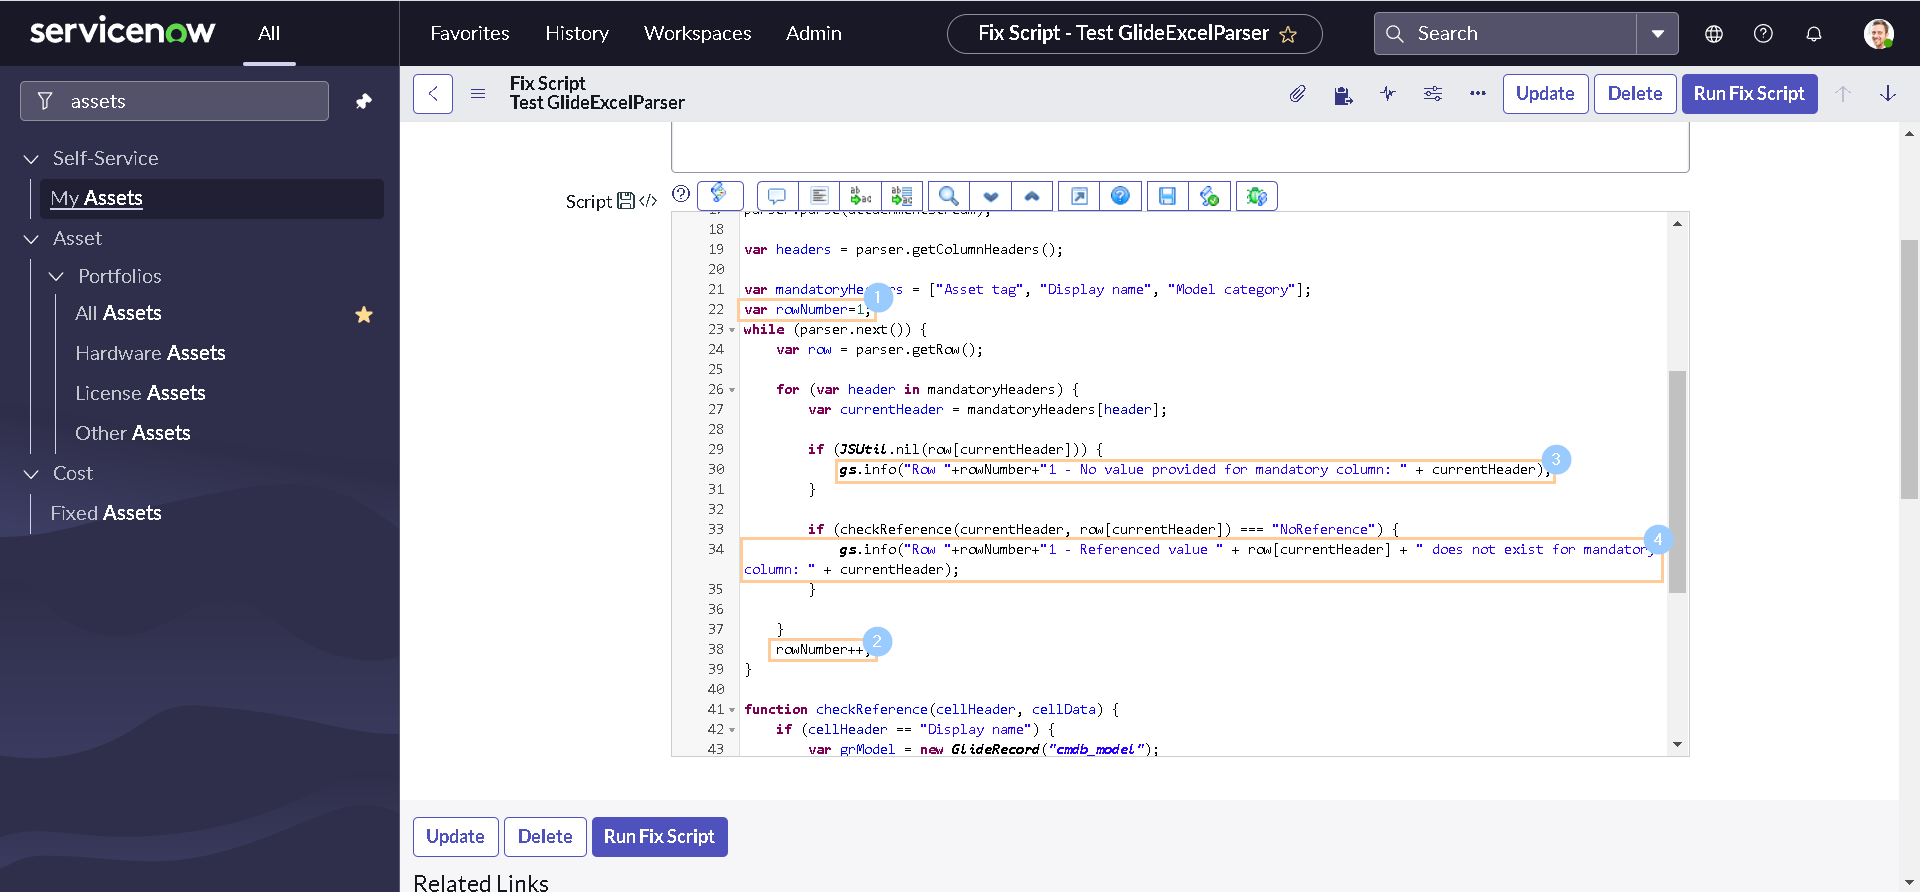
Let us introduce another variable insufficientData to check if manadatory column is empty or reference does not exist:
var insufficientData="FALSE";
while (parser.next()) {
    var row = parser.getRow();

    for (var header in mandatoryHeaders) {
        var currentHeader = mandatoryHeaders[header];

        if (JSUtil.nil(row[currentHeader])) {
            gs.info("Row "+rowNumber+" - No value provided for mandatory column: " + currentHeader);
   insufficientData="TRUE";
        }

        if (checkReference(currentHeader, row[currentHeader]) === "NoReference") {
            gs.info("Row "+rowNumber+" - Referenced value " + row[currentHeader] + " does not exist for mandatory column: " + currentHeader);
   insufficientData="TRUE";
        }

    }
 rowNumber++;
}
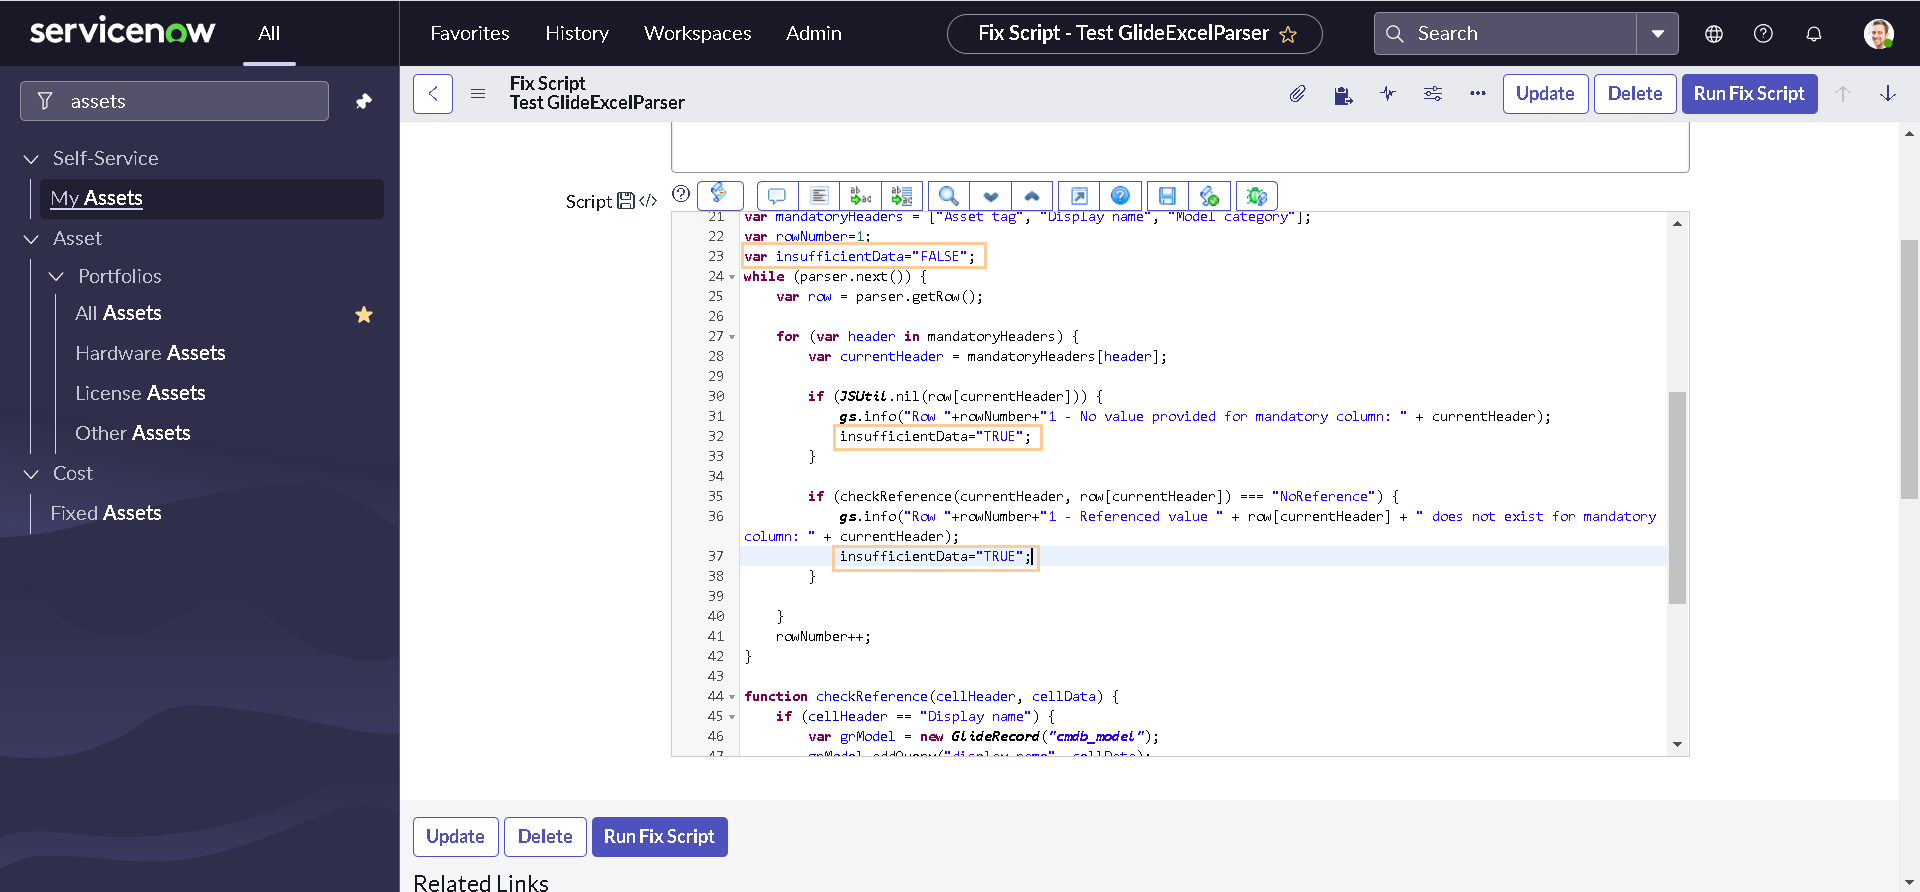
Before testing the code, we need to make two more changes for our use case. We will analyze the whole sheet for not sufficient data and will log the information only once. Let us modify the code one more time as below:
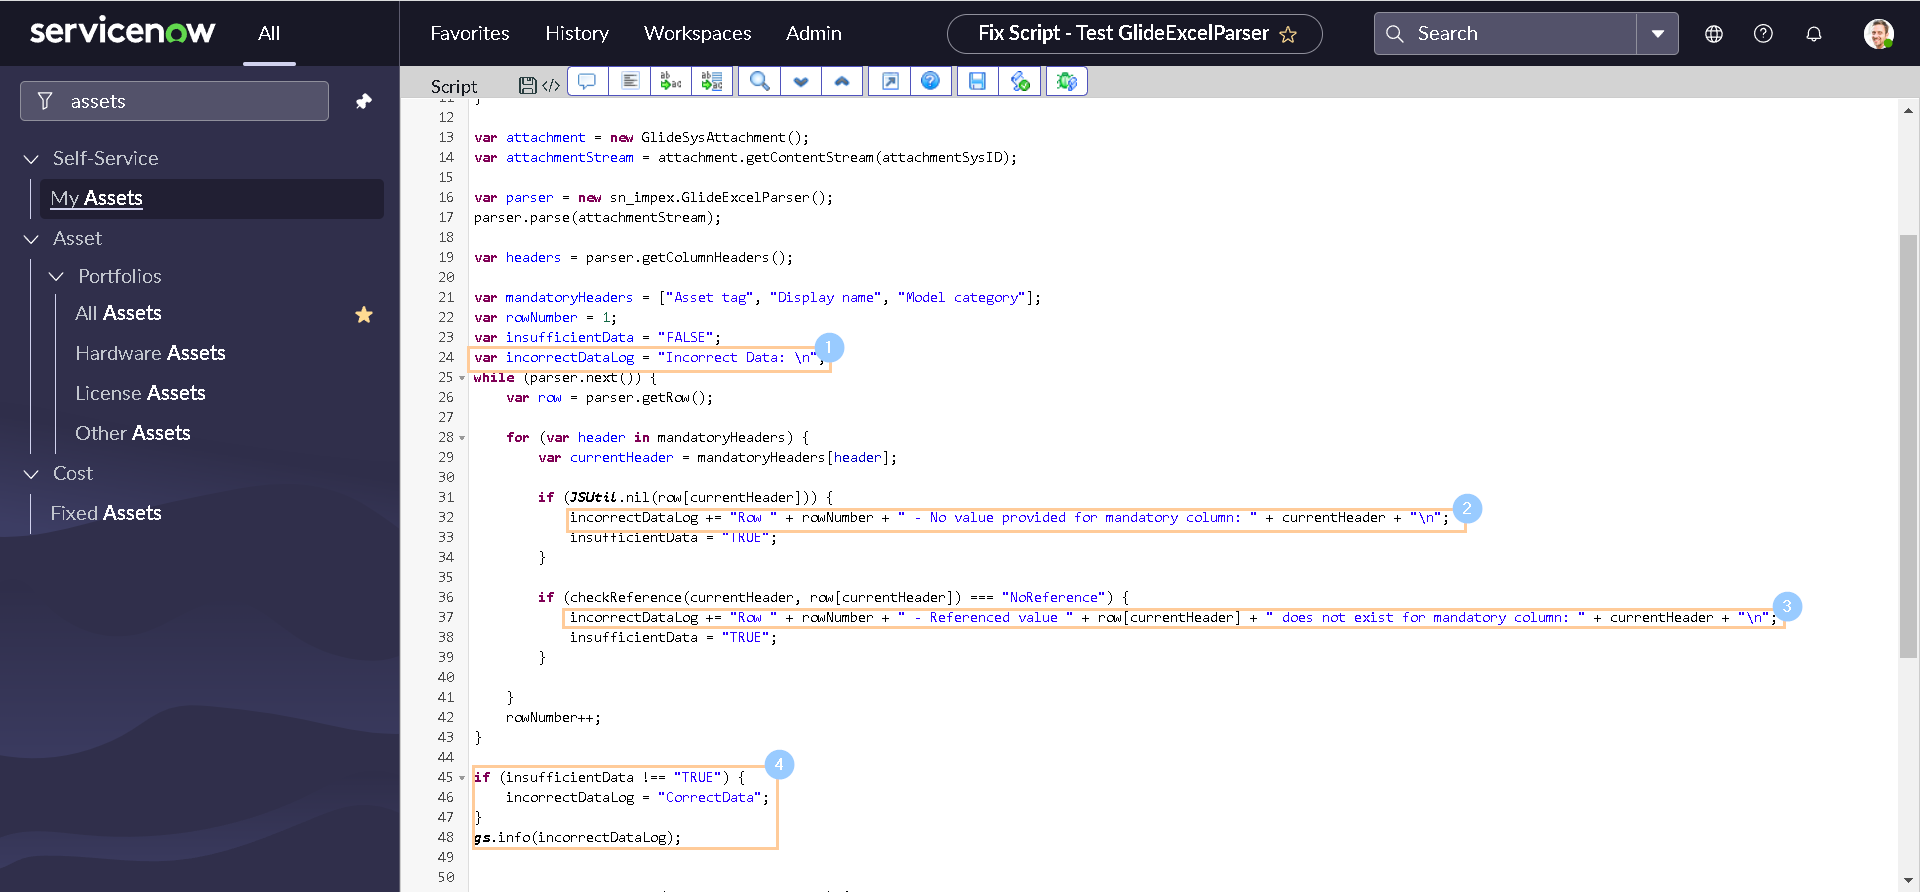
Now our final code should look like this:
var attachmentSysID = "";

var tableName = "sys_script_fix";
var tableSysID = "19932bfc2f971110ccc9821df699b692";

var grAttachment = new GlideRecord("sys_attachment");
grAttachment.addEncodedQuery("table_name=" + tableName + "^table_sys_id=" + tableSysID);
grAttachment.query();
if (grAttachment.next()) {
    attachmentSysID = grAttachment.getUniqueValue();
}

var attachment = new GlideSysAttachment();
var attachmentStream = attachment.getContentStream(attachmentSysID);

var parser = new sn_impex.GlideExcelParser();
parser.parse(attachmentStream);

var headers = parser.getColumnHeaders();

var mandatoryHeaders = ["Asset tag", "Display name", "Model category"];
var rowNumber = 1;
var insufficientData = "FALSE";
var incorrectDataLog = "Incorrect Data: \n";
while (parser.next()) {
    var row = parser.getRow();

    for (var header in mandatoryHeaders) {
        var currentHeader = mandatoryHeaders[header];

        if (JSUtil.nil(row[currentHeader])) {
            incorrectDataLog += "Row " + rowNumber + " - No value provided for mandatory column: " + currentHeader + "\n";
            insufficientData = "TRUE";
        }

        if (checkReference(currentHeader, row[currentHeader]) === "NoReference") {
            incorrectDataLog += "Row " + rowNumber + " - Referenced value " + row[currentHeader] + " does not exist for mandatory column: " + currentHeader + "\n";
            insufficientData = "TRUE";
        }

    }
    rowNumber++;
}

if (insufficientData !== "TRUE") {
    incorrectDataLog = "CorrectData";
}
gs.info(incorrectDataLog);


function checkReference(cellHeader, cellData) {
    if (cellHeader == "Display name") {
        var grModel = new GlideRecord("cmdb_model");
        grModel.addQuery("display_name", cellData);
        grModel.query();
        if (!grModel.hasNext()) {
            return "NoReference";
        }
    }
    if (cellHeader == "Model category") {
        var grModelCategory = new GlideRecord("cmdb_model_category");
        grModelCategory.addQuery("name", cellData);
        grModelCategory.query();
        if (!grModelCategory.hasNext()) {
            return "NoReference";
        }

    }
    return "ReferencedRecordFound";
}
Creating and testing Invalid Demo Data
Now that we have our code ready to be tested, we need a demo data sheet with some missing or incorrect information. Let's modify the original sheet by deleting some of the mandatory information:

Next, remove the old attachment and replace it with new attachment having incorrect data:

Executing the code again, should didplay the output like this:

But if you are really paying an attention, you will notice that it is Row 8 and not Row 7 which is actually empty. Same applies for other rows. The reason for this is because the first row of excel is column headers and not actually a data. Let's fix it with just increasing the initial value of rowNumber by 1.

Another thing that you should notice is, The API parses all the Rows in the sheet even if they are totally empty (E.g. Row 8). Unfortunately, there is no OOTB workaround for this issue available yet. You can read more about the issue here. Though, we can skip those rows with a little trick. Let us write an additional line of code in our script:
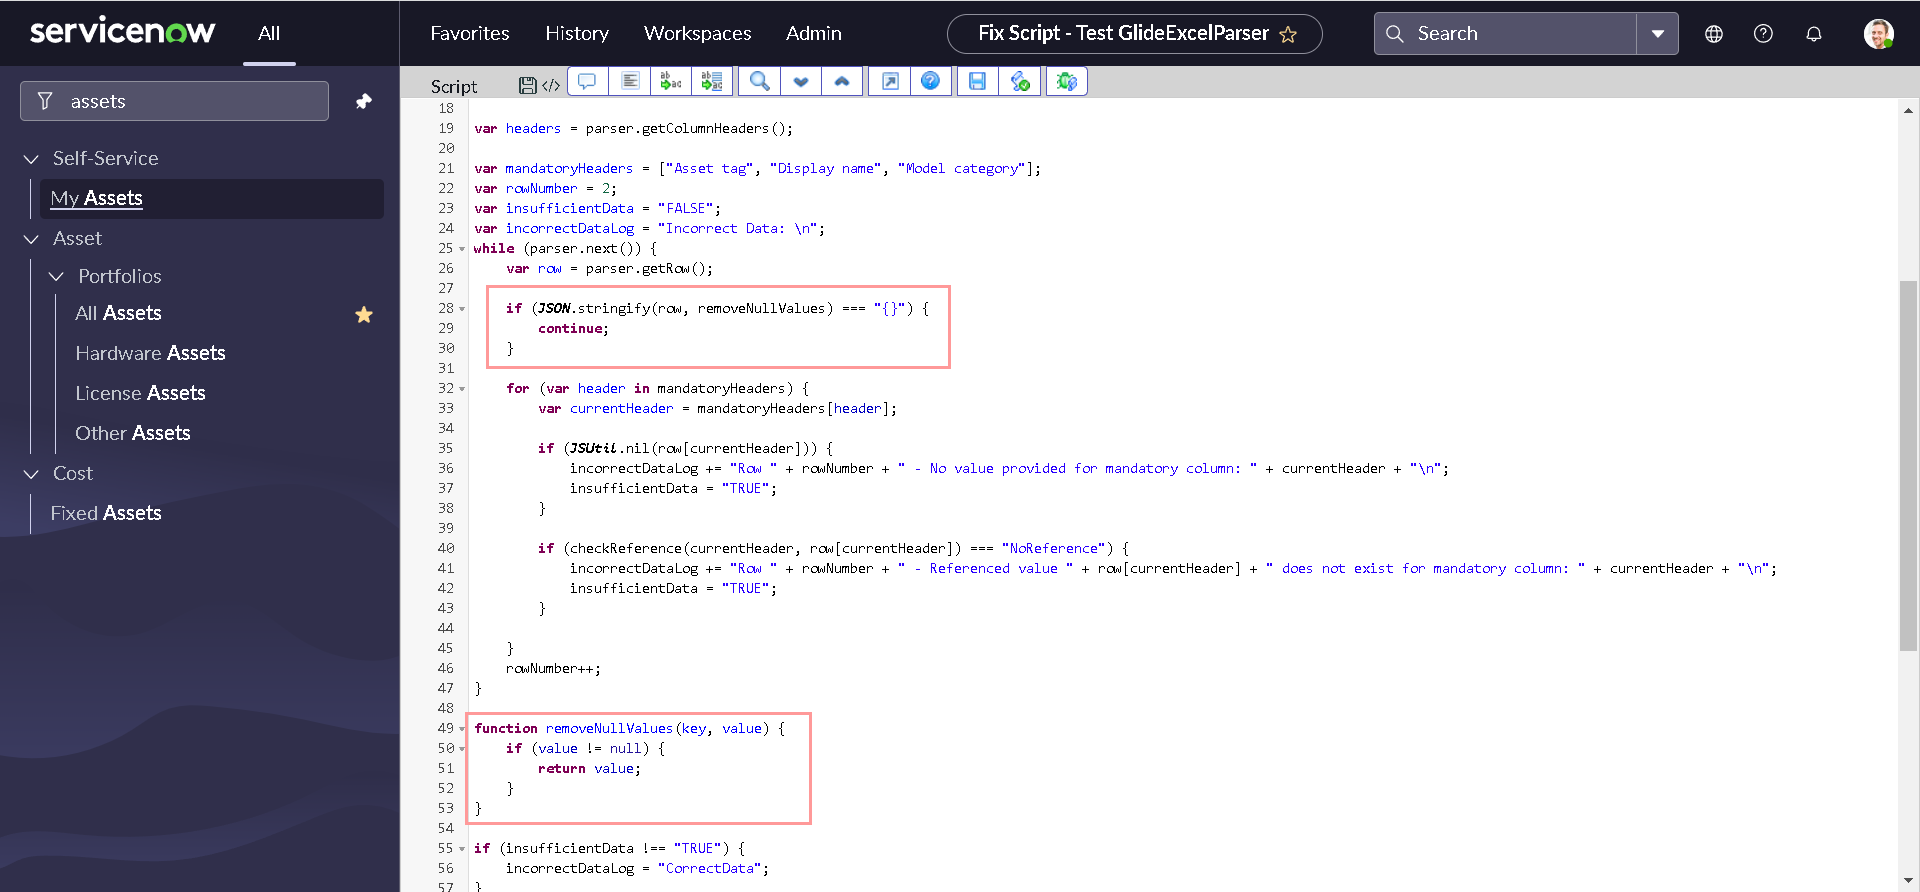
At the end of this section, your final code should be somewhat similar to this:
var attachmentSysID = "";

var tableName = "sys_script_fix";
var tableSysID = "19932bfc2f971110ccc9821df699b692";

var grAttachment = new GlideRecord("sys_attachment");
grAttachment.addEncodedQuery("table_name=" + tableName + "^table_sys_id=" + tableSysID);
grAttachment.query();
if (grAttachment.next()) {
    attachmentSysID = grAttachment.getUniqueValue();
}

var attachment = new GlideSysAttachment();
var attachmentStream = attachment.getContentStream(attachmentSysID);

var parser = new sn_impex.GlideExcelParser();
parser.parse(attachmentStream);

var headers = parser.getColumnHeaders();

var mandatoryHeaders = ["Asset tag", "Display name", "Model category"];
var rowNumber = 2;
var insufficientData = "FALSE";
var incorrectDataLog = "Incorrect Data: \n";
while (parser.next()) {
    var row = parser.getRow();

    if (JSON.stringify(row, removeNullValues) === "{}") {
        continue;
    }

    for (var header in mandatoryHeaders) {
        var currentHeader = mandatoryHeaders[header];

        if (JSUtil.nil(row[currentHeader])) {
            incorrectDataLog += "Row " + rowNumber + " - No value provided for mandatory column: " + currentHeader + "\n";
            insufficientData = "TRUE";
        }

        if (checkReference(currentHeader, row[currentHeader]) === "NoReference") {
            incorrectDataLog += "Row " + rowNumber + " - Referenced value " + row[currentHeader] + " does not exist for mandatory column: " + currentHeader + "\n";
            insufficientData = "TRUE";
        }

    }
    rowNumber++;
}

function removeNullValues(key, value) {
    if (value != null) {
        return value;
    }
}

if (insufficientData !== "TRUE") {
    incorrectDataLog = "CorrectData";
}
gs.info(incorrectDataLog);


function checkReference(cellHeader, cellData) {
    if (cellHeader == "Display name") {
        var grModel = new GlideRecord("cmdb_model");
        grModel.addQuery("display_name", cellData);
        grModel.query();
        if (!grModel.hasNext()) {
            return "NoReference";
        }
    }
    if (cellHeader == "Model category") {
        var grModelCategory = new GlideRecord("cmdb_model_category");
        grModelCategory.addQuery("name", cellData);
        grModelCategory.query();
        if (!grModelCategory.hasNext()) {
            return "NoReference";
        }

    }
    return "ReferencedRecordFound";
}
If you dont have any idea about how json works or why we have written the code, I highly recommend you to checkout my post on community - What You Need To Know About JSON And Objects.
Building a Data Source and Transform Map
So we have our script to validate the Excel sheet. But, we did not do anything for loading the excel data to the platform. Let's build a data source and transform map, which we can use later in our script to automate the process.
-
Navigate to All > System Import Sets > Administration > Data Sources and Click New.

-
Provide some meaningful Name & Import set table label. Select other details as below before clicking Submit:
- Type: File
- Format: Excel
- Sheet number: 1
- Header row: 1
- File retrieval method: Attachment

-
You will be navigated back to list view. Open the recently created Data source record.

-
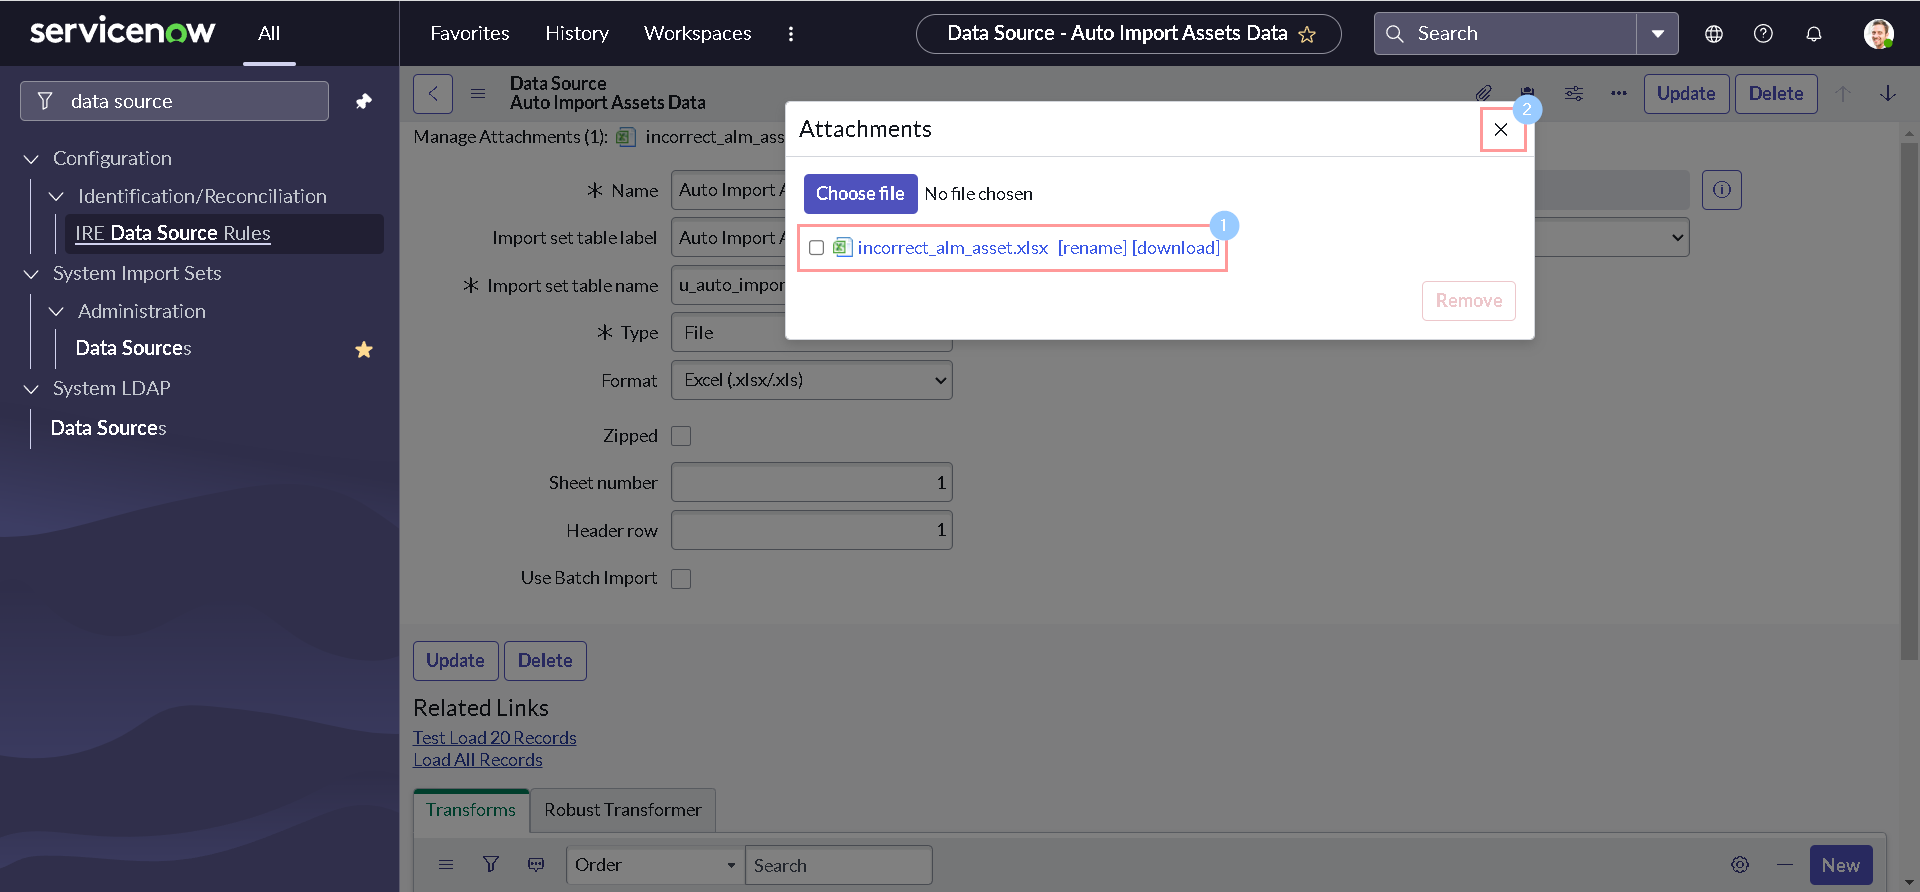
Add our demo sheet as an attachment to the current record.
-
Click Test Load 20 Records related link at the bottom of the form.
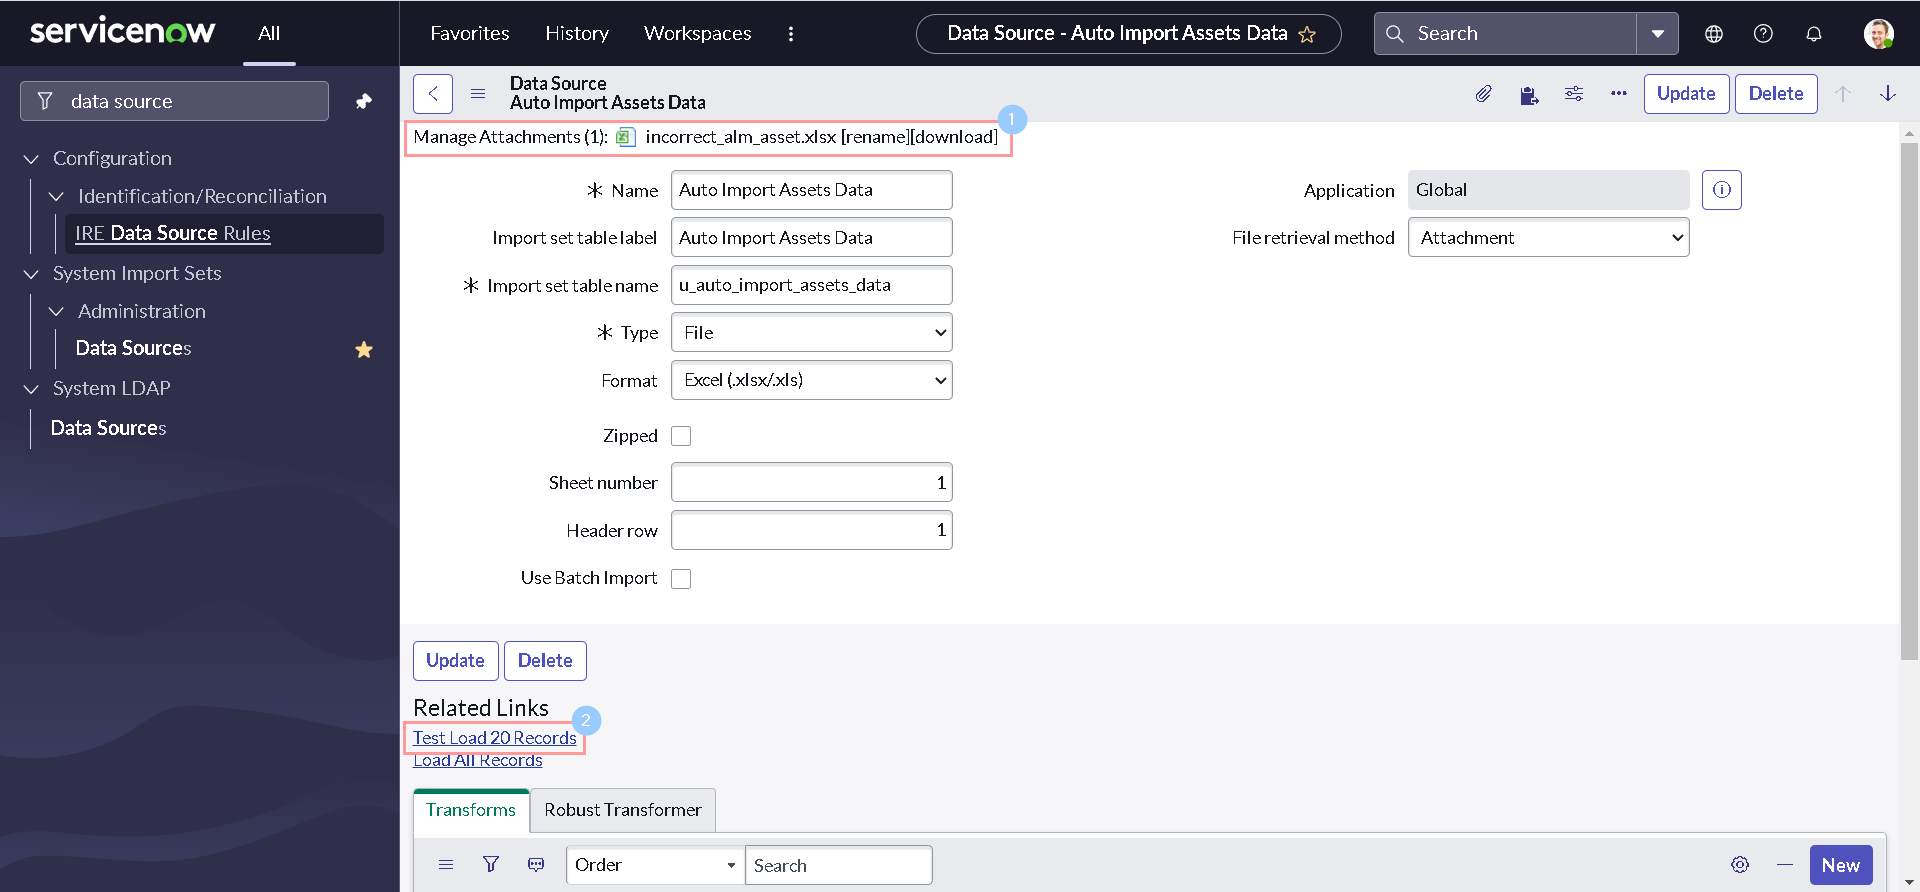
The Test Load 20 Records UI action is generally used to validate the records that you want to import without the initial intention of running a transformation map to the target table. This action sets the internal state of the import to Load, therefore the transformation map is skipped. There are two good articles regarding this on NowSupport & Community that you must read.
-
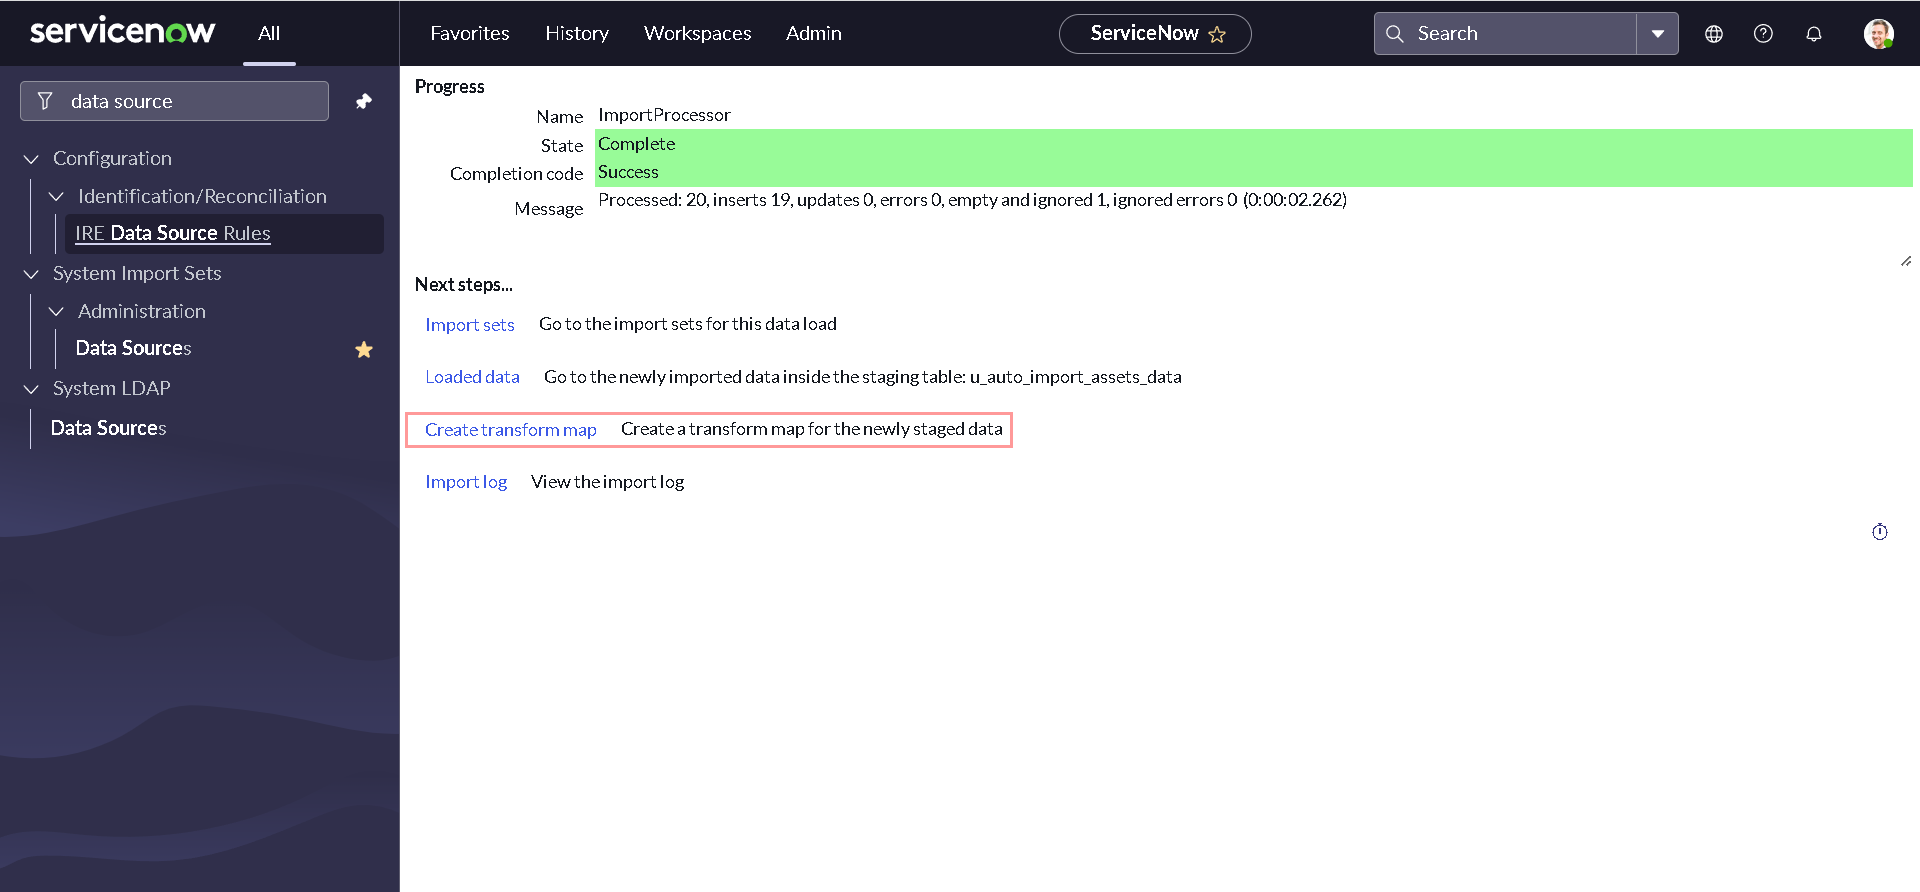
Once data is loaded, click the Create transform map link.
-
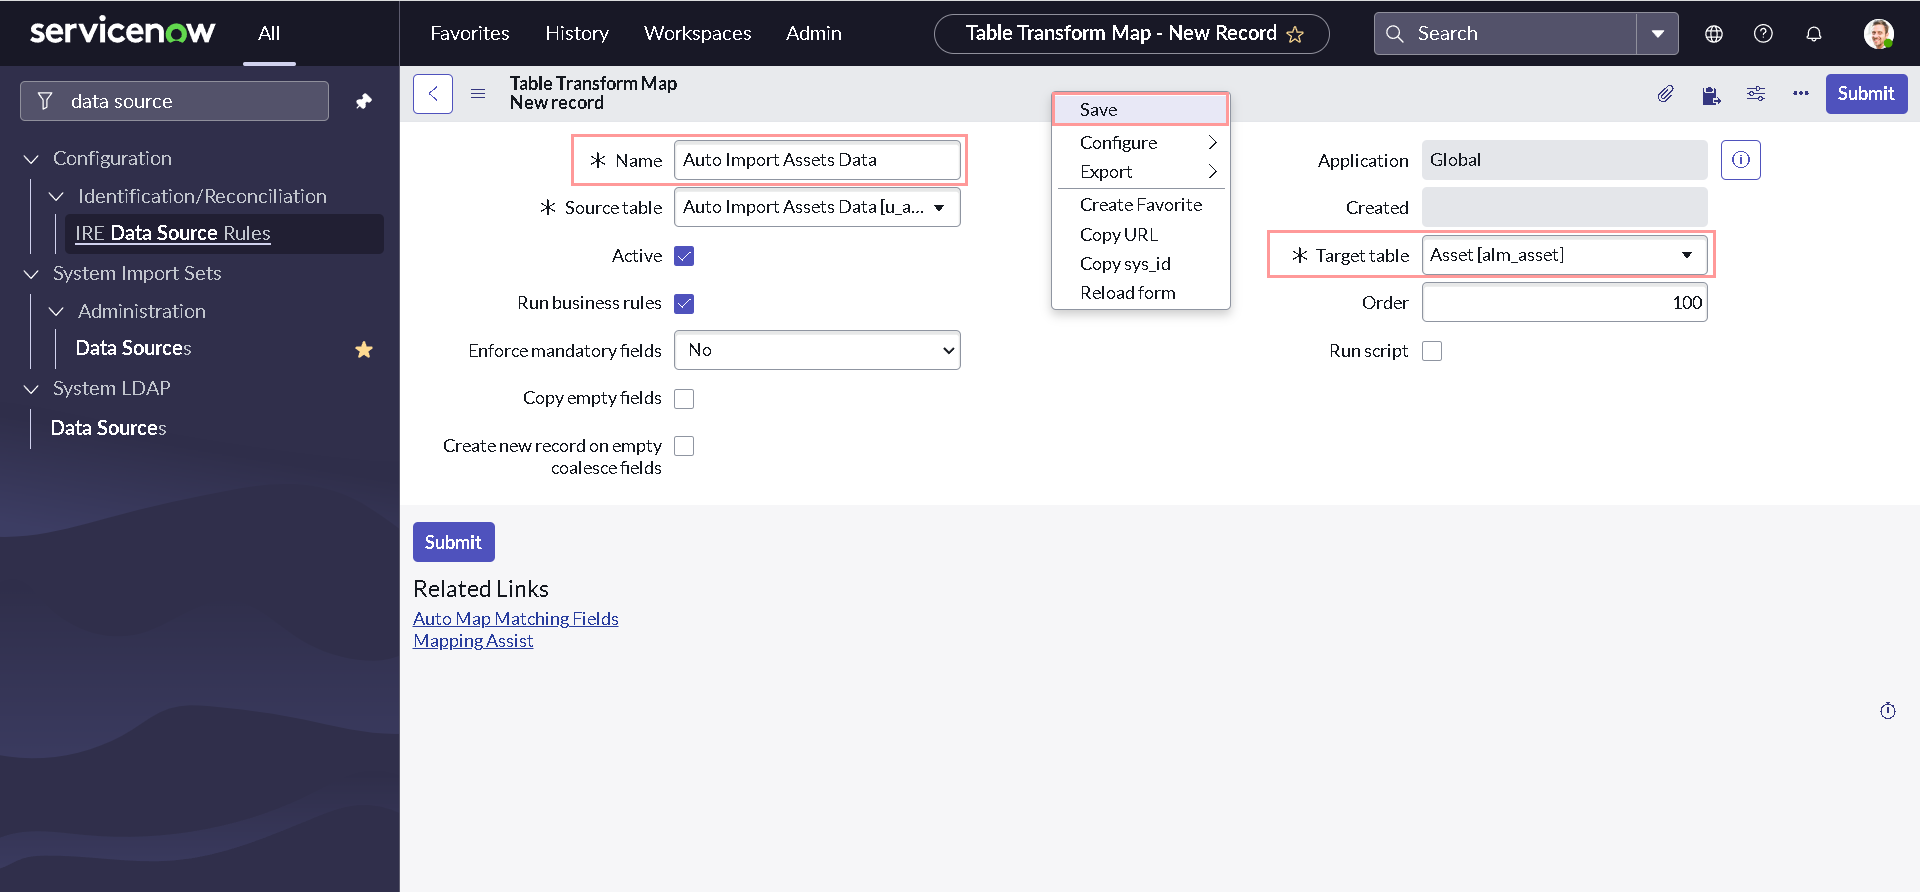
Provide some meaningful Name and Select the Target table as Asset, then right click on the form header and select Save.
-
Click the Auto Map Matching Fields Related Link for ServiceNow to attempt to match the staging table columns to the target table columns based on column name.
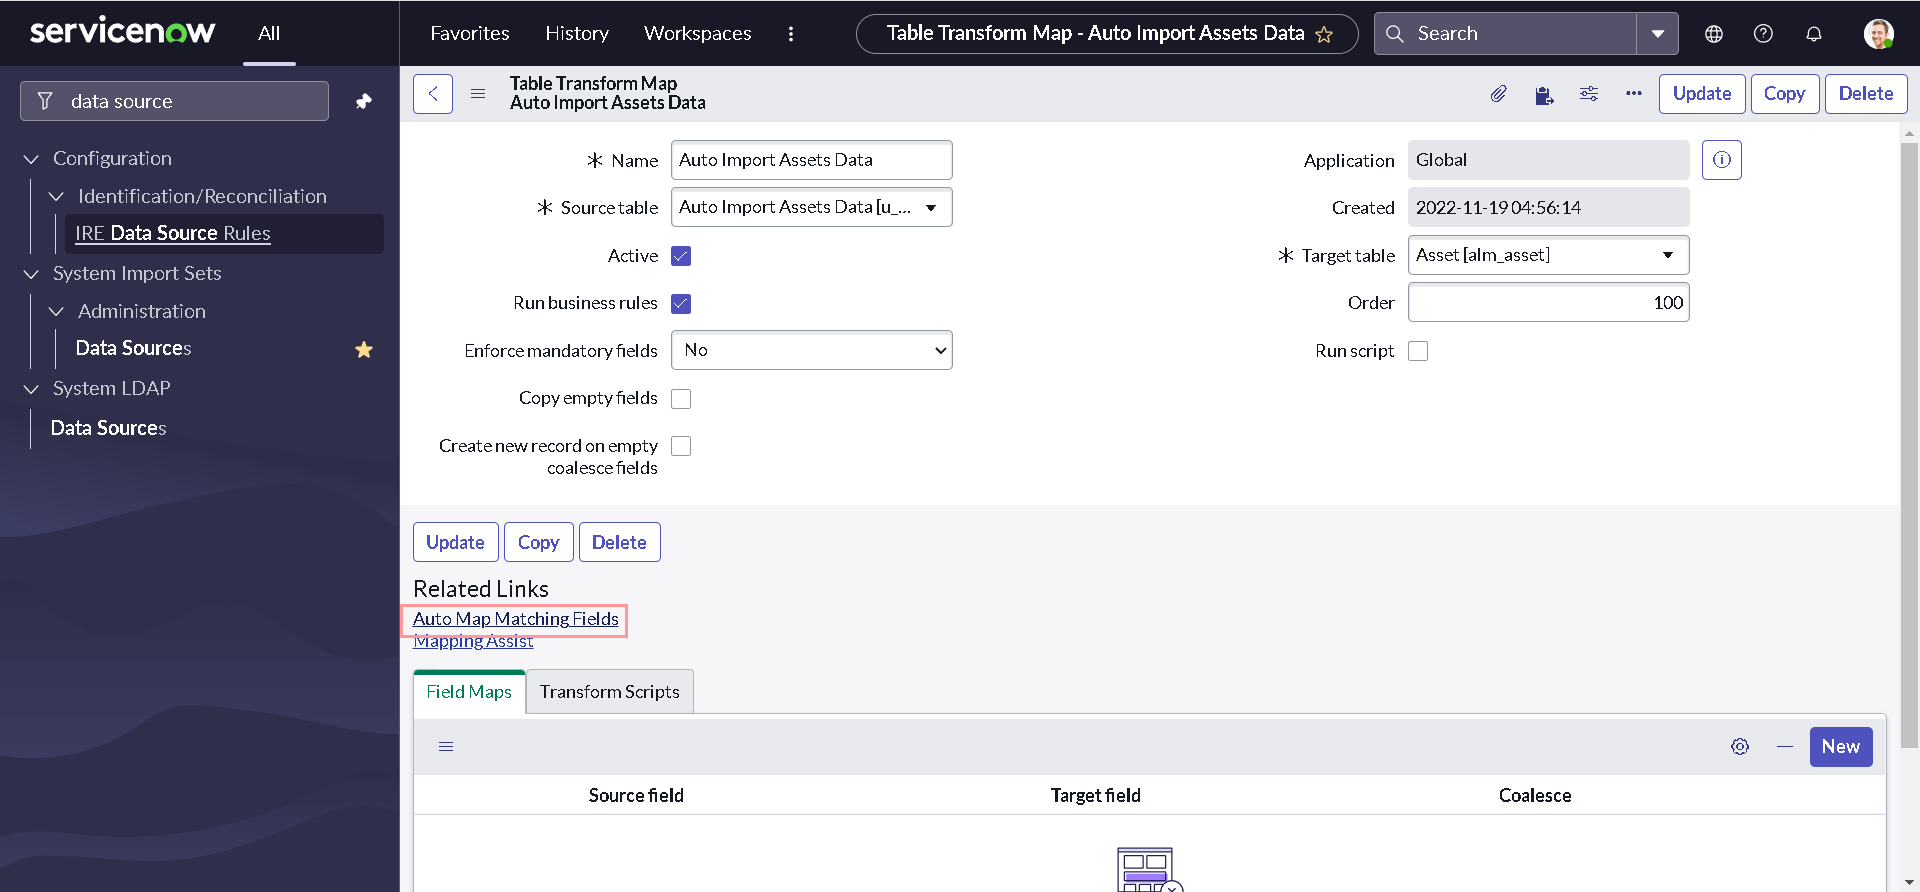
-
Set the Coalesce value to true to use an Asset tag field to check for collisions.
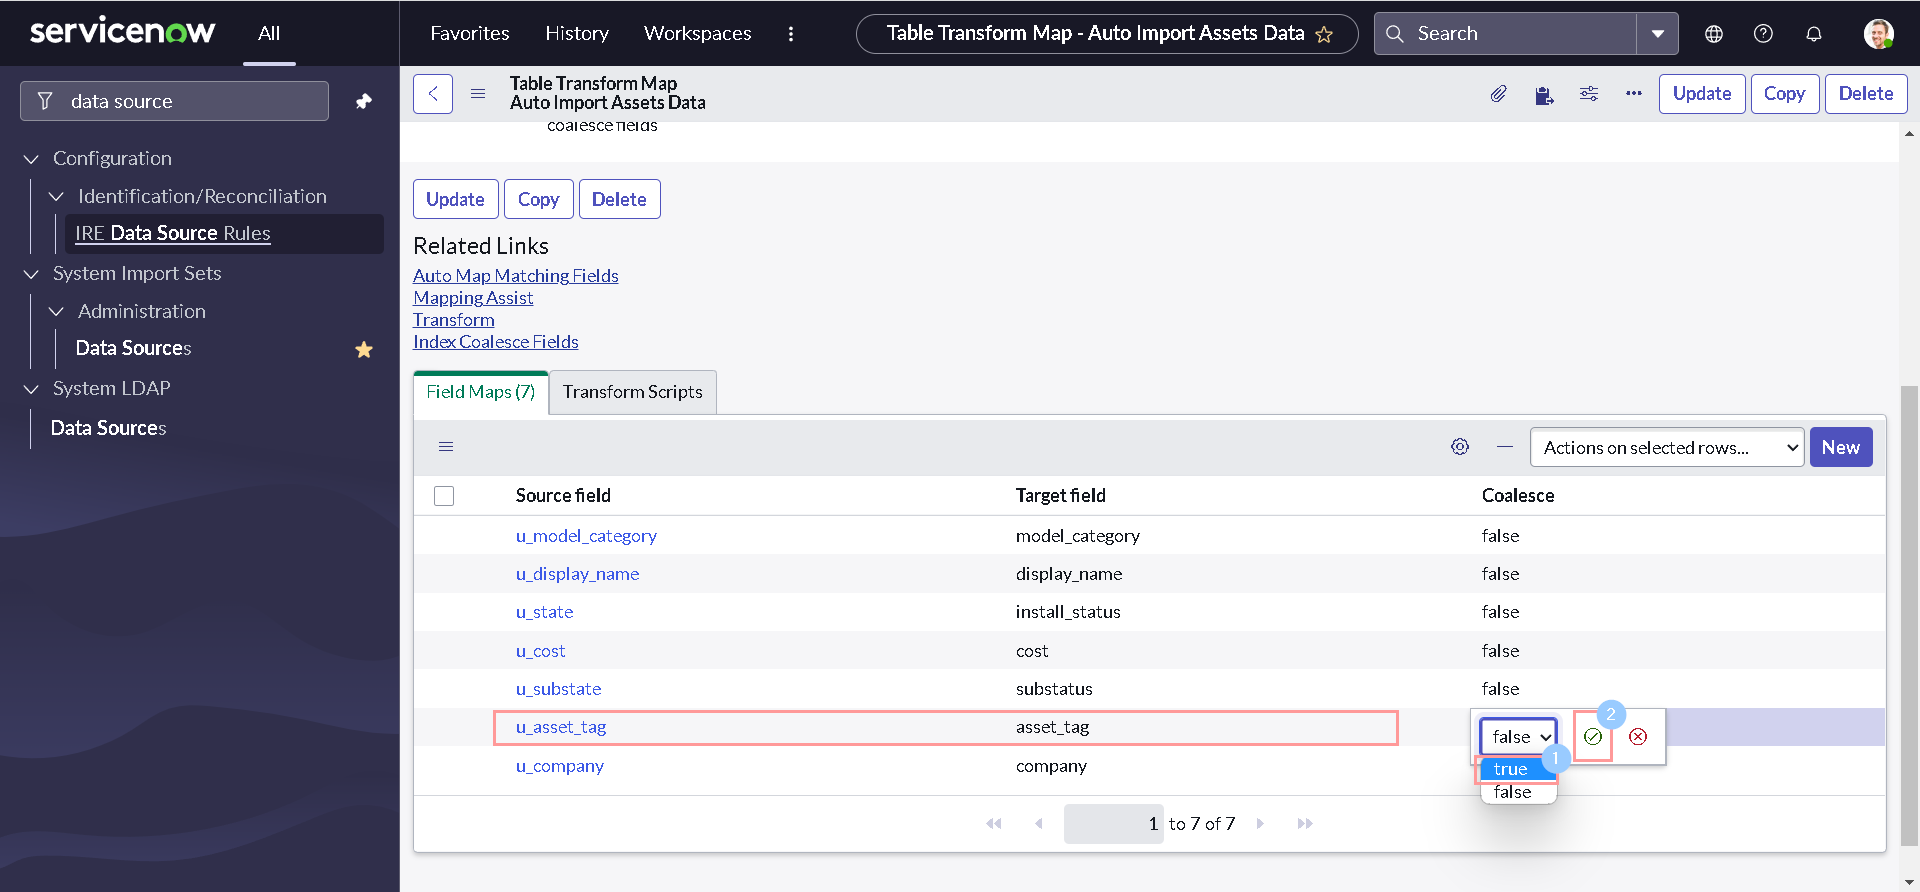
If a match is found using the coalesce fields, the target record is updated with the information imported from the staging table. If no match is found, a new record is inserted in the database. If no fields are coalesce fields, records are always inserted on import. You can read more about coalescing on developer portal.
- Note down the Import set table name from data source and SysID of recently created transform map for later reference (we need it!).
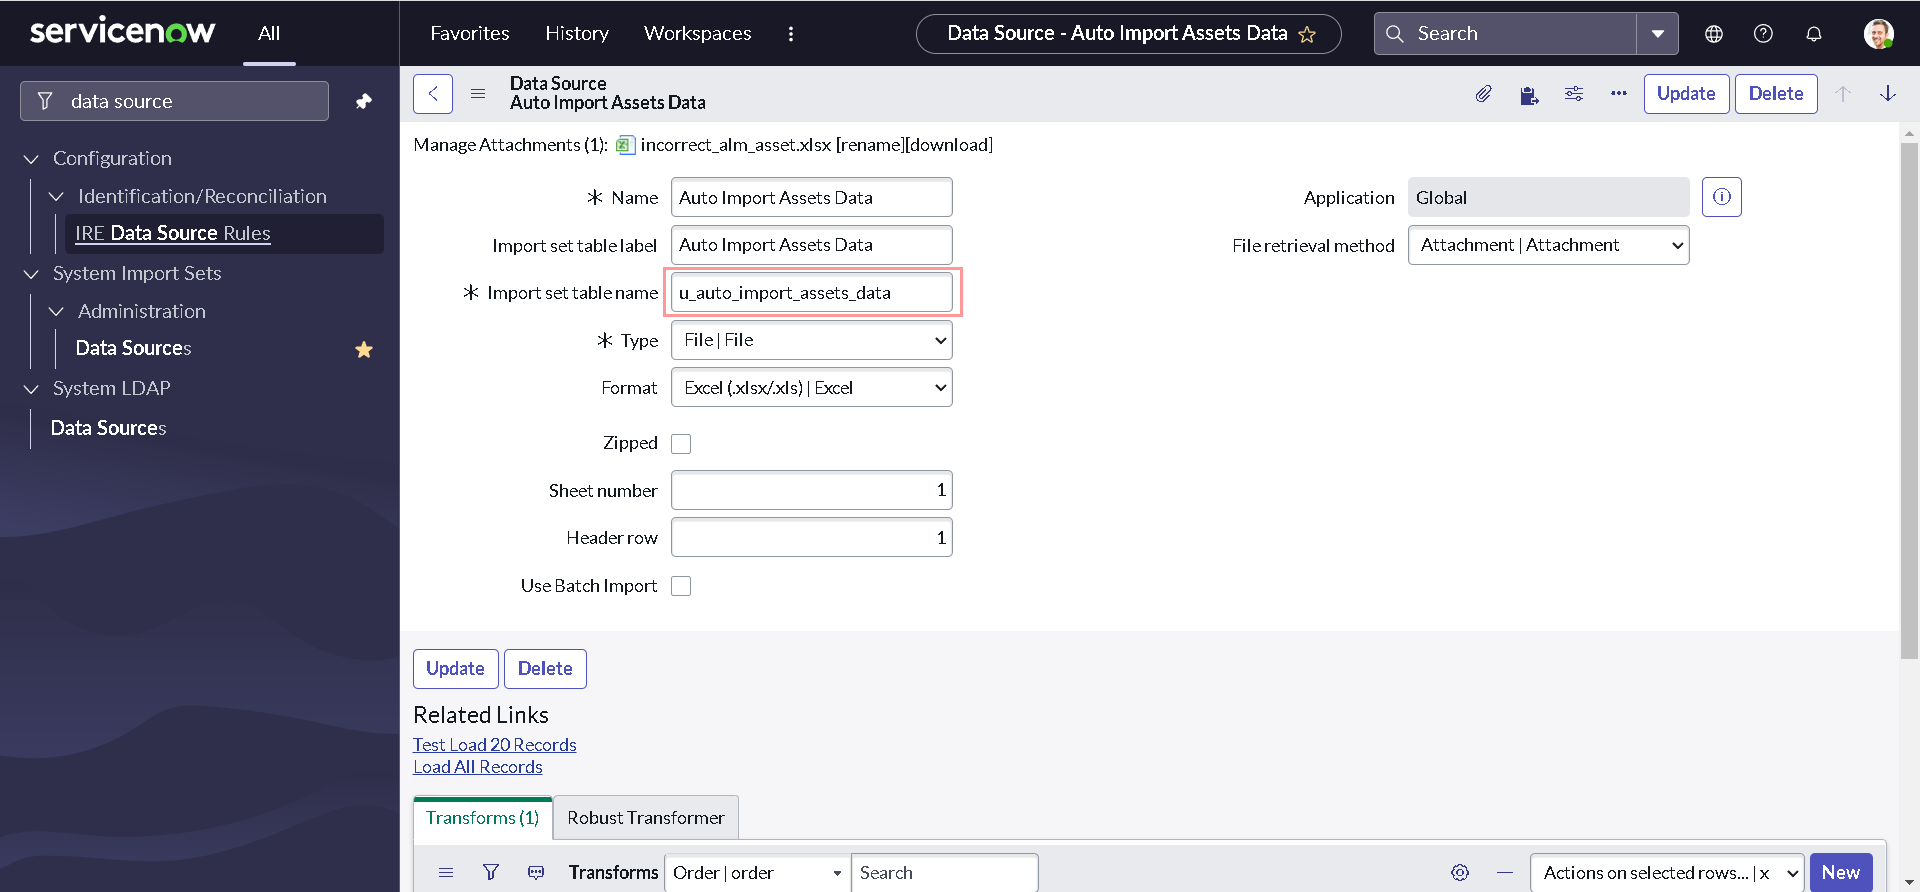
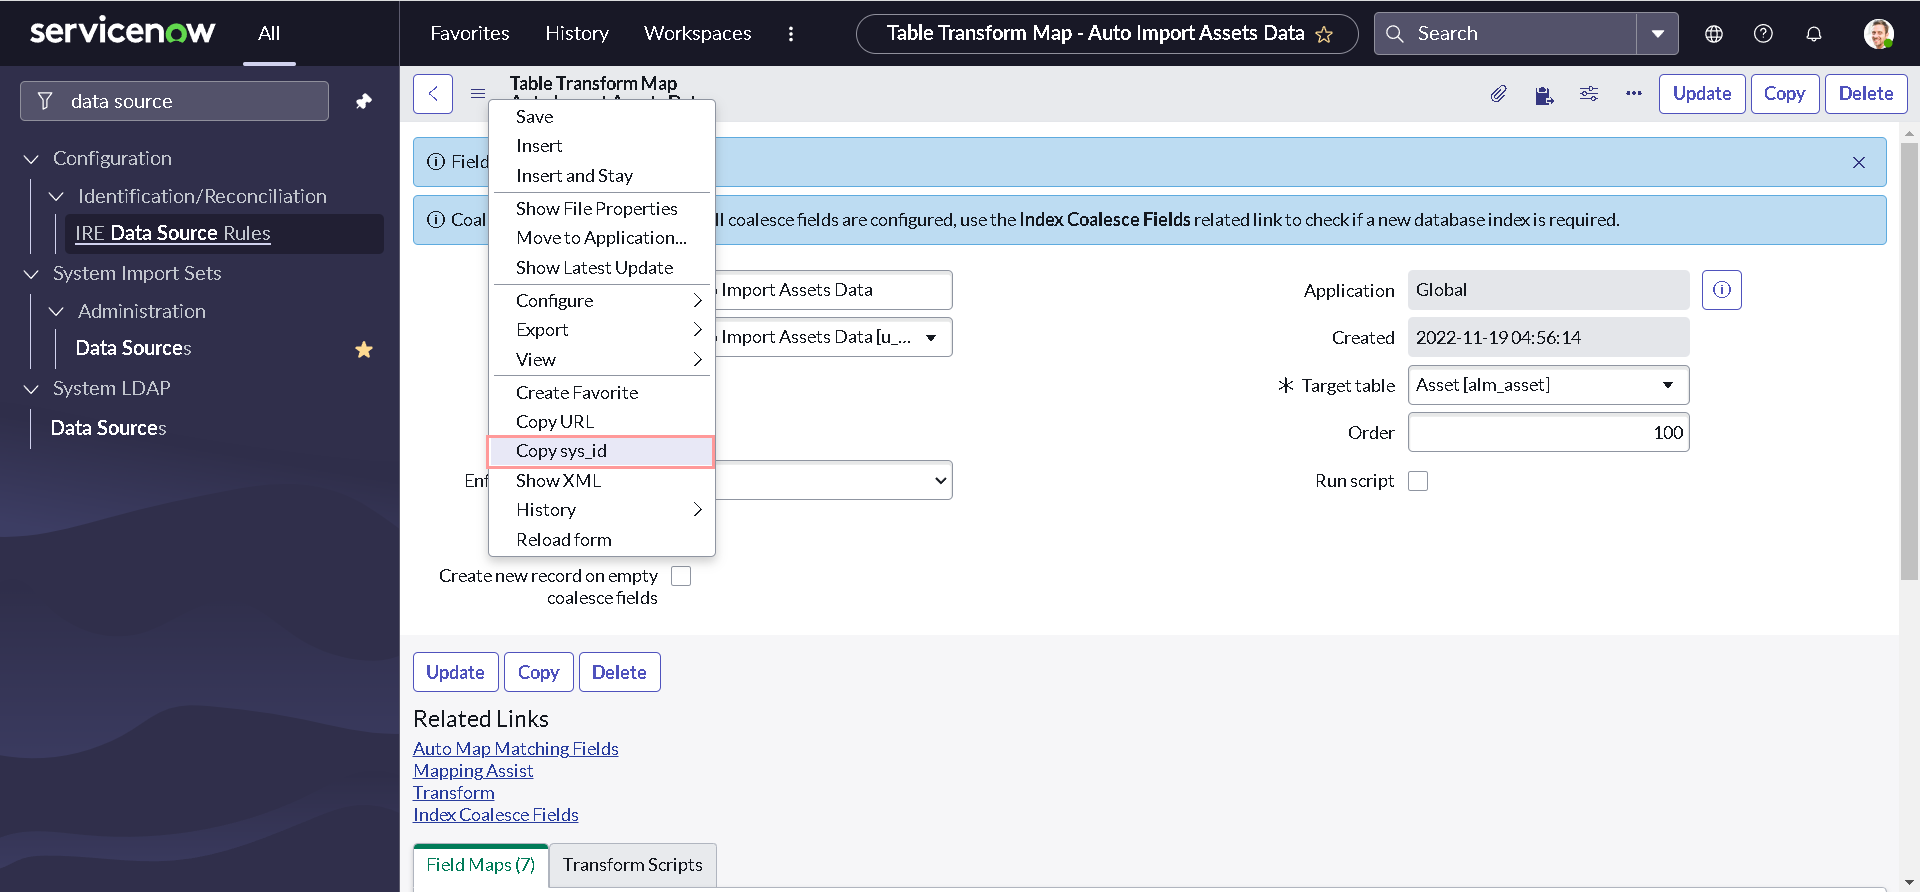
If you did not use data source or transform map earlier Importing Data is a good place to start.
Building Catalog item and Workflow
Now that we have all pre-requisites (a validation script, a data source and a transform map), we can go ahead and create a Catalog item to realize our business requirement.
-
Navigate to Service Catalog > Catalog Definition > Maintain Items & Click New.
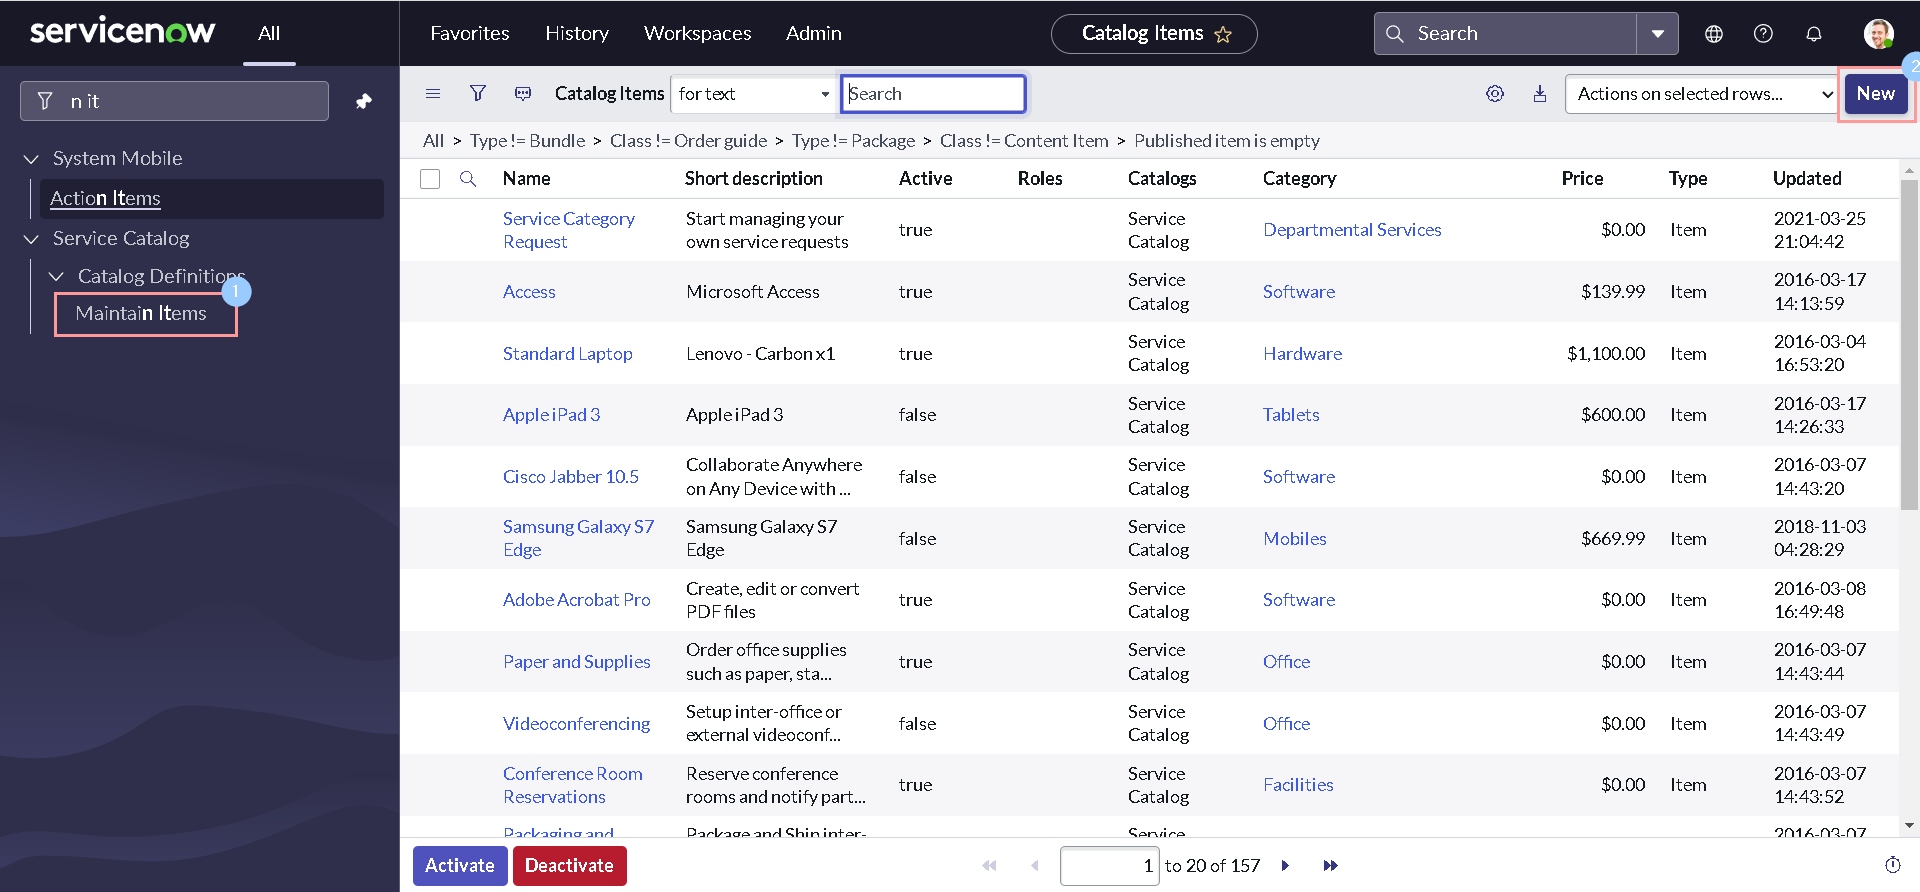
-
Provide some meaningful Name, Short Description & Description. Select other details as below and Save the form:
- Catalogs: Technical Catalog
- Category: Infrastructure
- Fulfillment automation level: Fully automated
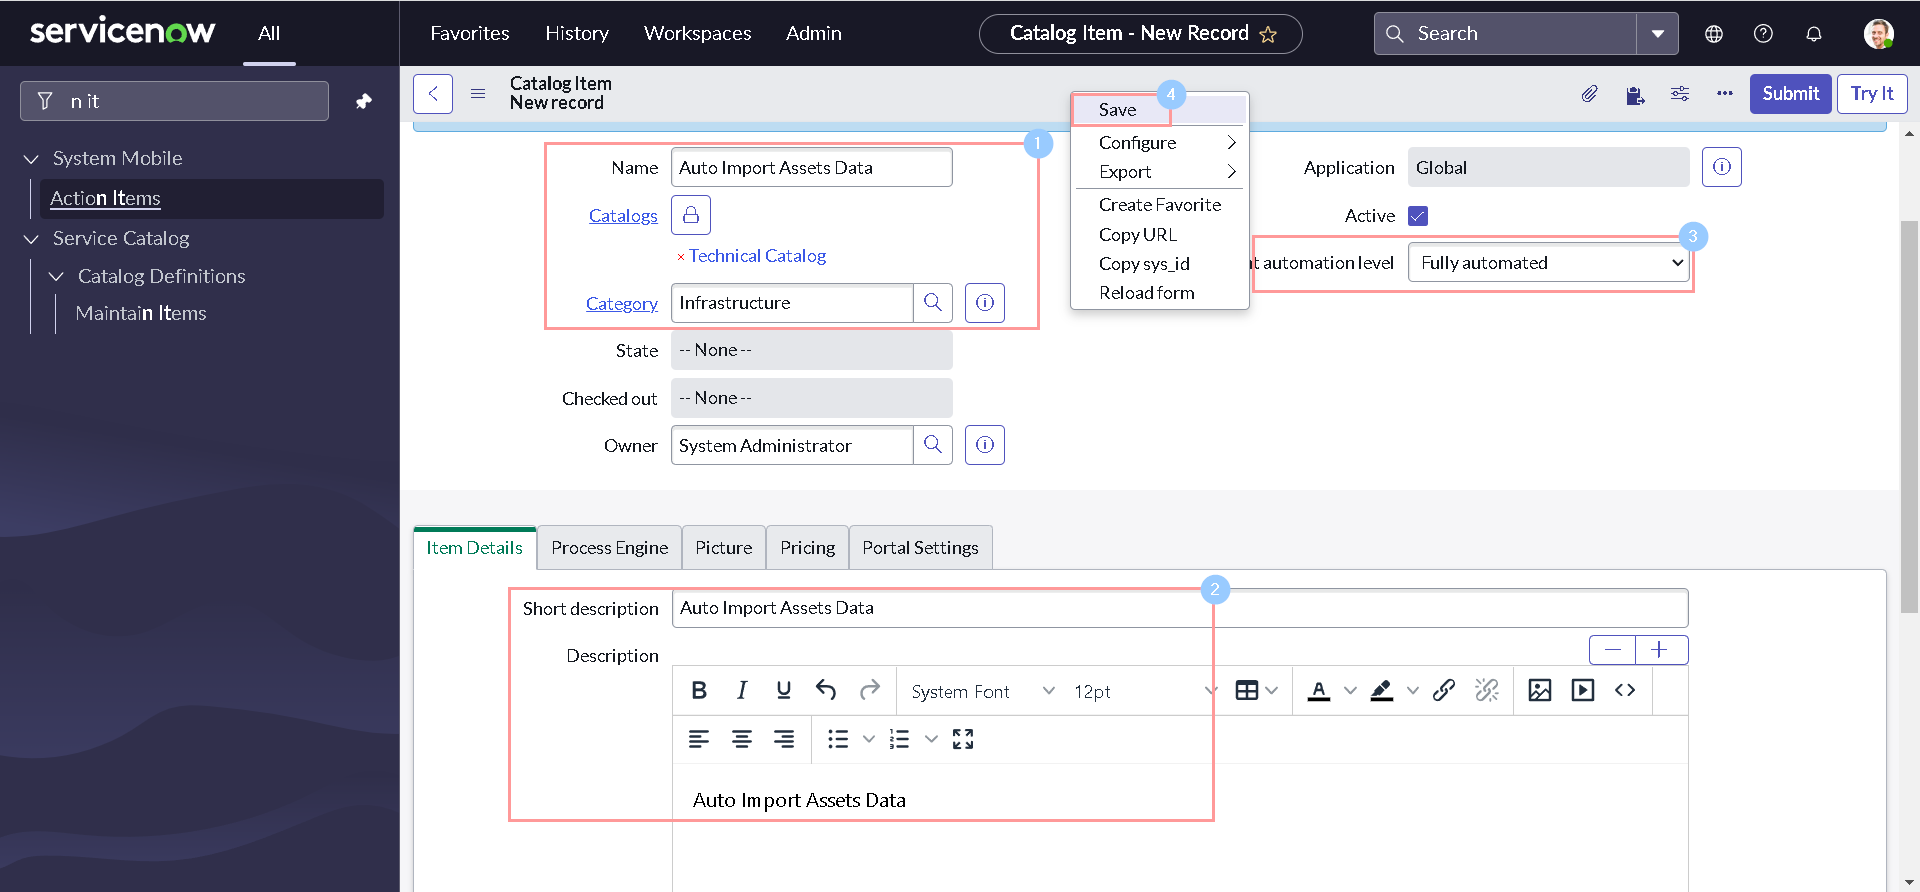
-
Under Portal Settings section, Select Request method as Submit and mark Hide 'Add to Wish List' & Mandatory Attachment as checked.
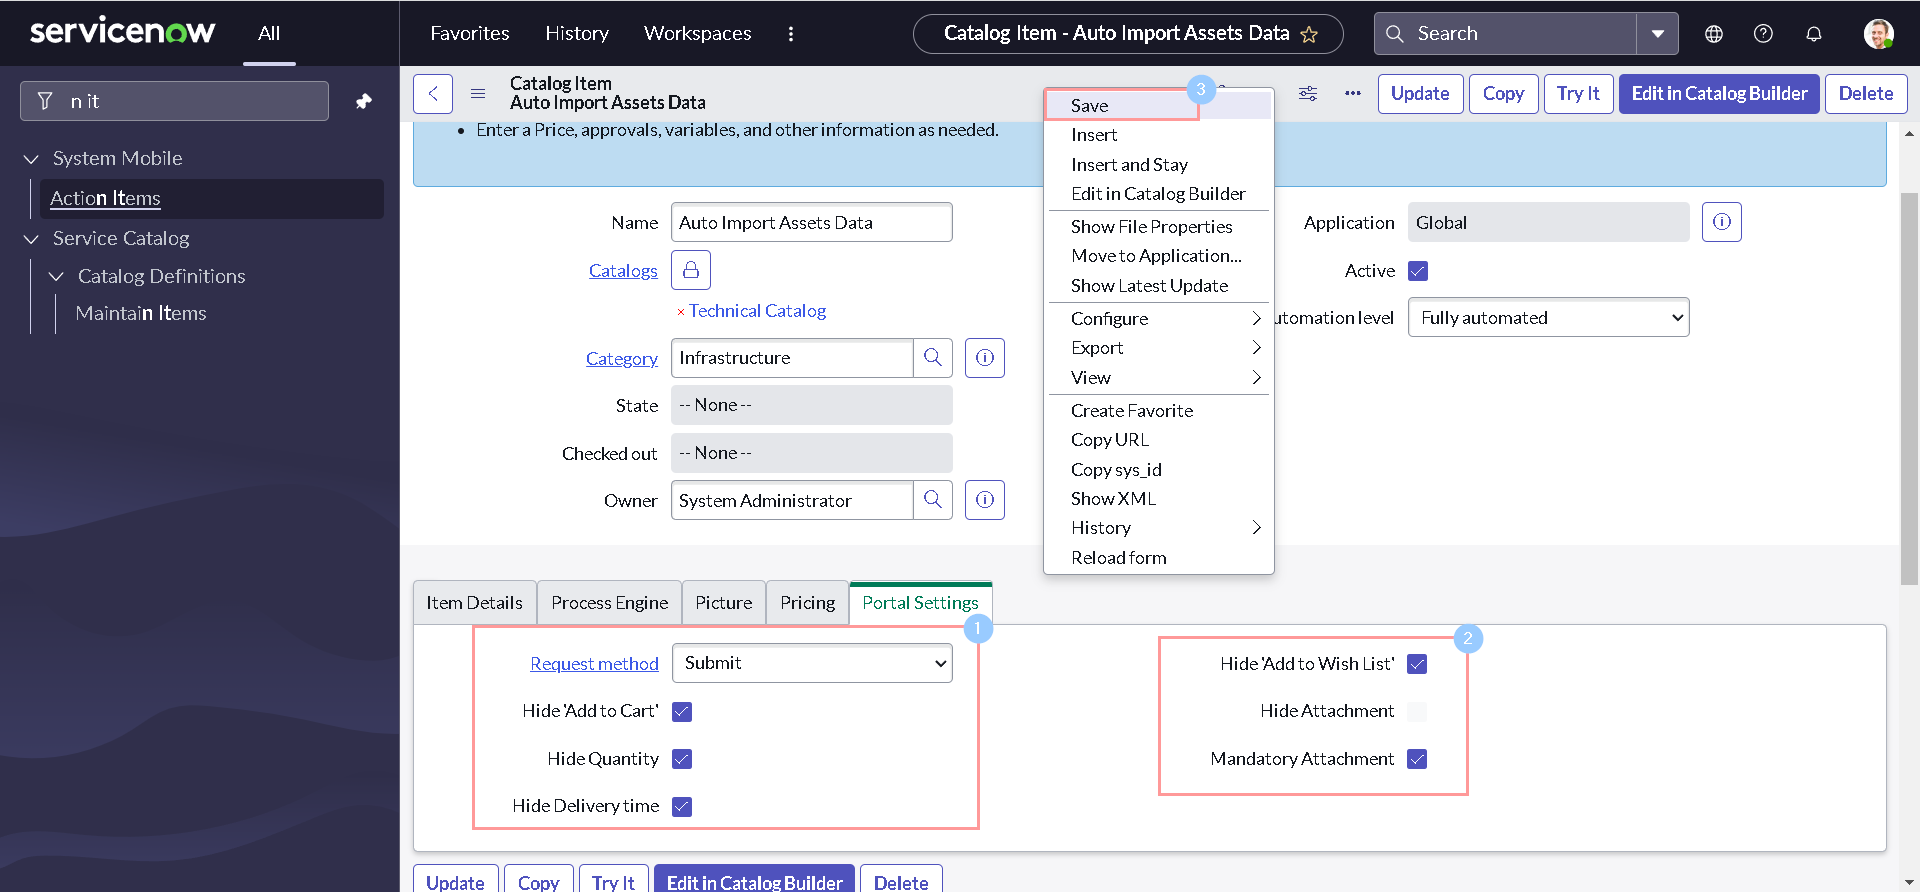
-
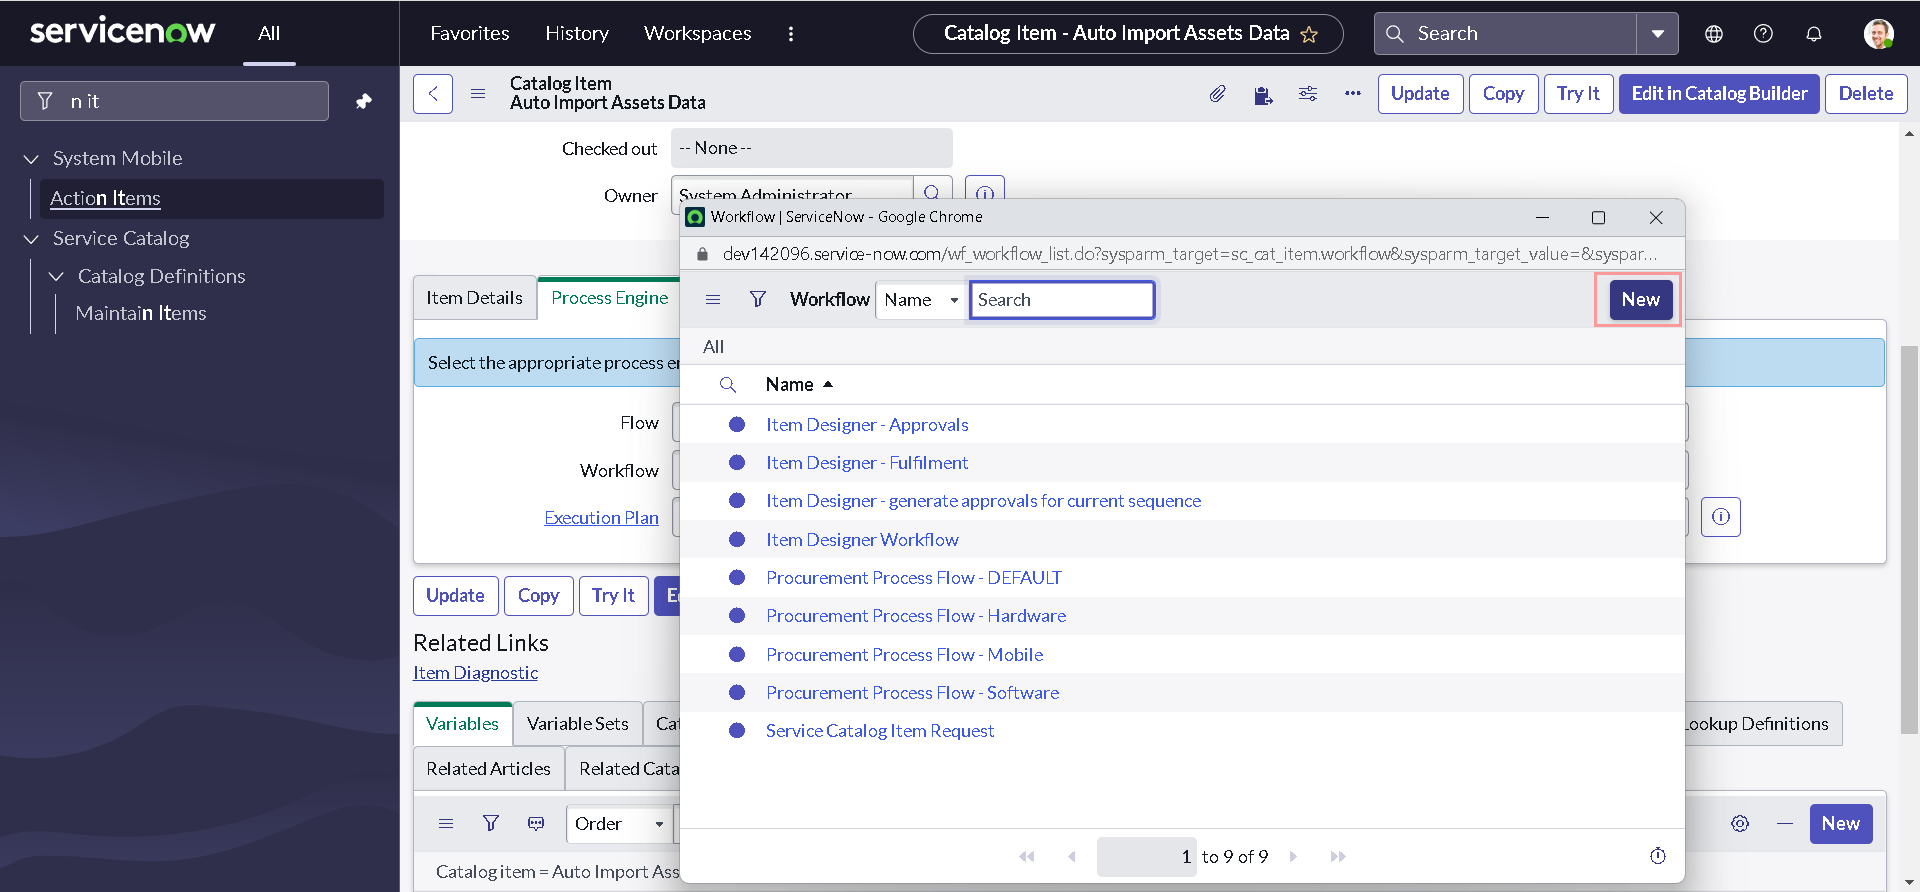
Under Process Engine, click the magnifying glass besides Workflow field.
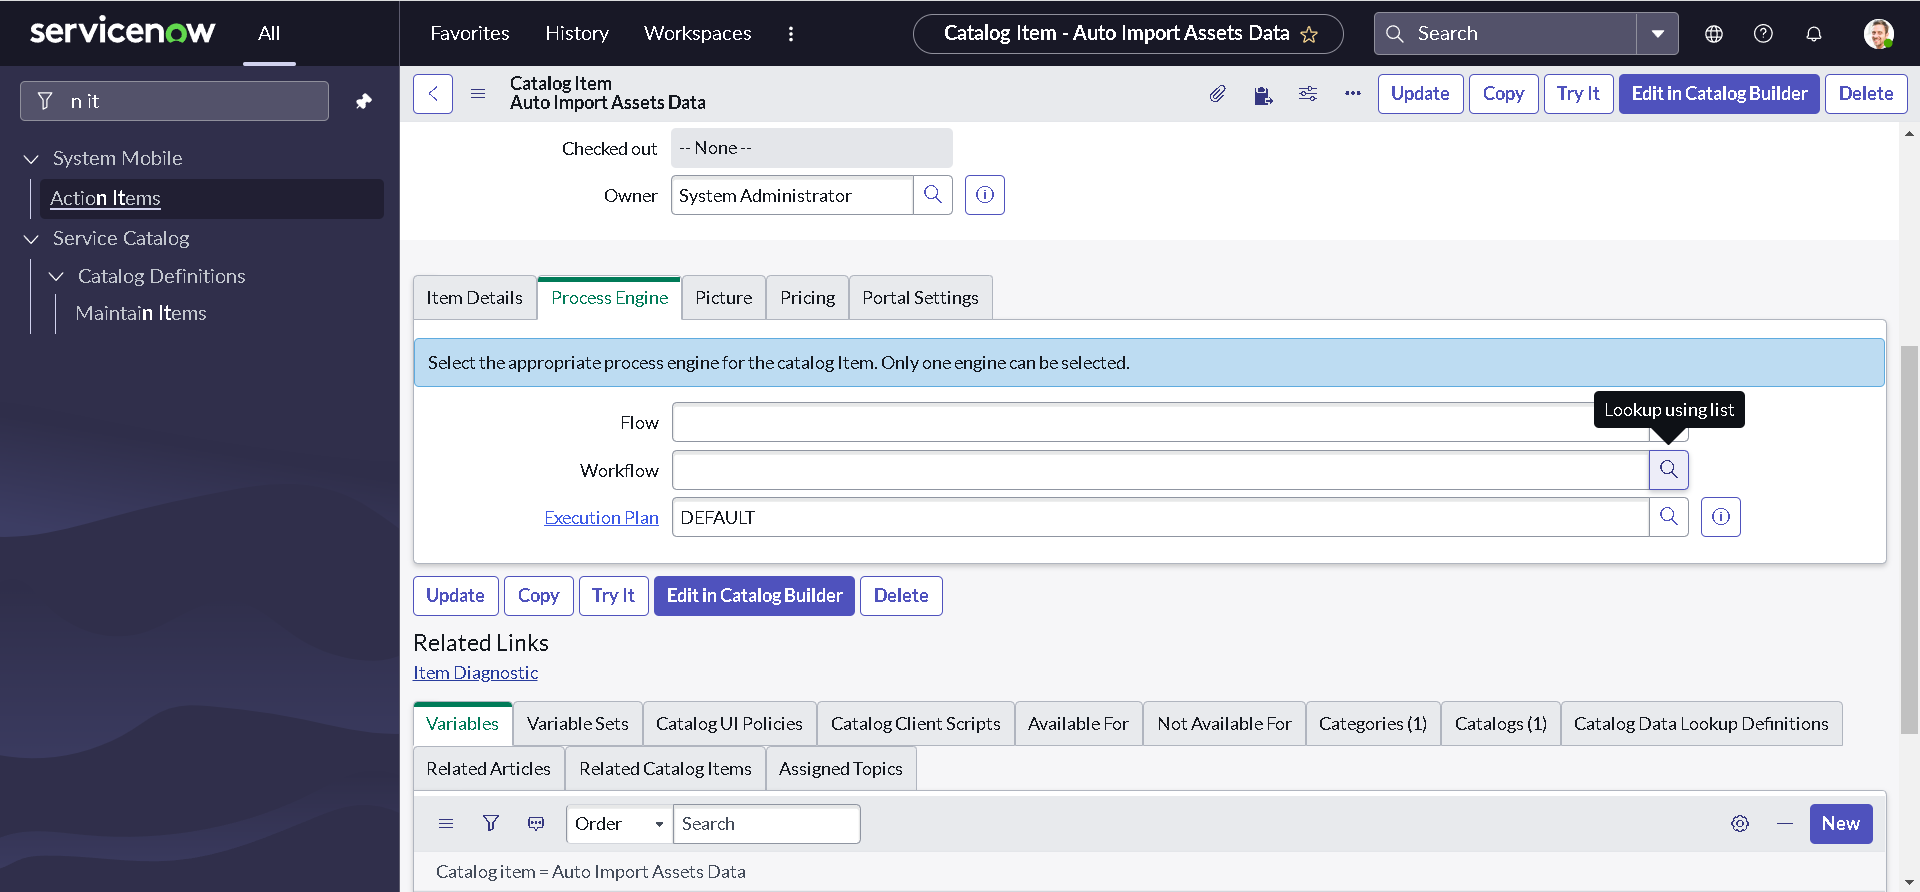
-
Click New
-
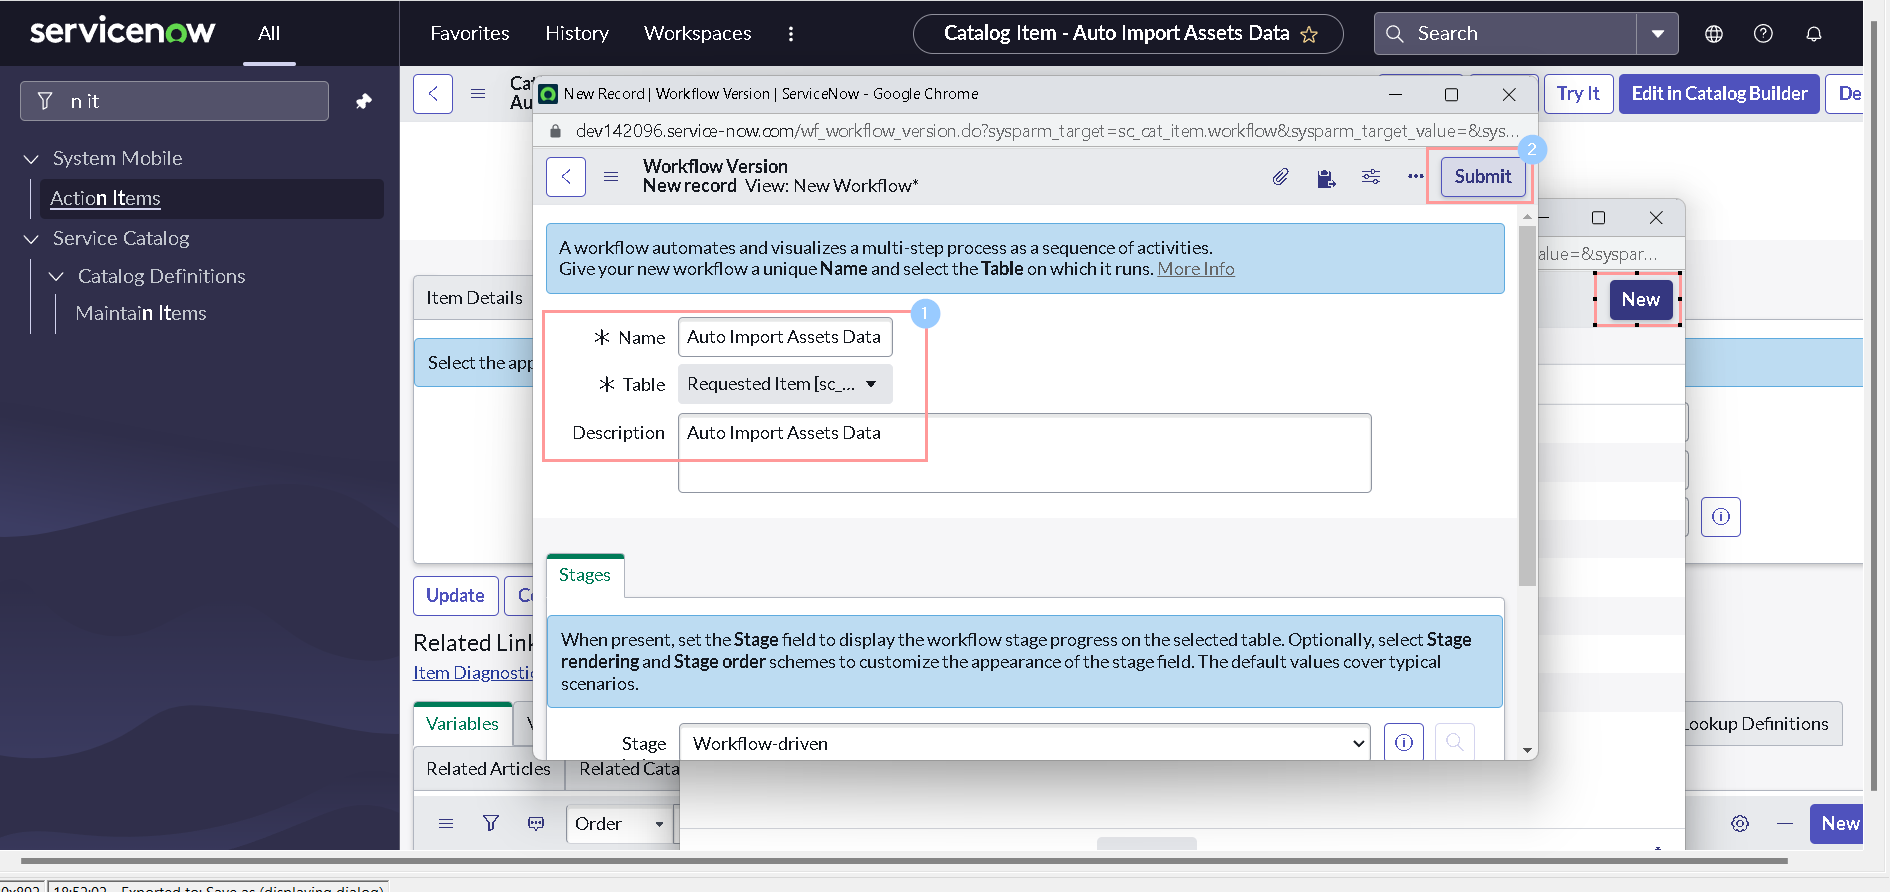
Provide some meaningful Name and Description and click Submit.
-
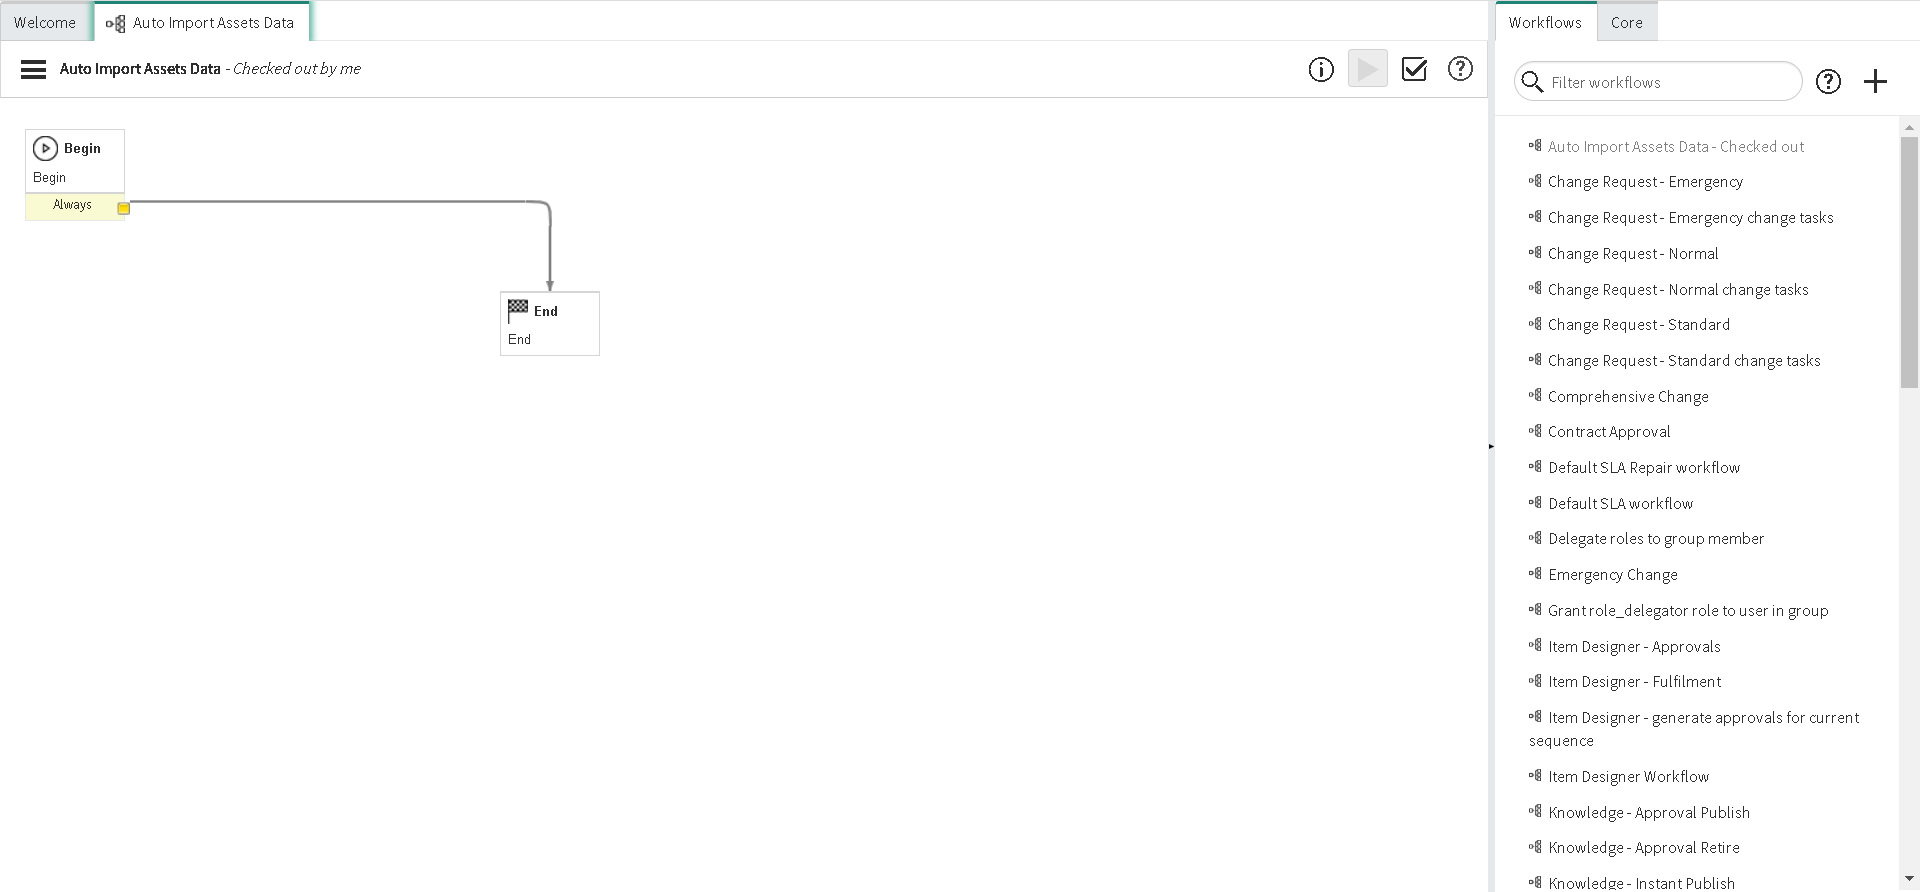
The new workflow is created with the Begin and End activities connected by a single transition.
-
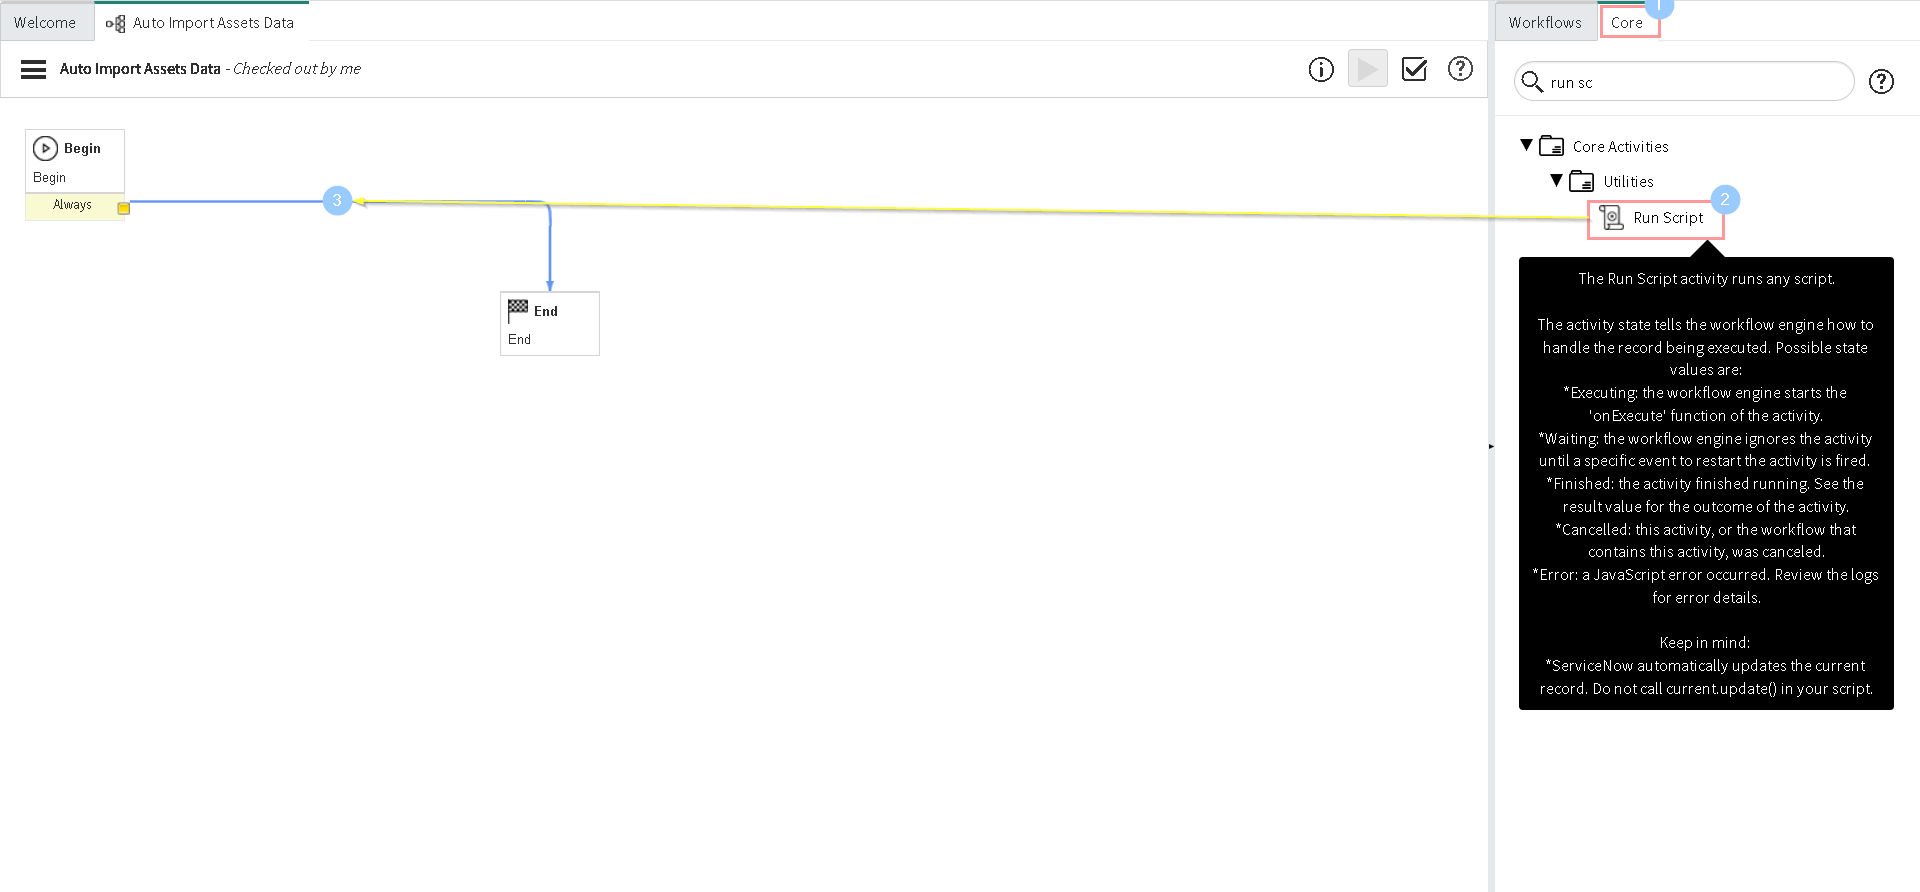
Switch to the Core tab in the Palette. Click, hold, and drag the Run Script activity onto the canvas. Hover the activity over a transition. When the transition turns blue, drop the activity.
-
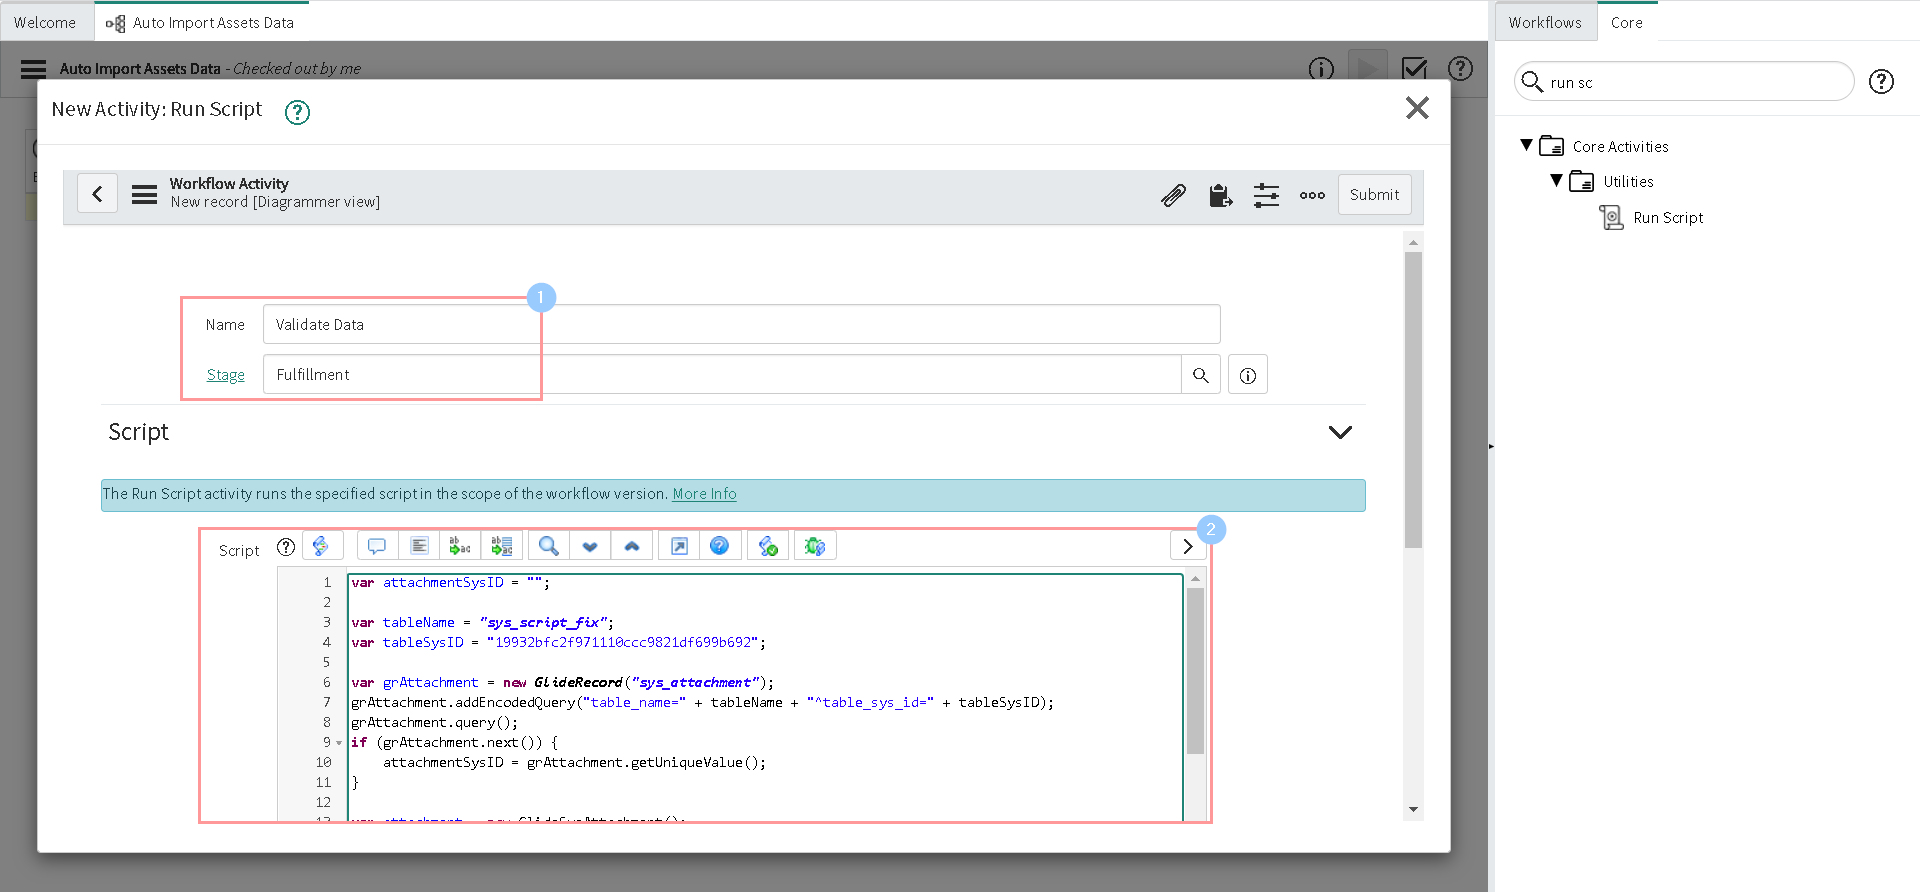
Add some meaningful Name and Stage. Then Copy the final fix script created in first step and paste here in the Script field.
-
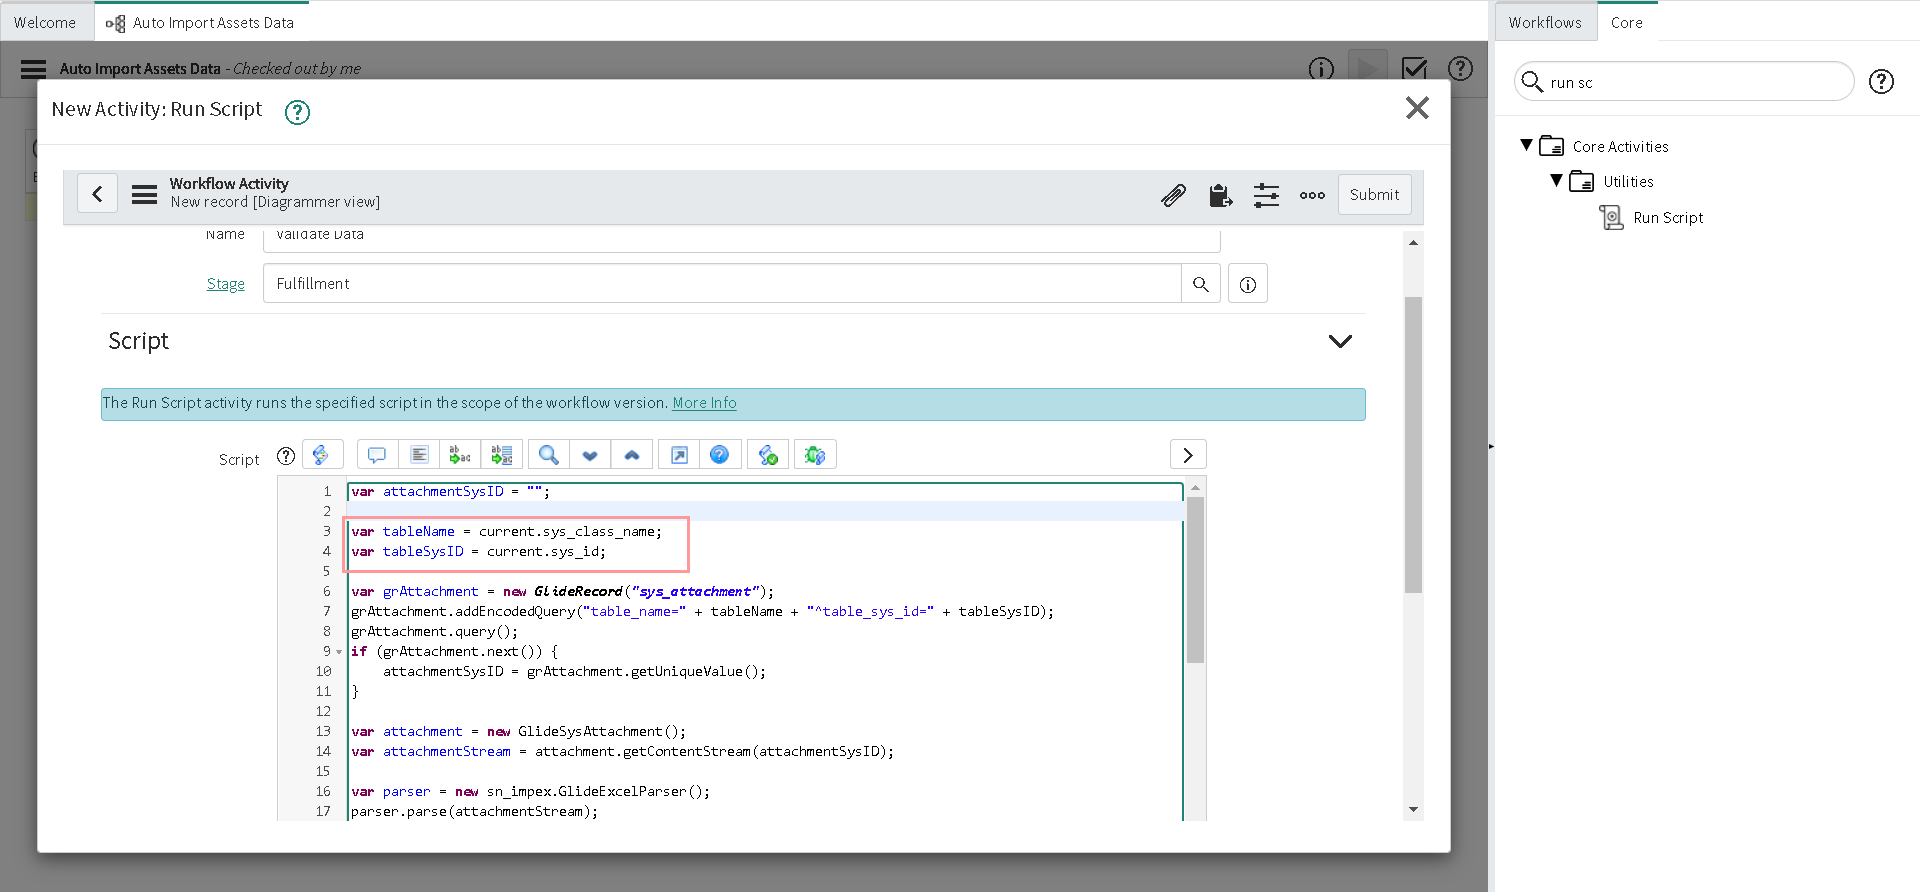
Change the values of variable tableName & tableSysID as below:
var tableName = current.sys_class_name;
var tableSysID = current.sys_id;
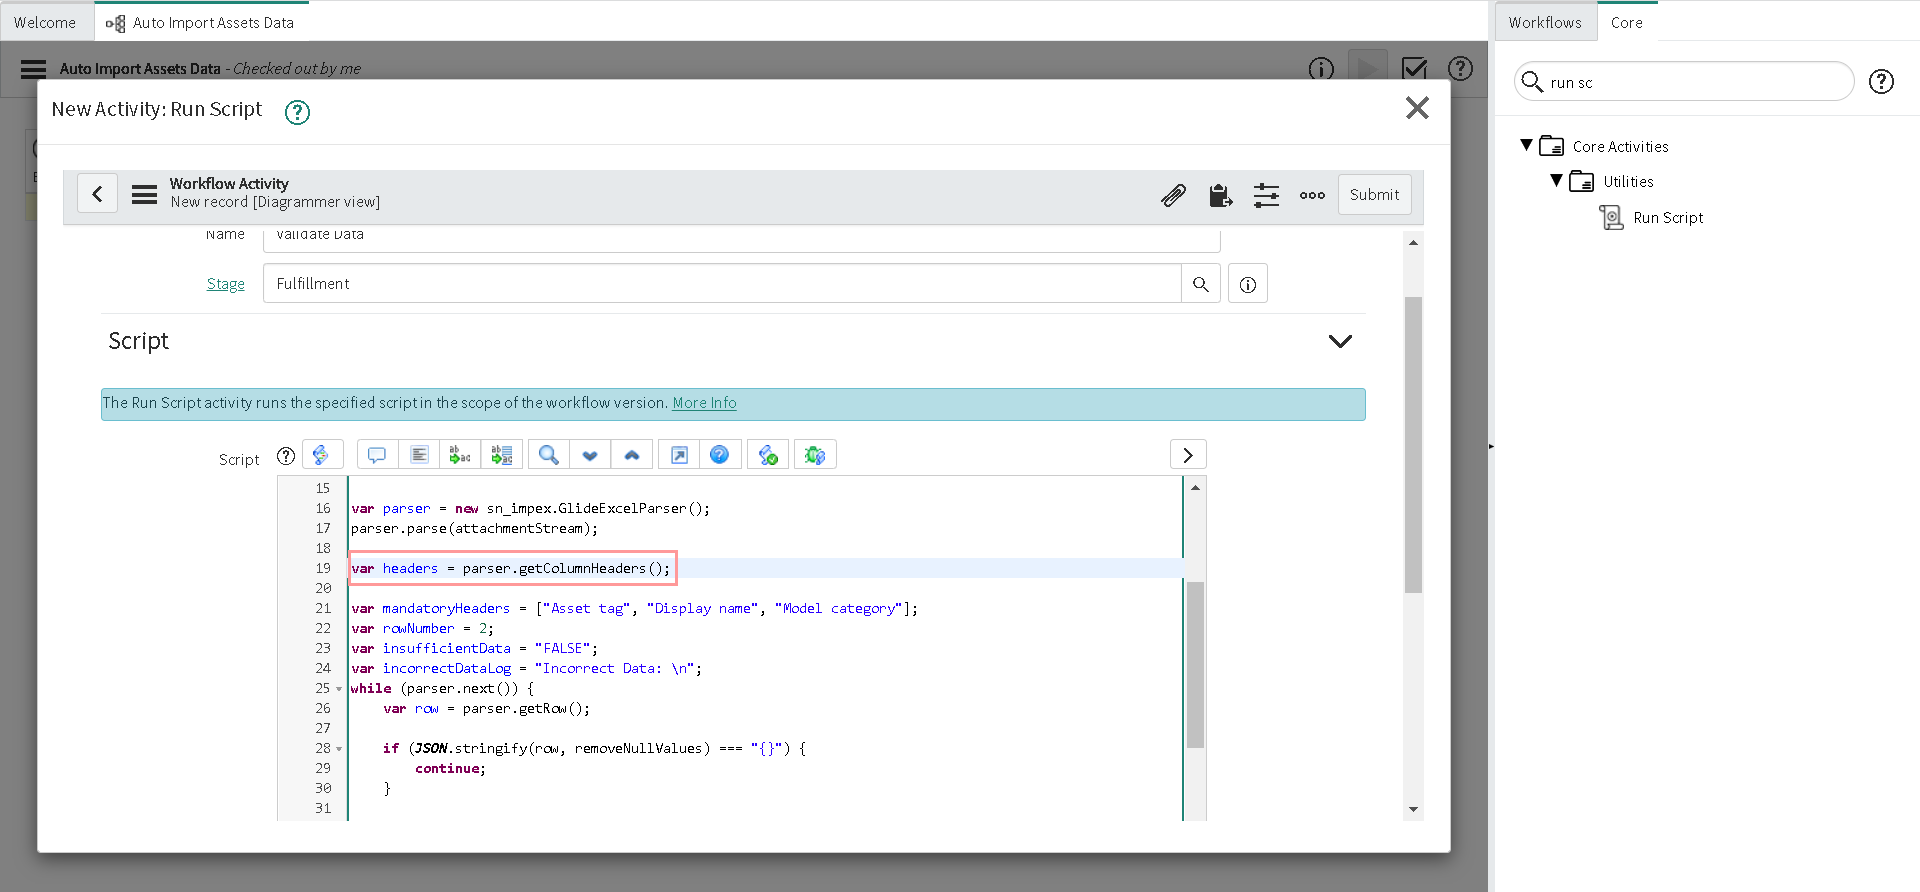
- Since we already know the list of mandatory columns to be validated; Let's remove the following line of code as we are not going to need it.
var headers = parser.getColumnHeaders();
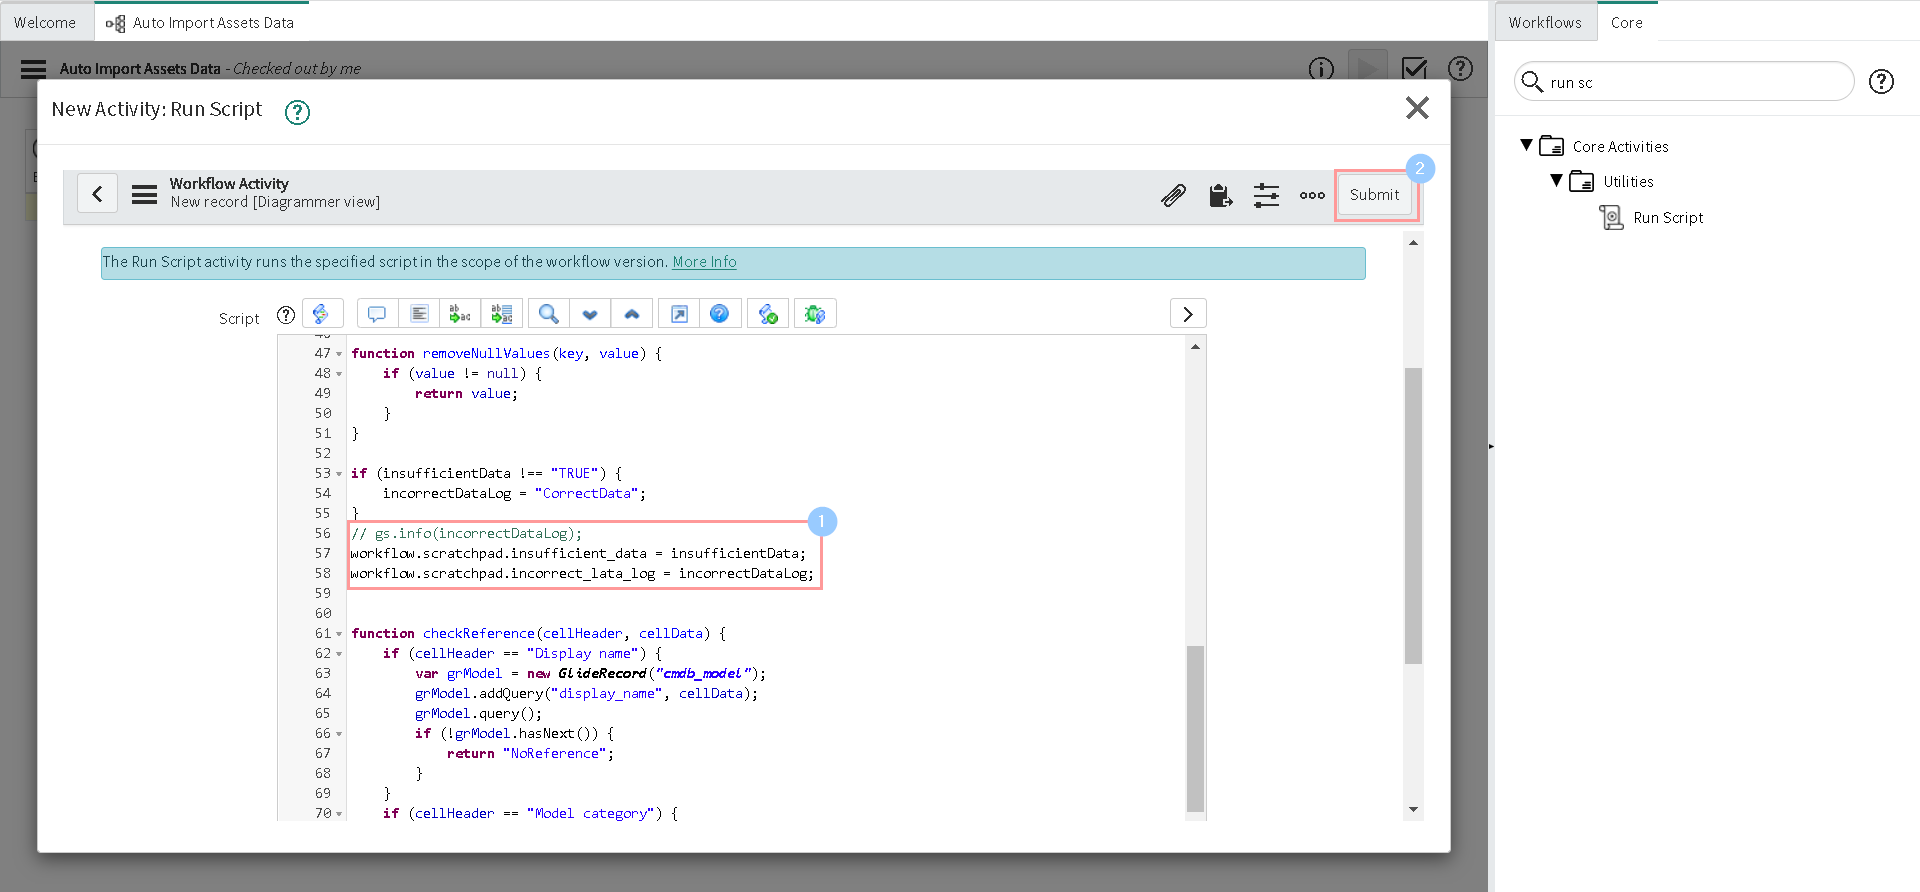
- Let's comment the log statements and add the following line of code at the end of the script, to store the additional comments in the scratchpad if data is not sufficient or incorrect. Then Click Submit.
workflow.scratchpad.insufficient_data = insufficientData;
workflow.scratchpad.incorrect_lata_log = incorrectDataLog;
-
Double click the If activity.
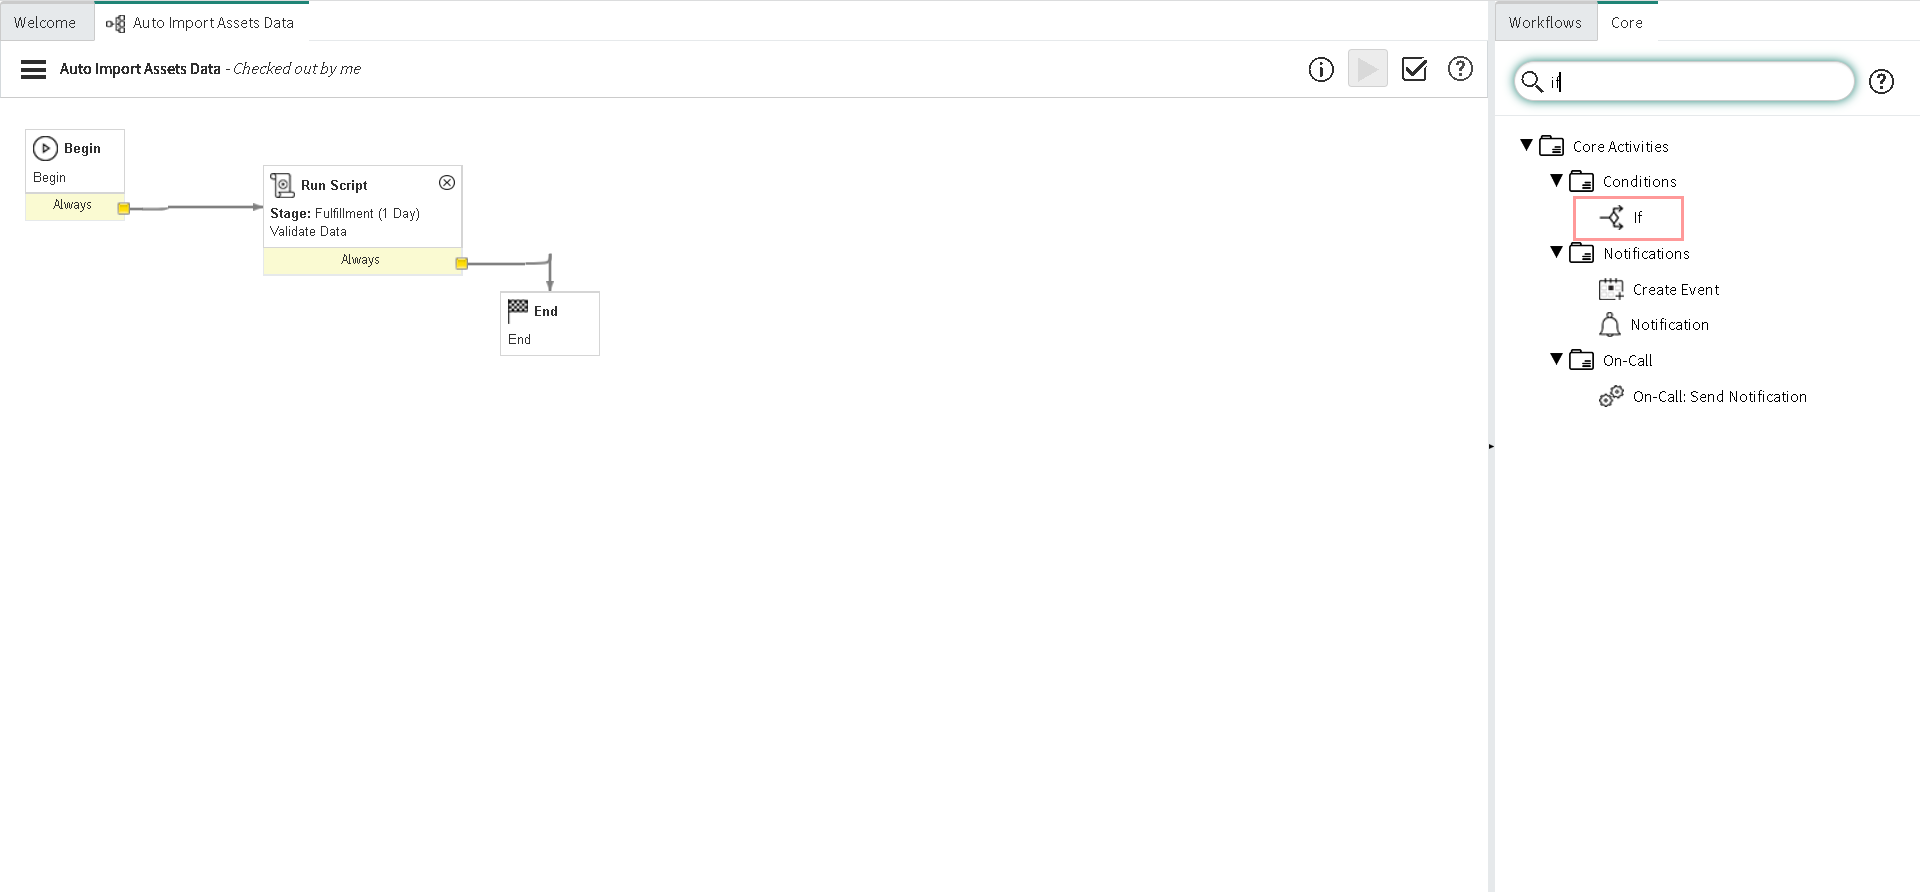
-
Give some meaningful Name and Stage.
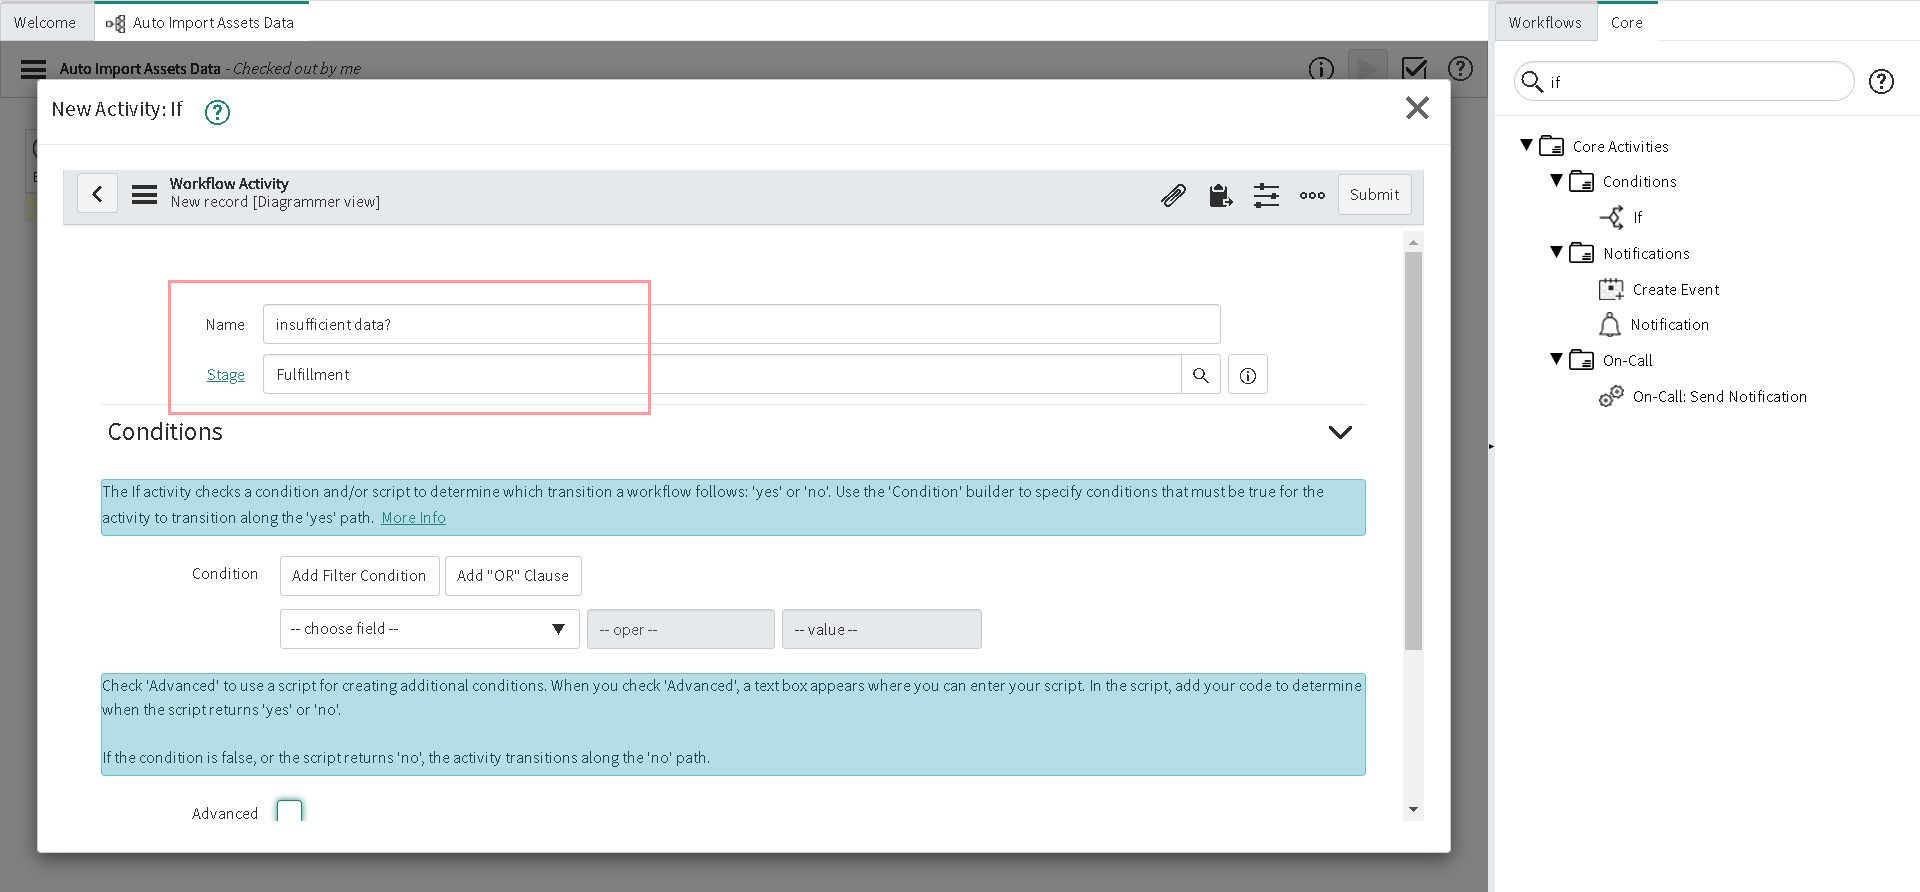
-
Select the Advanced check box and add the following script to the Script before clicking Submit.
answer = ifScript();

function ifScript() {
    if (workflow.scratchpad.insufficient_data === "TRUE") {
        return 'yes';
    }
    return 'no';
}
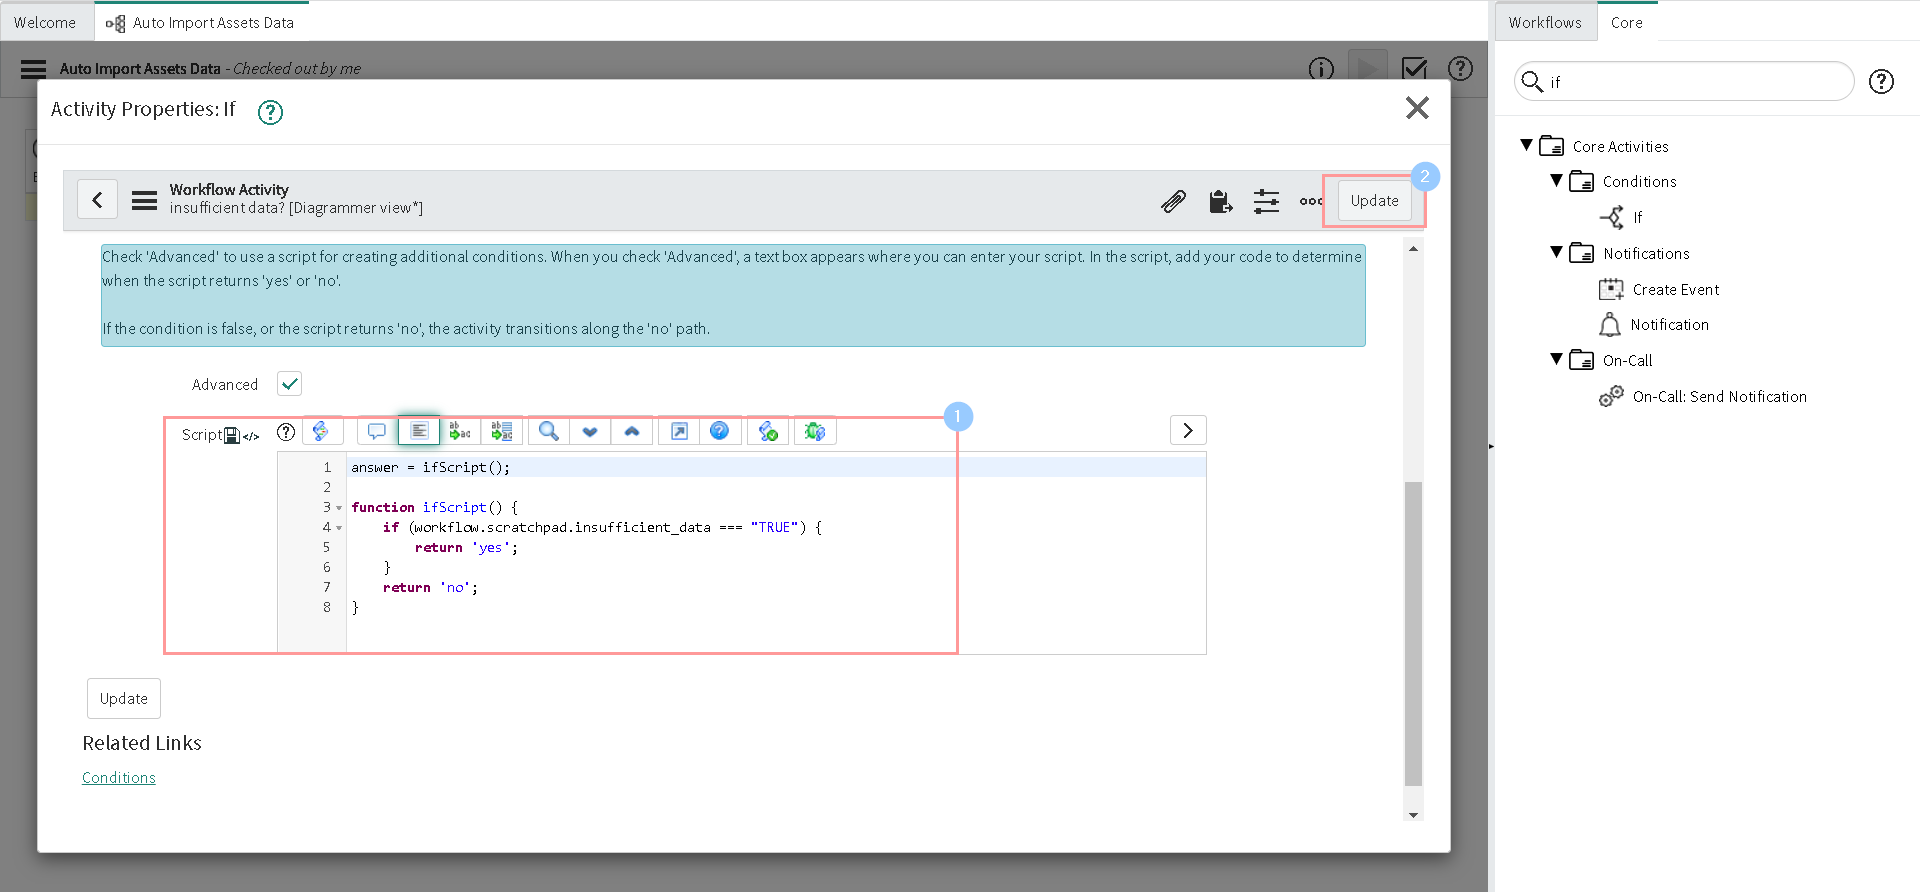
-
Next, Double click on Set Values activity and set the values as below, then click Submit:
- Name: Closed Incomplete
- Stage: Completed
- Set these values:
- State: Closed inomplete
- Additional comments: ${workflow.scratchpad.incorrect_lata_log}
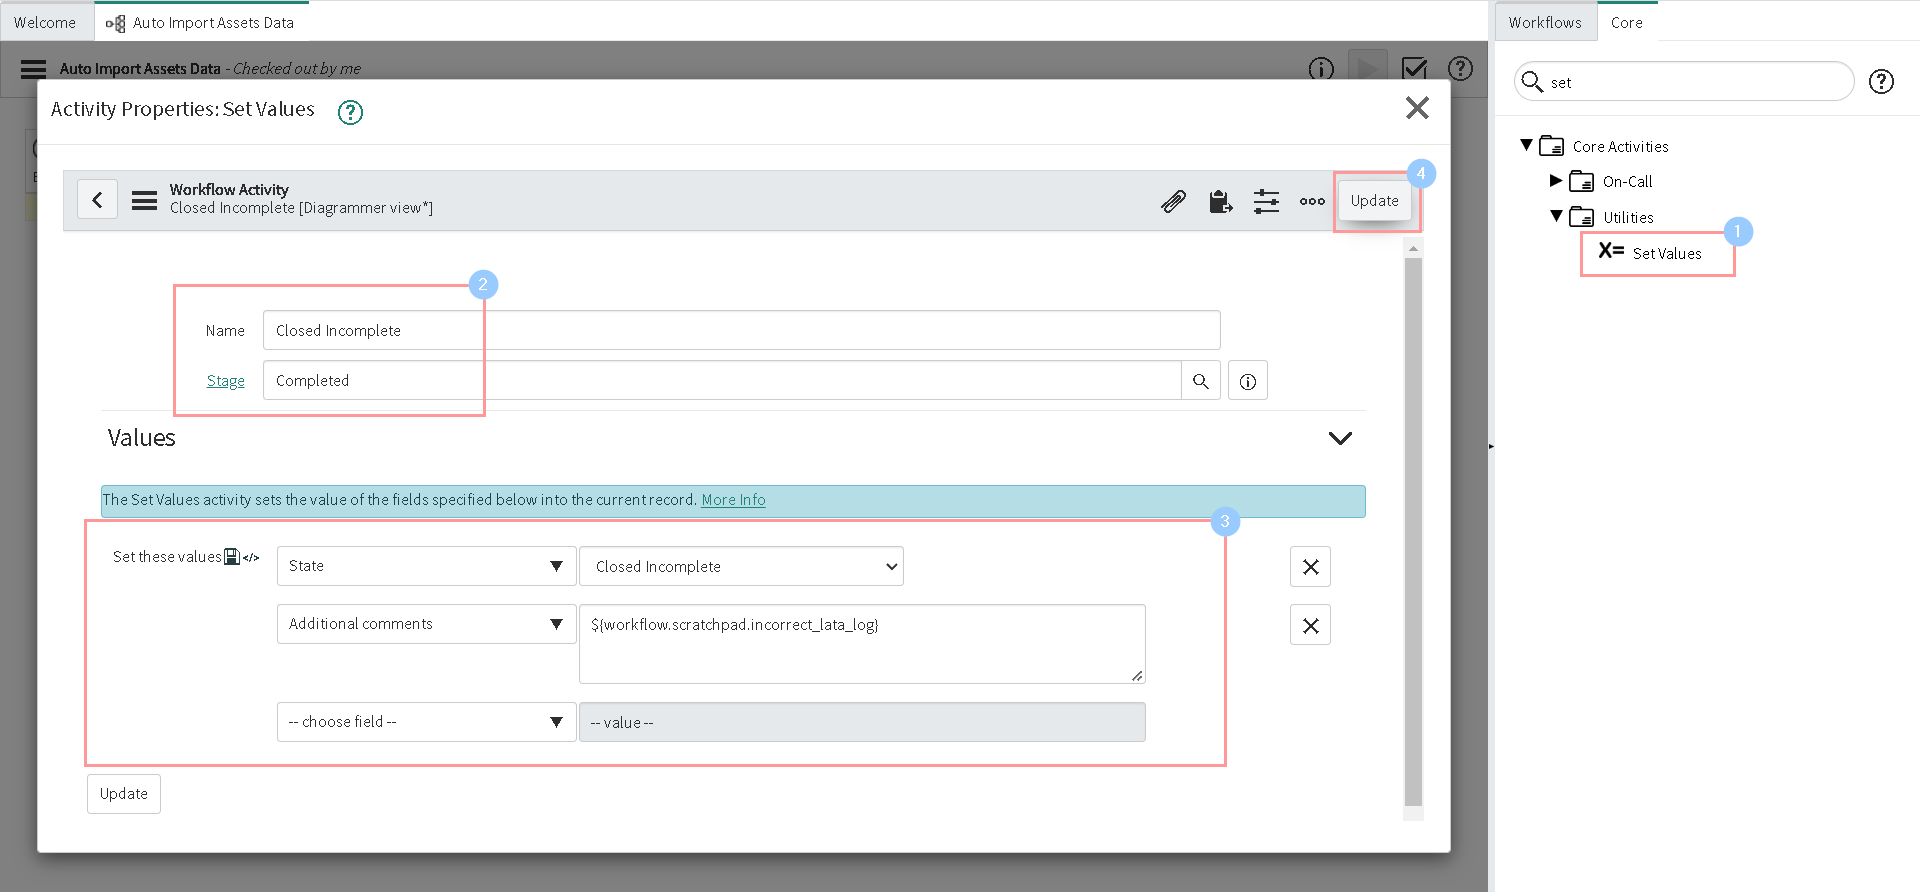
-
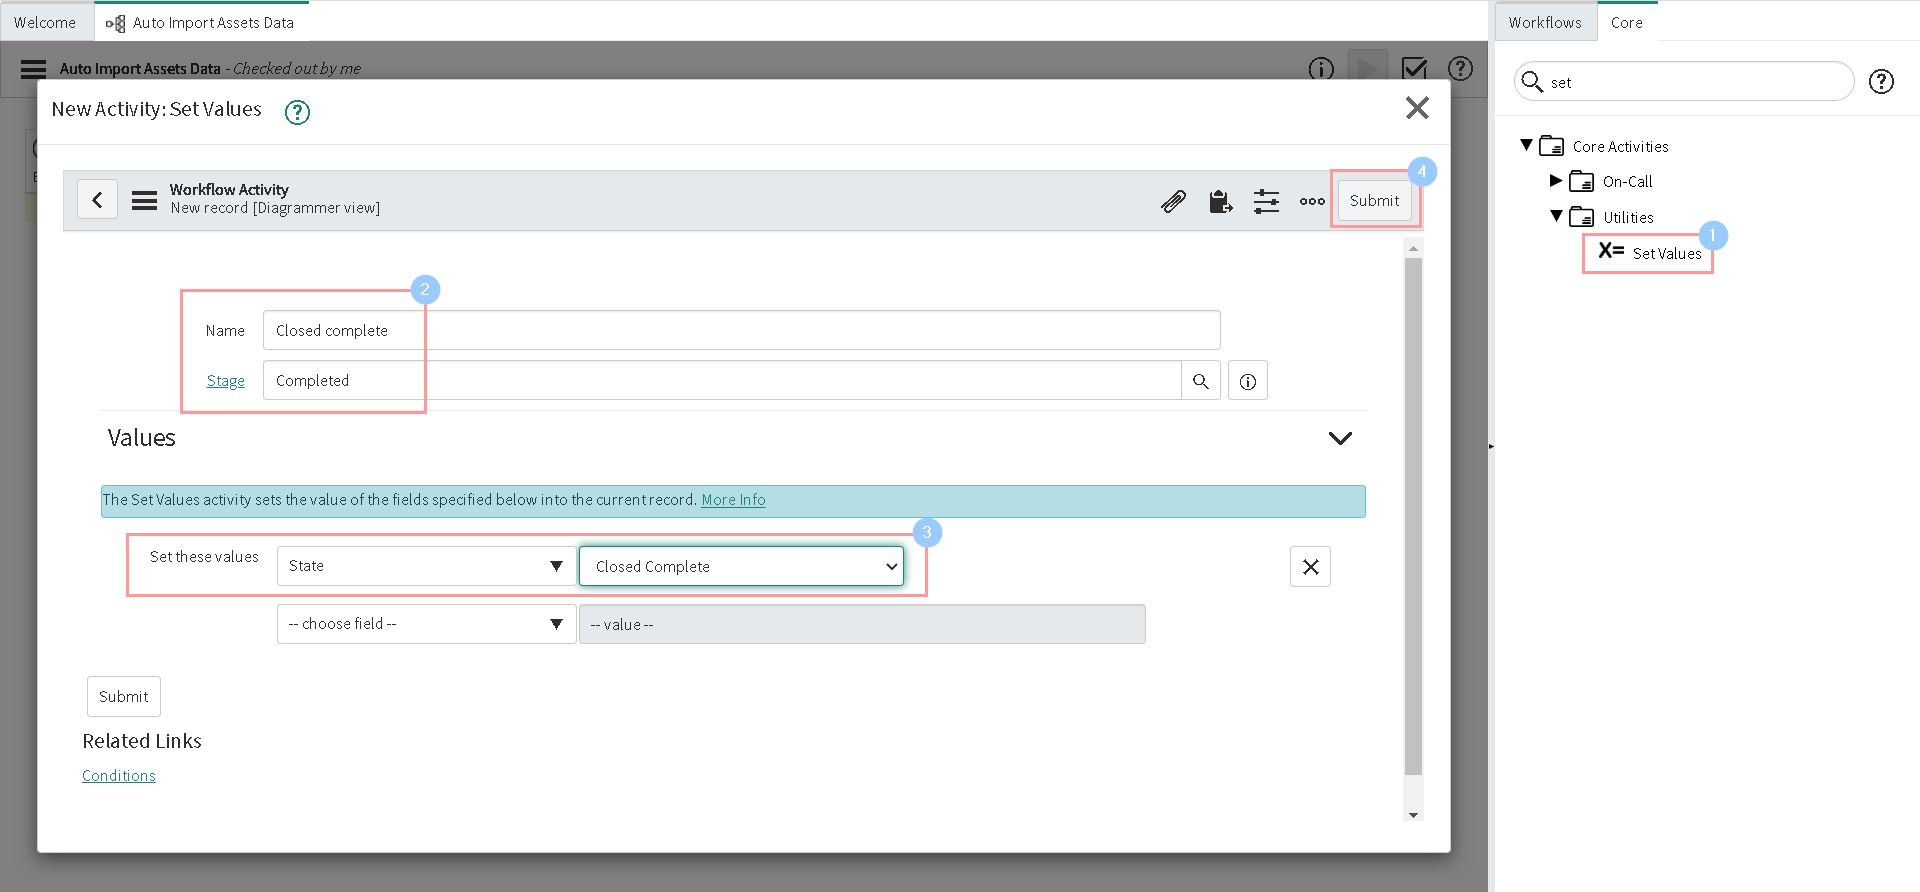
Similarly, Double click on Set Values activity again and set the values as below, then click Submit:
- Name: Closed complete
- Stage: Completed
- Set these values:
- State: Closed complete
-
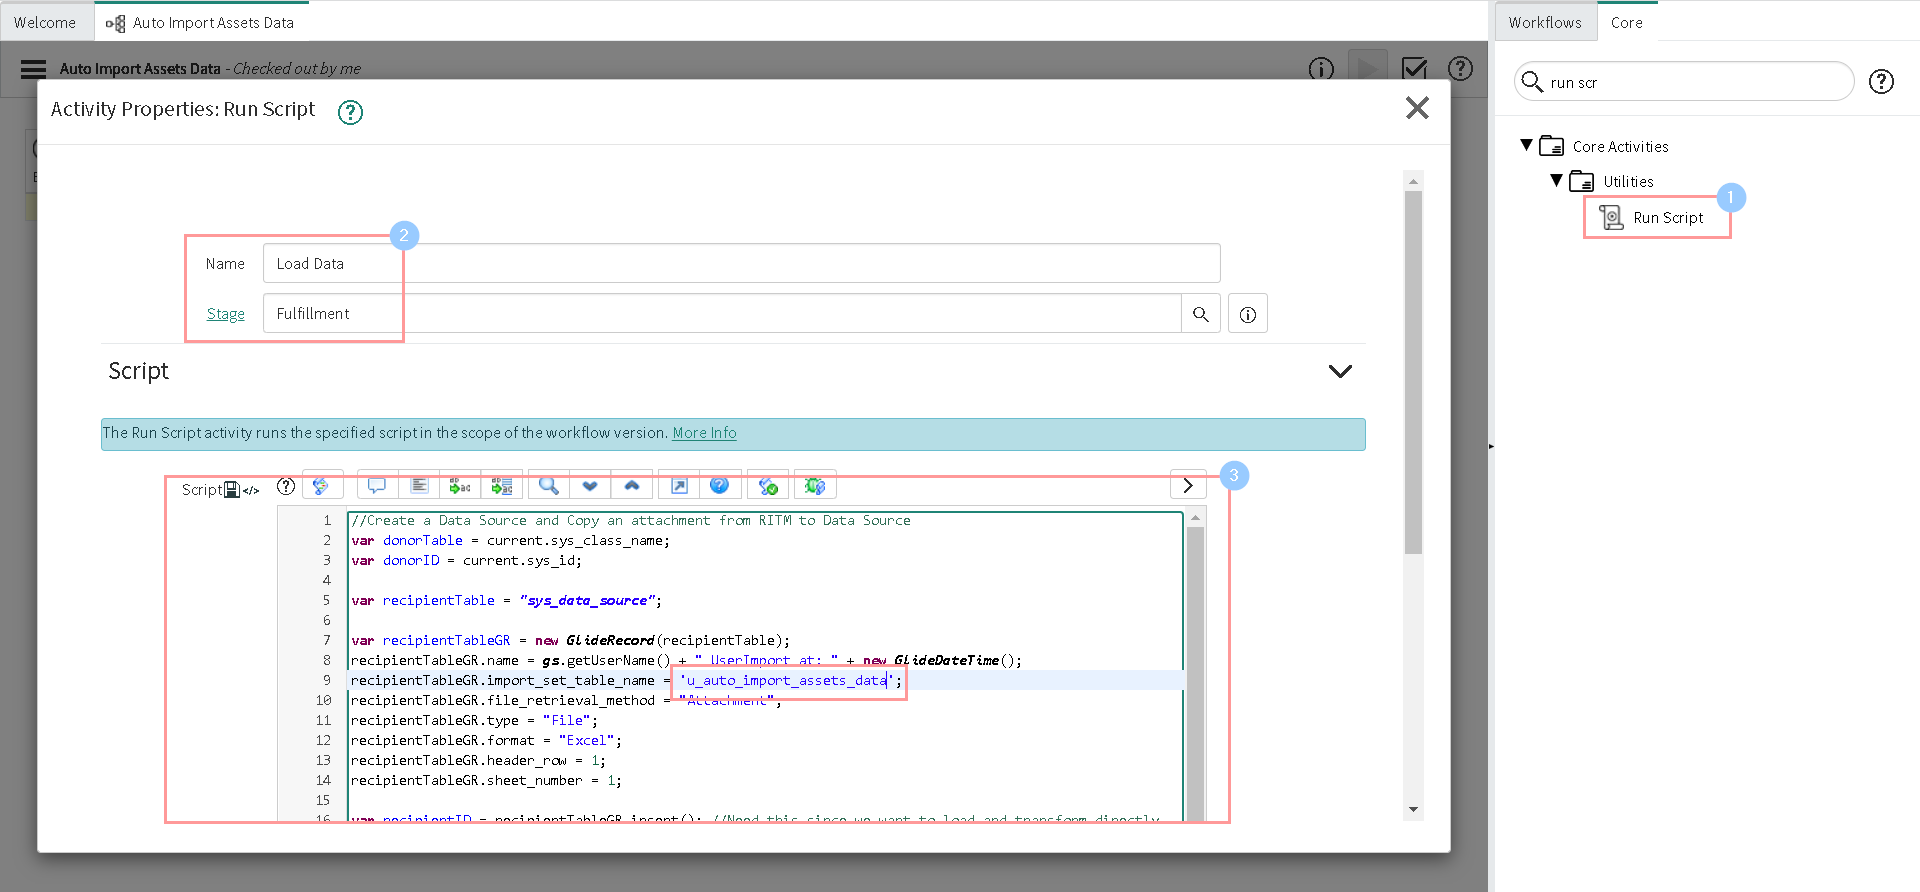
Finally, Double click the new Run script activity. Add the following script to the Script field:
//Create a Data Source and Copy an attachment from RITM to Data Source
var donorTable = current.sys_class_name;
var donorID = current.sys_id;

var recipientTable = "sys_data_source";

var recipientTableGR = new GlideRecord(recipientTable);
recipientTableGR.name = gs.getUserName() + " UserImport at: " + new GlideDateTime();
recipientTableGR.import_set_table_name = 'u_auto_import_assets_data';
recipientTableGR.file_retrieval_method = "Attachment";
recipientTableGR.type = "File";
recipientTableGR.format = "Excel";
recipientTableGR.header_row = 1;
recipientTableGR.sheet_number = 1;

var recipientID = recipientTableGR.insert(); //Need this since we want to load and transform directly

GlideSysAttachment.copy(donorTable, donorID, recipientTable, recipientID);

//Load the data from attachment to Staging table
var dataSourceGR = new GlideRecord("sys_data_source");
dataSourceGR.get(recipientID);
var loader = new GlideImportSetLoader();
var importSetRec = loader.getImportSetGr(dataSourceGR);
var ranload = loader.loadImportSetTable(importSetRec, dataSourceGR);
importSetRec.state = "loaded";
importSetRec.update();

//Transform the data into system database
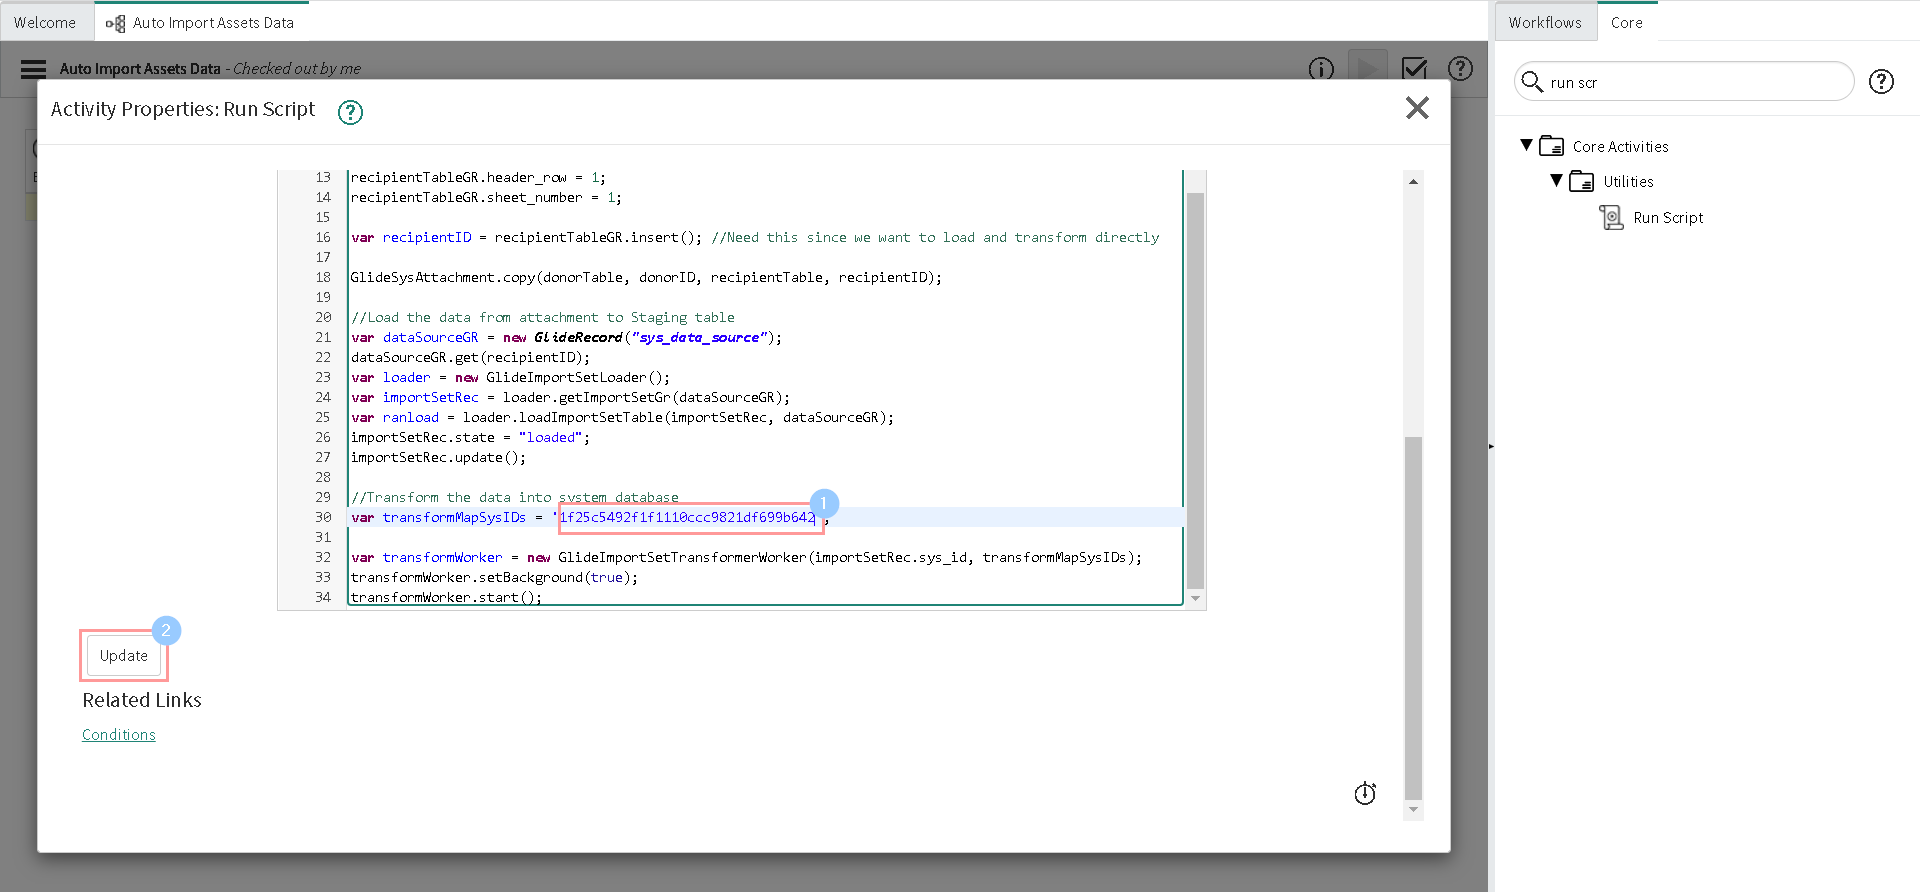
var transformMapSysIDs = '1f25c5492f1f1110ccc9821df699b642';

var transformWorker = new GlideImportSetTransformerWorker(importSetRec.sys_id, transformMapSysIDs);
transformWorker.setBackground(true);
transformWorker.start();
For the sake of this article, I'm not going to explain the above script details. May be it could be a content for another article. But to be short we are loading the data from our sheet to import set table that we created and then transforming it to assets table. To understand better what is happening here, I encourage you to check teh youtube video Upload data with an excel file and Record producer in ServiceNow by Göran Lundqvist.
-
Don't forget to replace the Import set table name and Transform Map SysID noted from second step before clicking Submit:
-
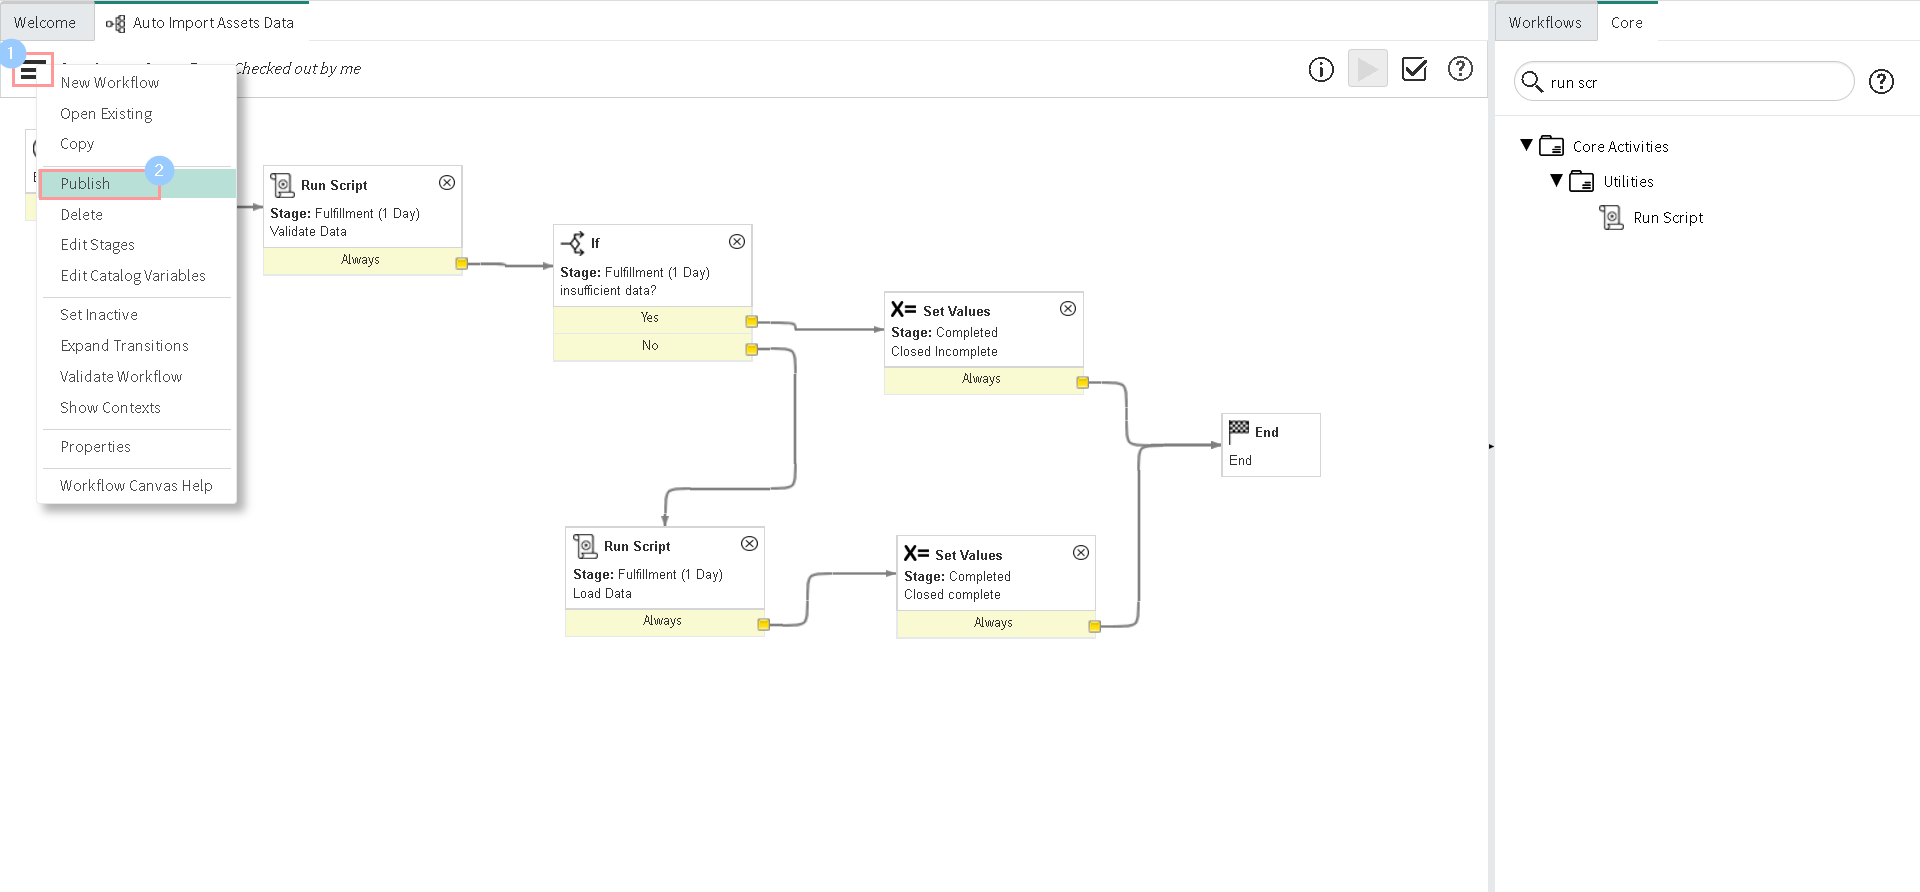
Now configure transitions for all activities as shown in the screenshot below:
-
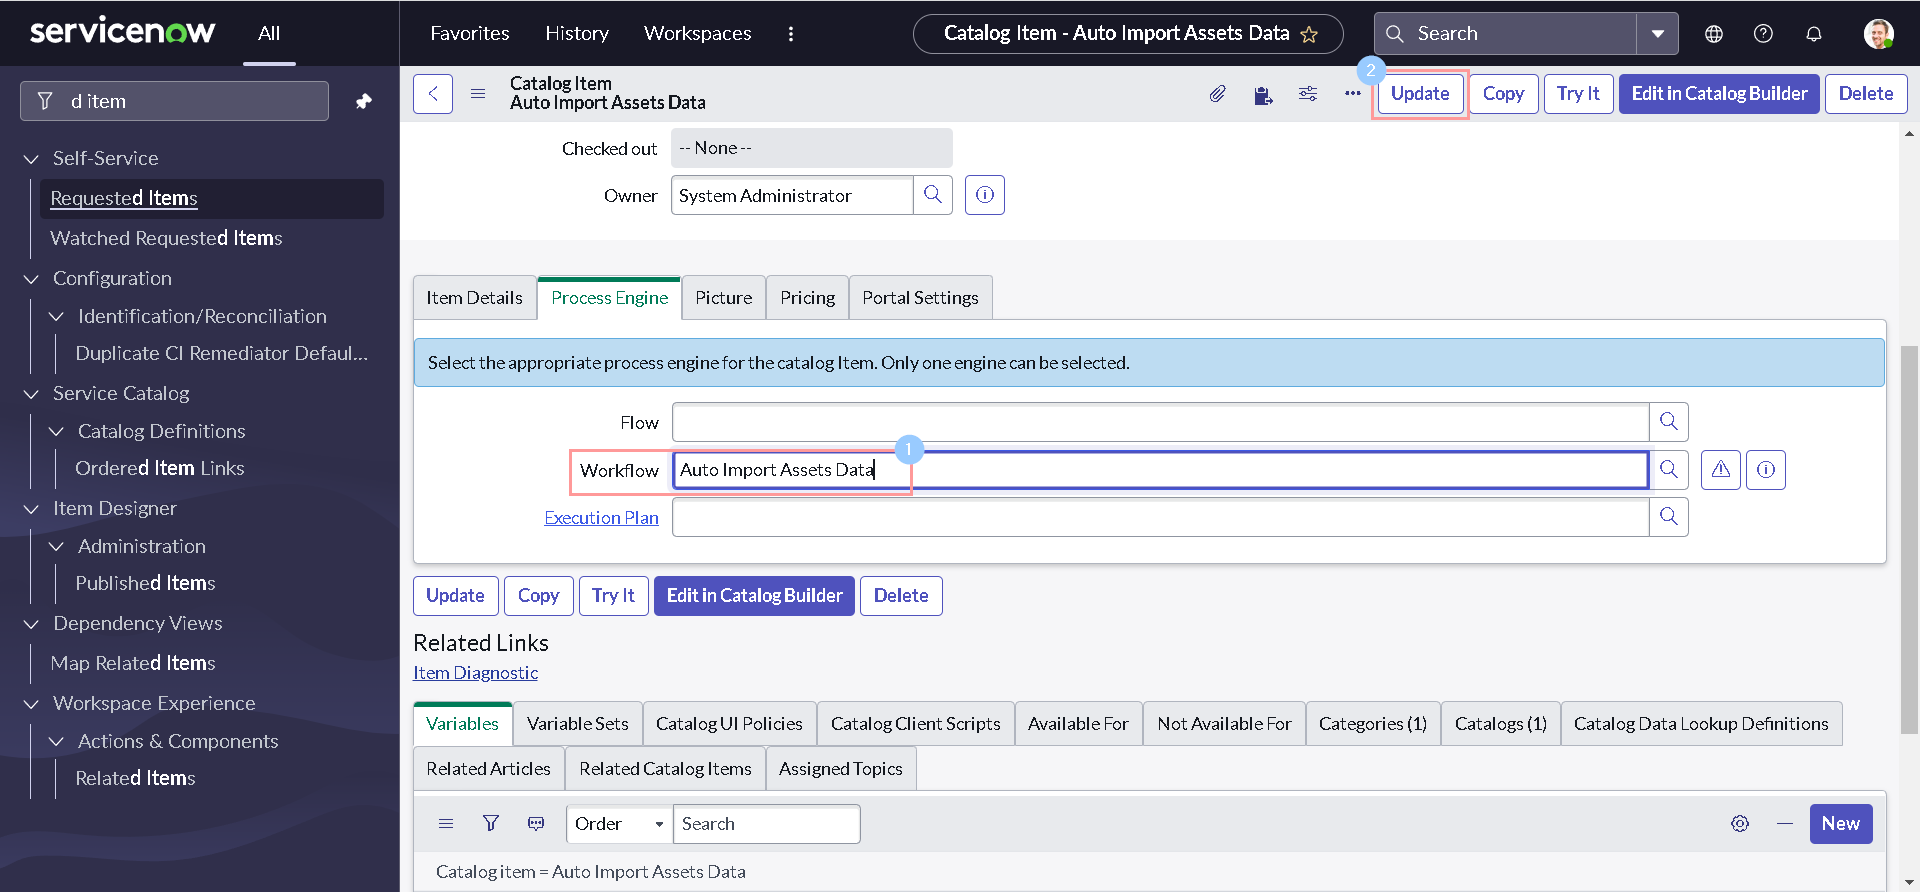
Let's navigate back to our catalog item window and select the newly created workflow and Update the catalog item.
-
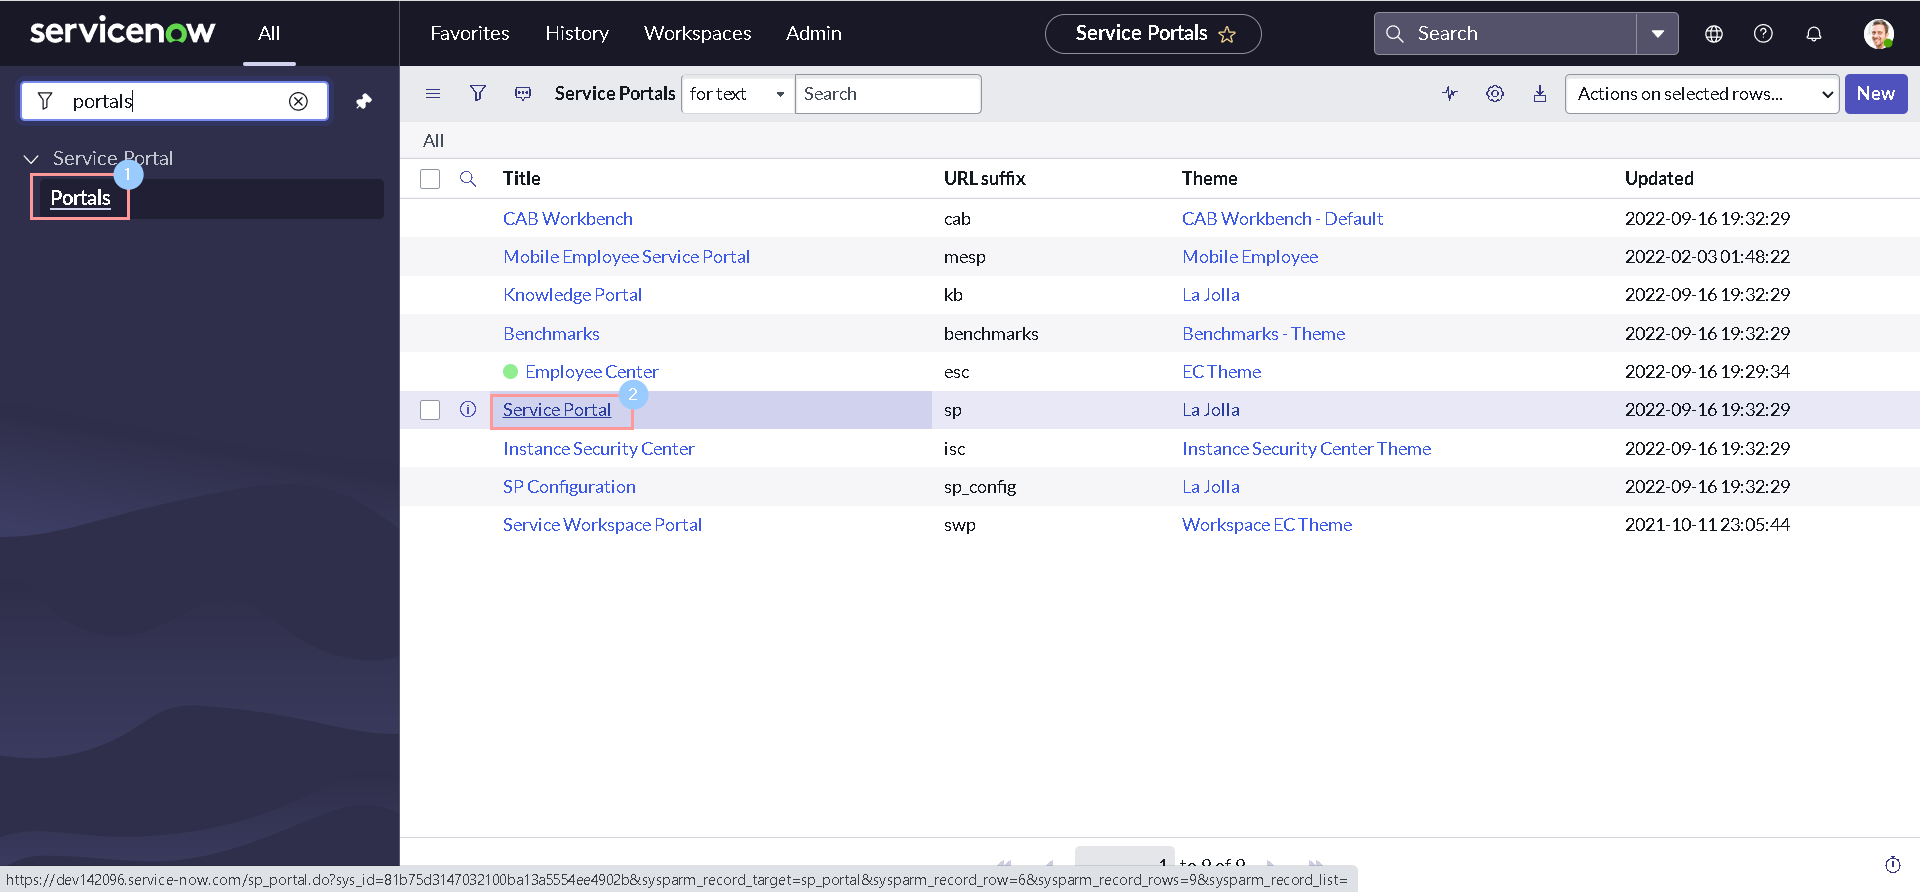
In order to see the Technical Catalog on our Service Portal, we need to do some additional configurations. Navigate to All > Service Portal > Portals & Click the Service Portal record.
-
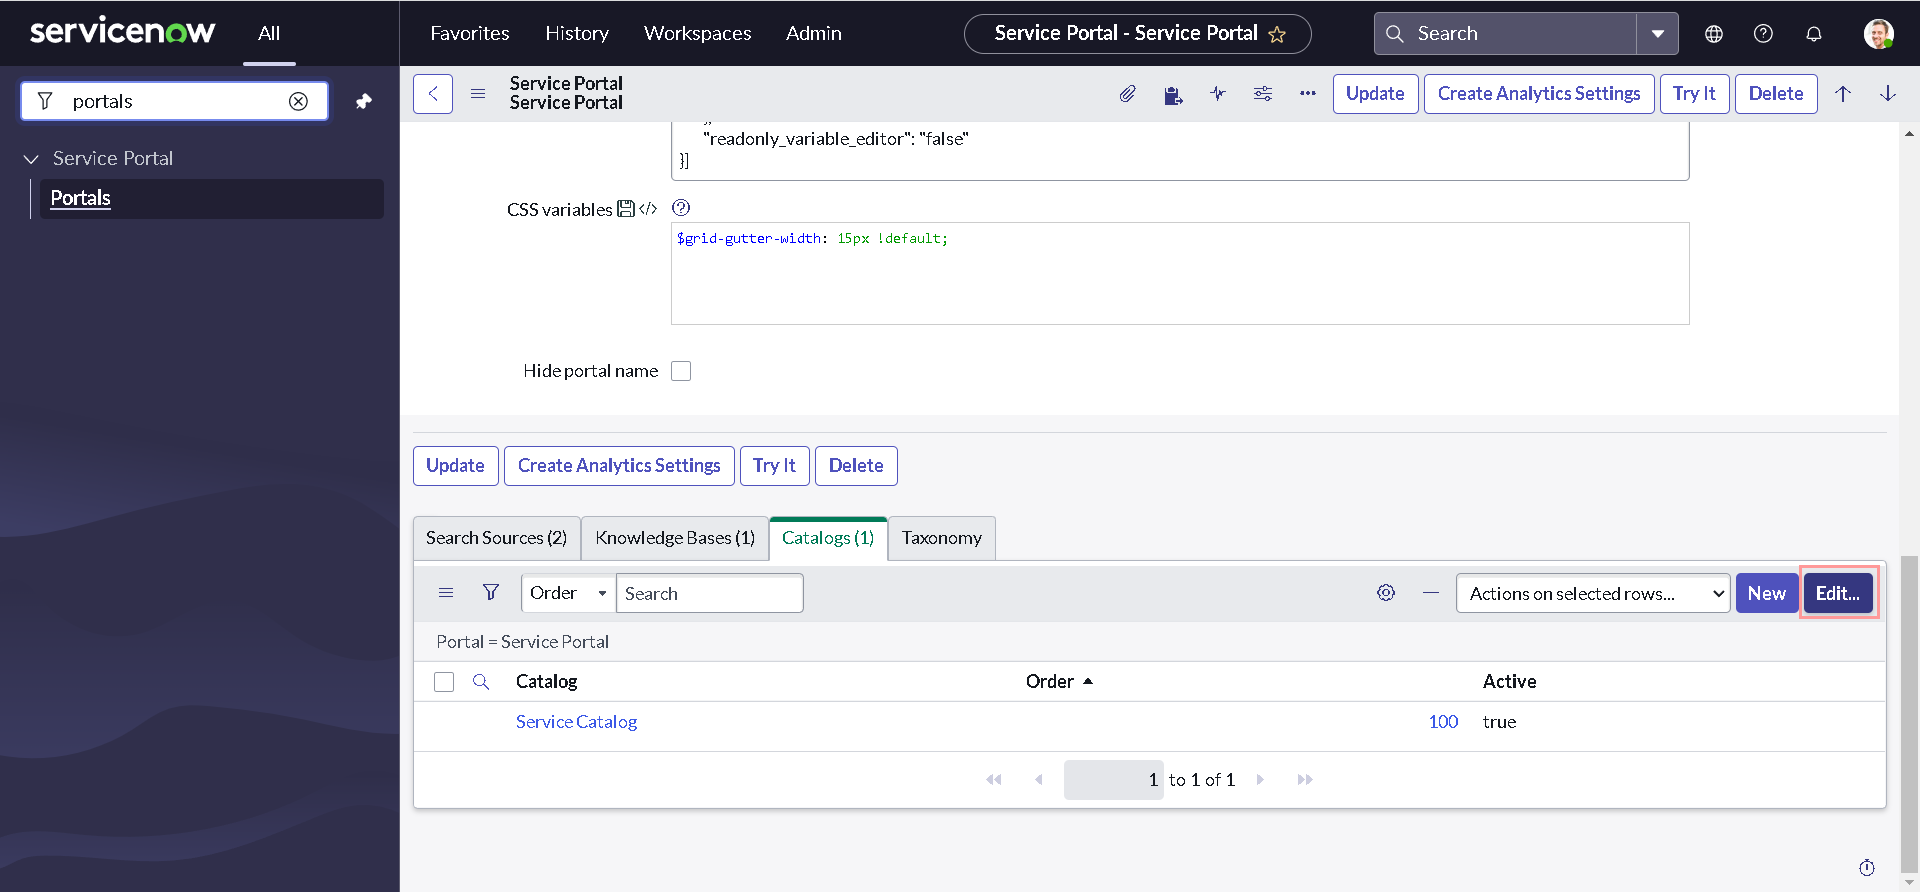
In the Catalogs related list, click Edit.
-
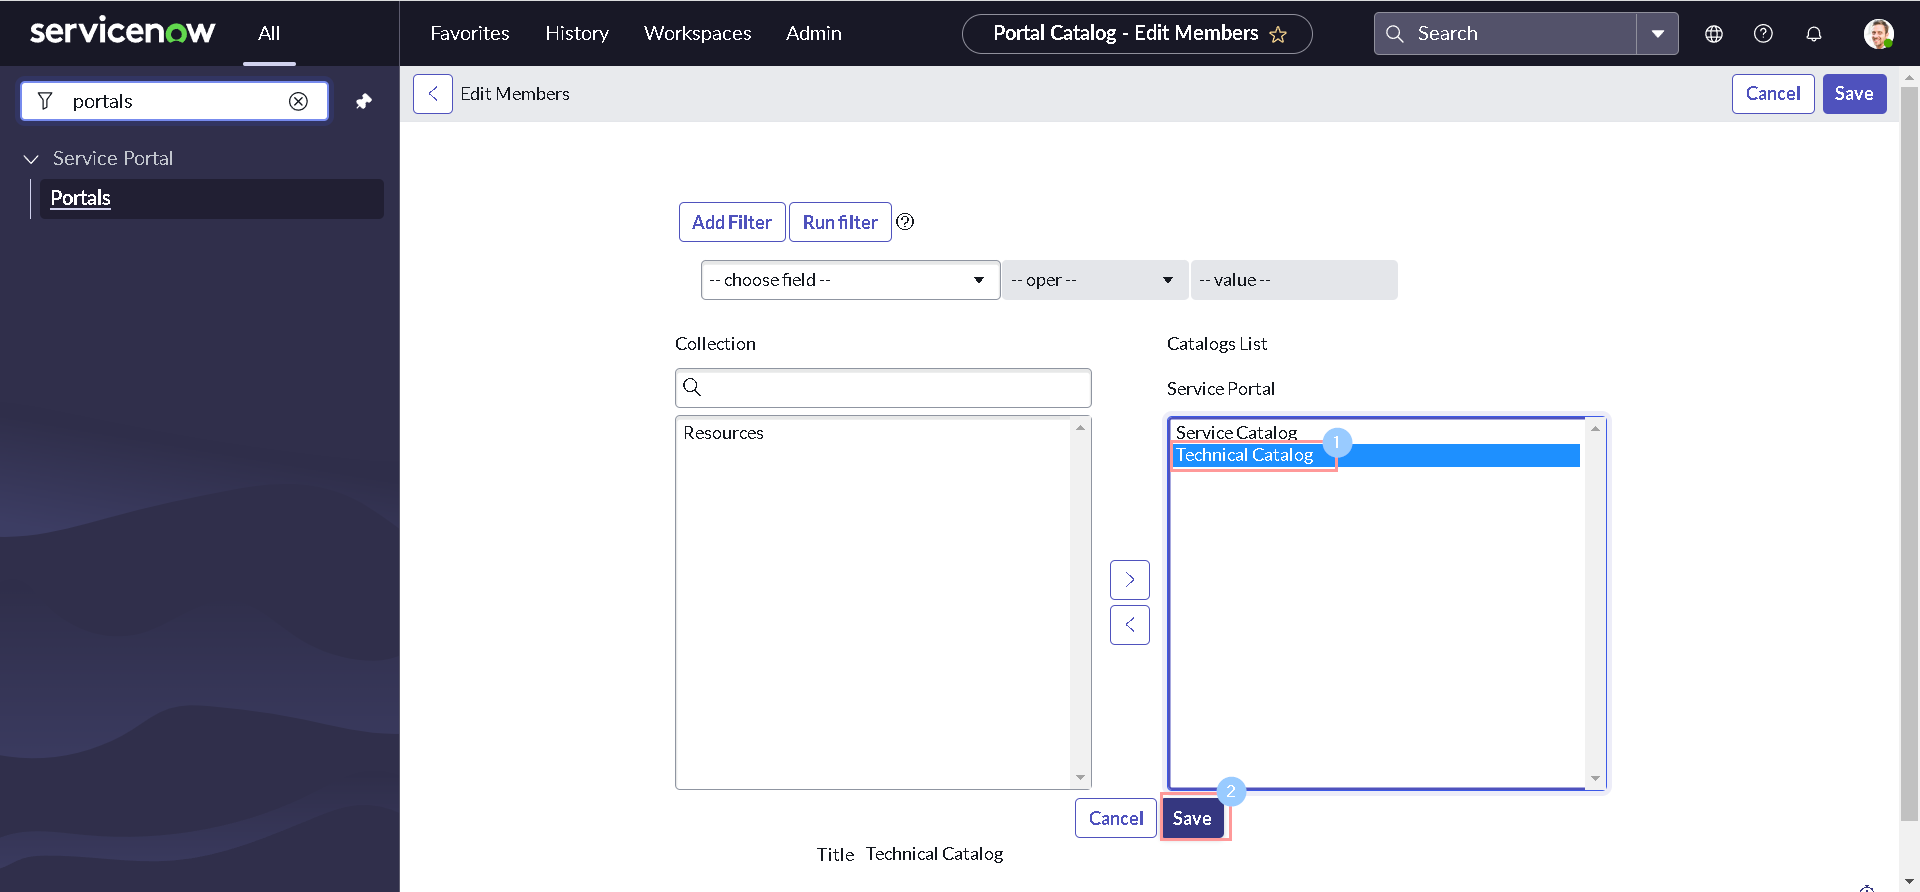
Select Technical Catalog to add to the portal and click Save
Well we are done with our development and it is a time for unit testing:
-
Navigate to Service Portal and click Request Something.
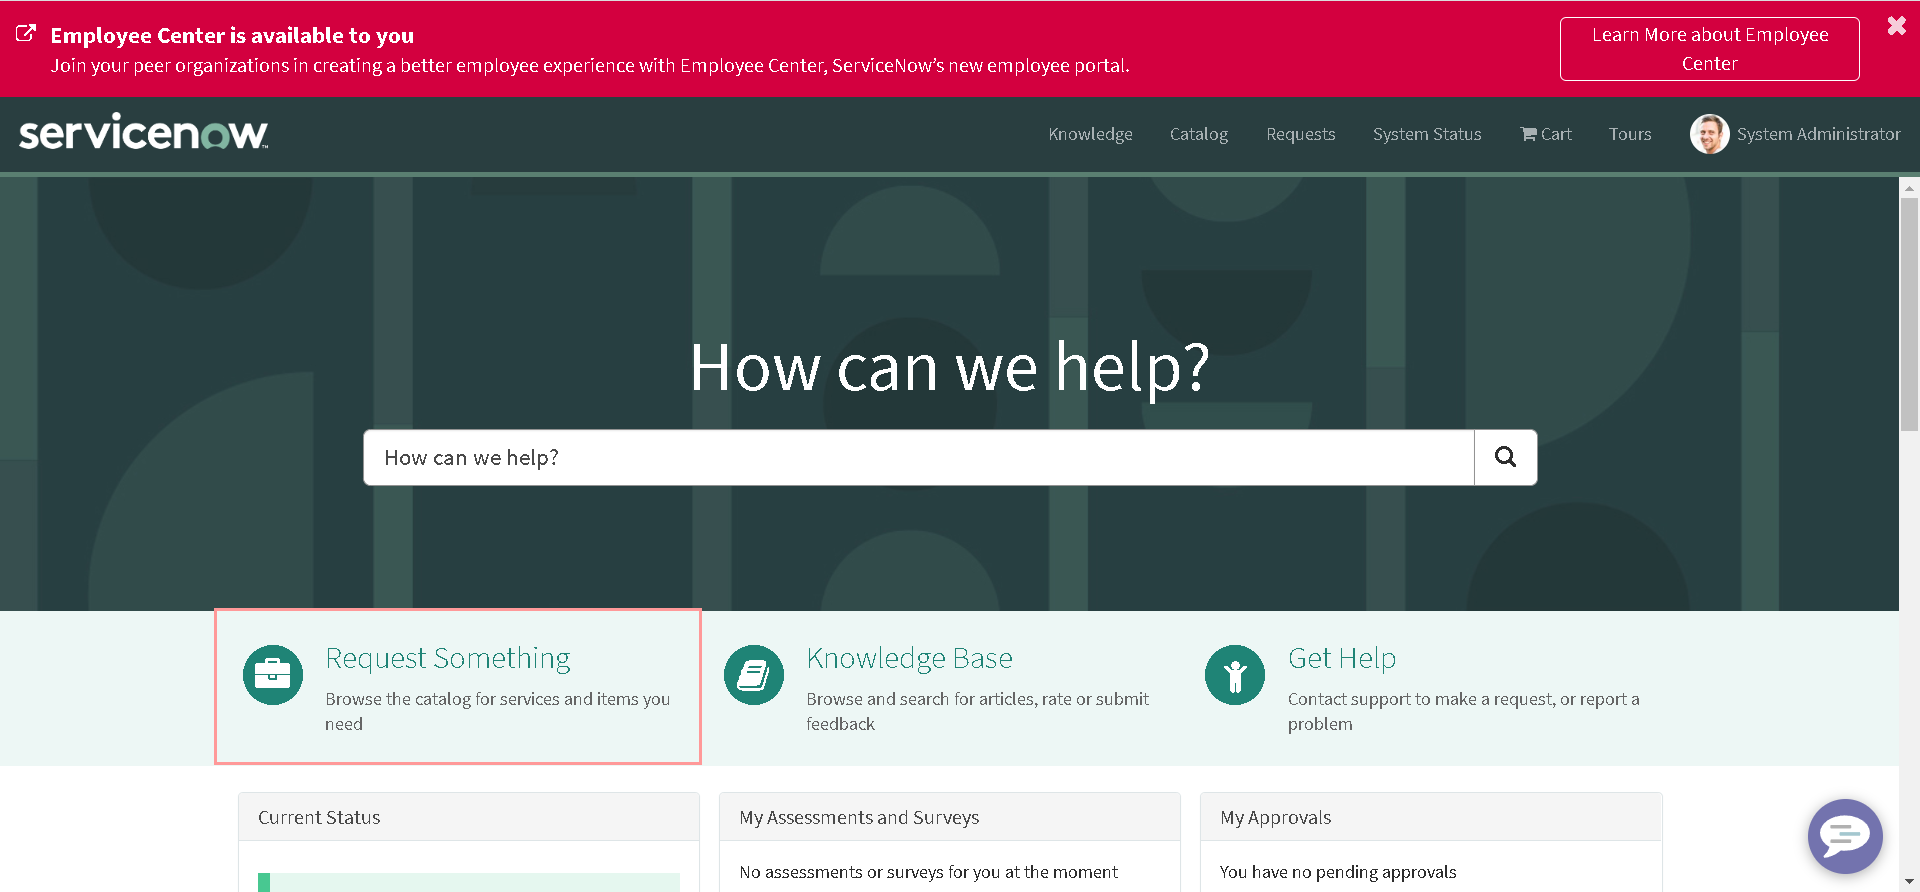
-
Now, we should be able to see our newly created catalog item under Infrastructure category of Technical Catalog. Click to open it.
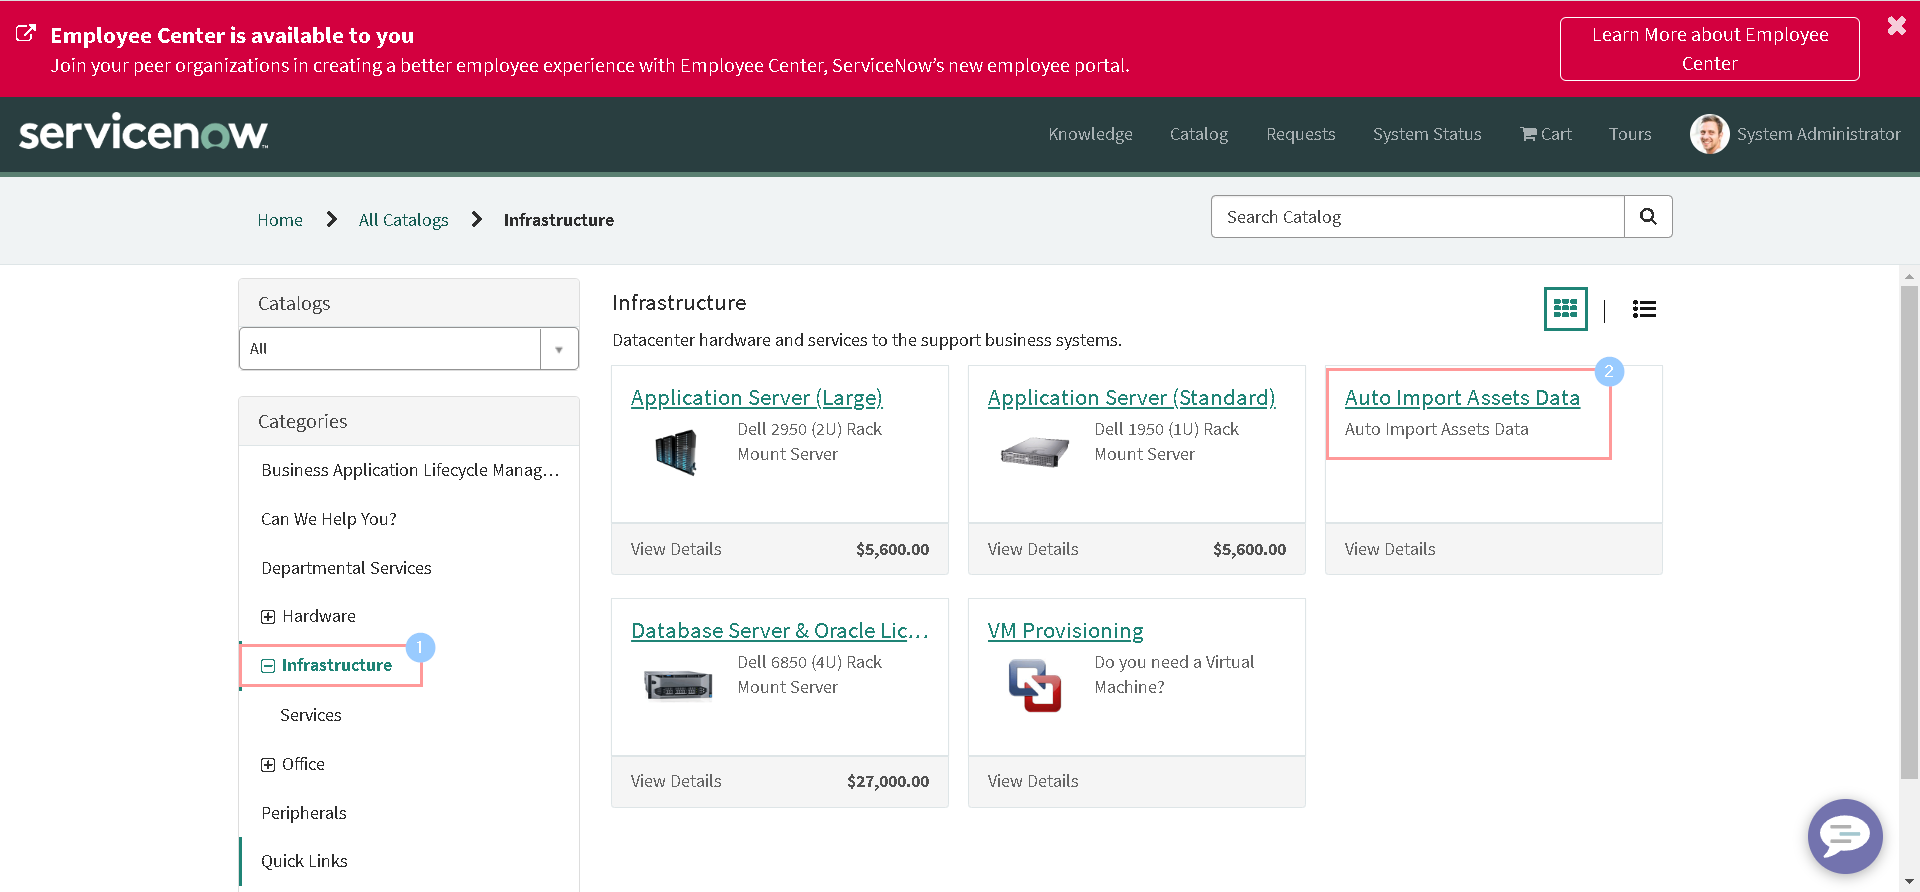
-
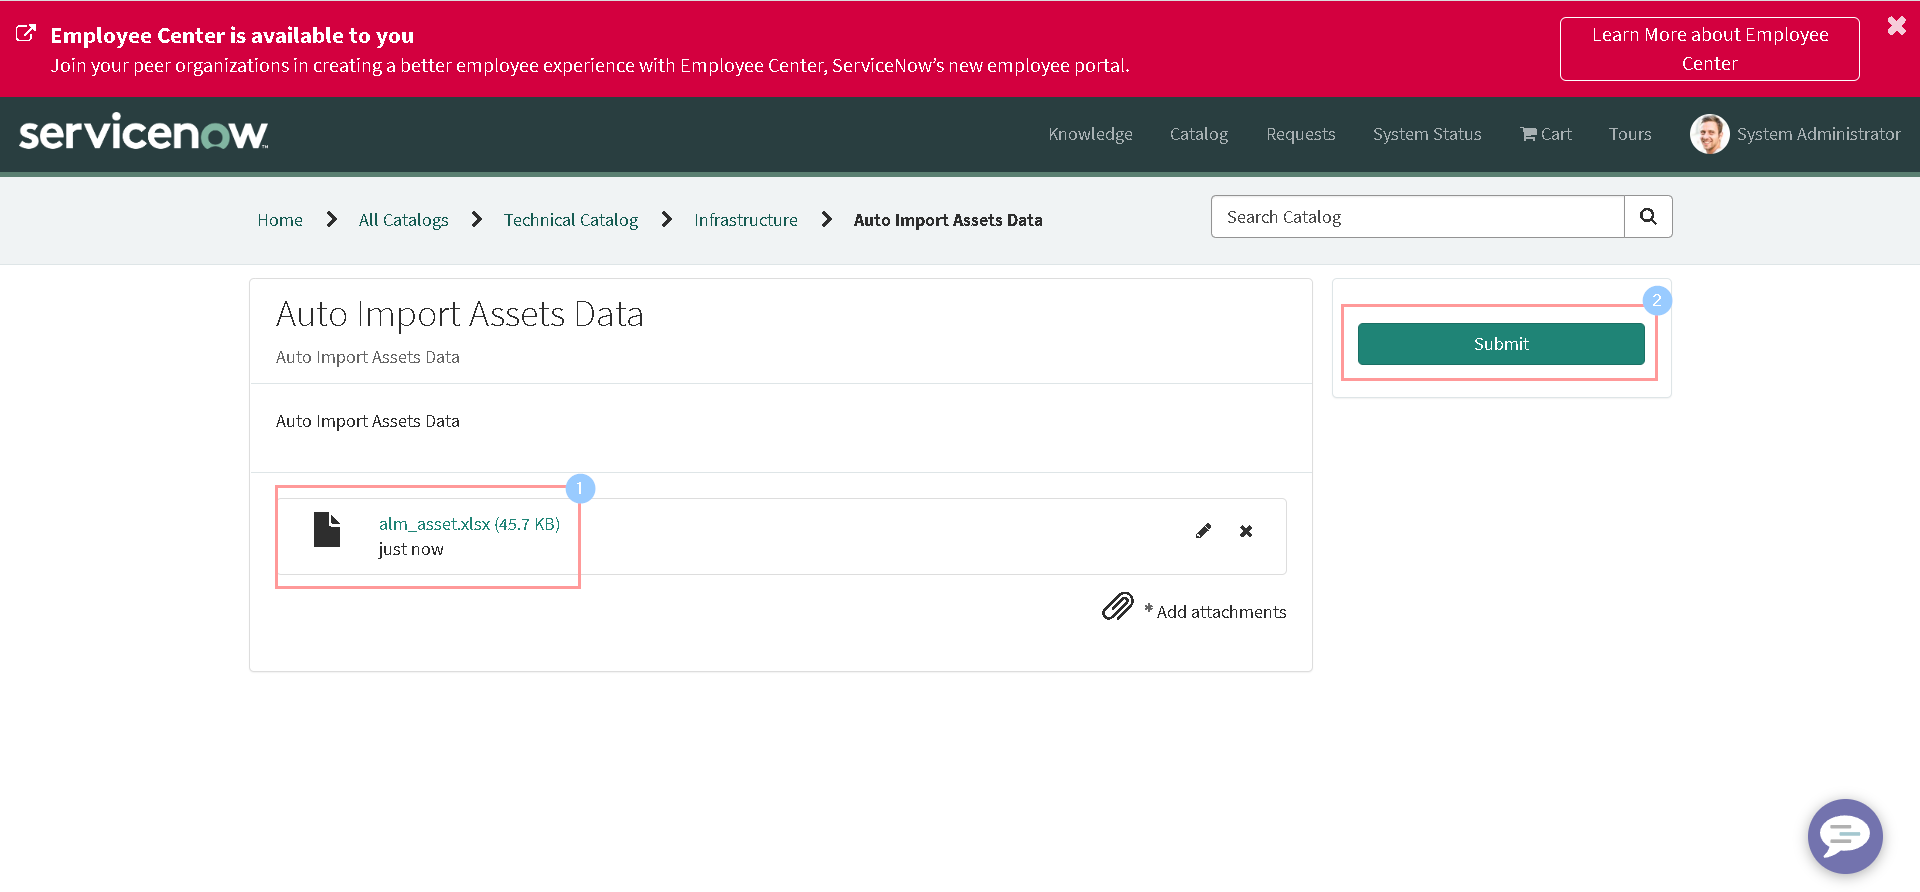
Add our incorrect demo data sheet as an attachment and click Submit.
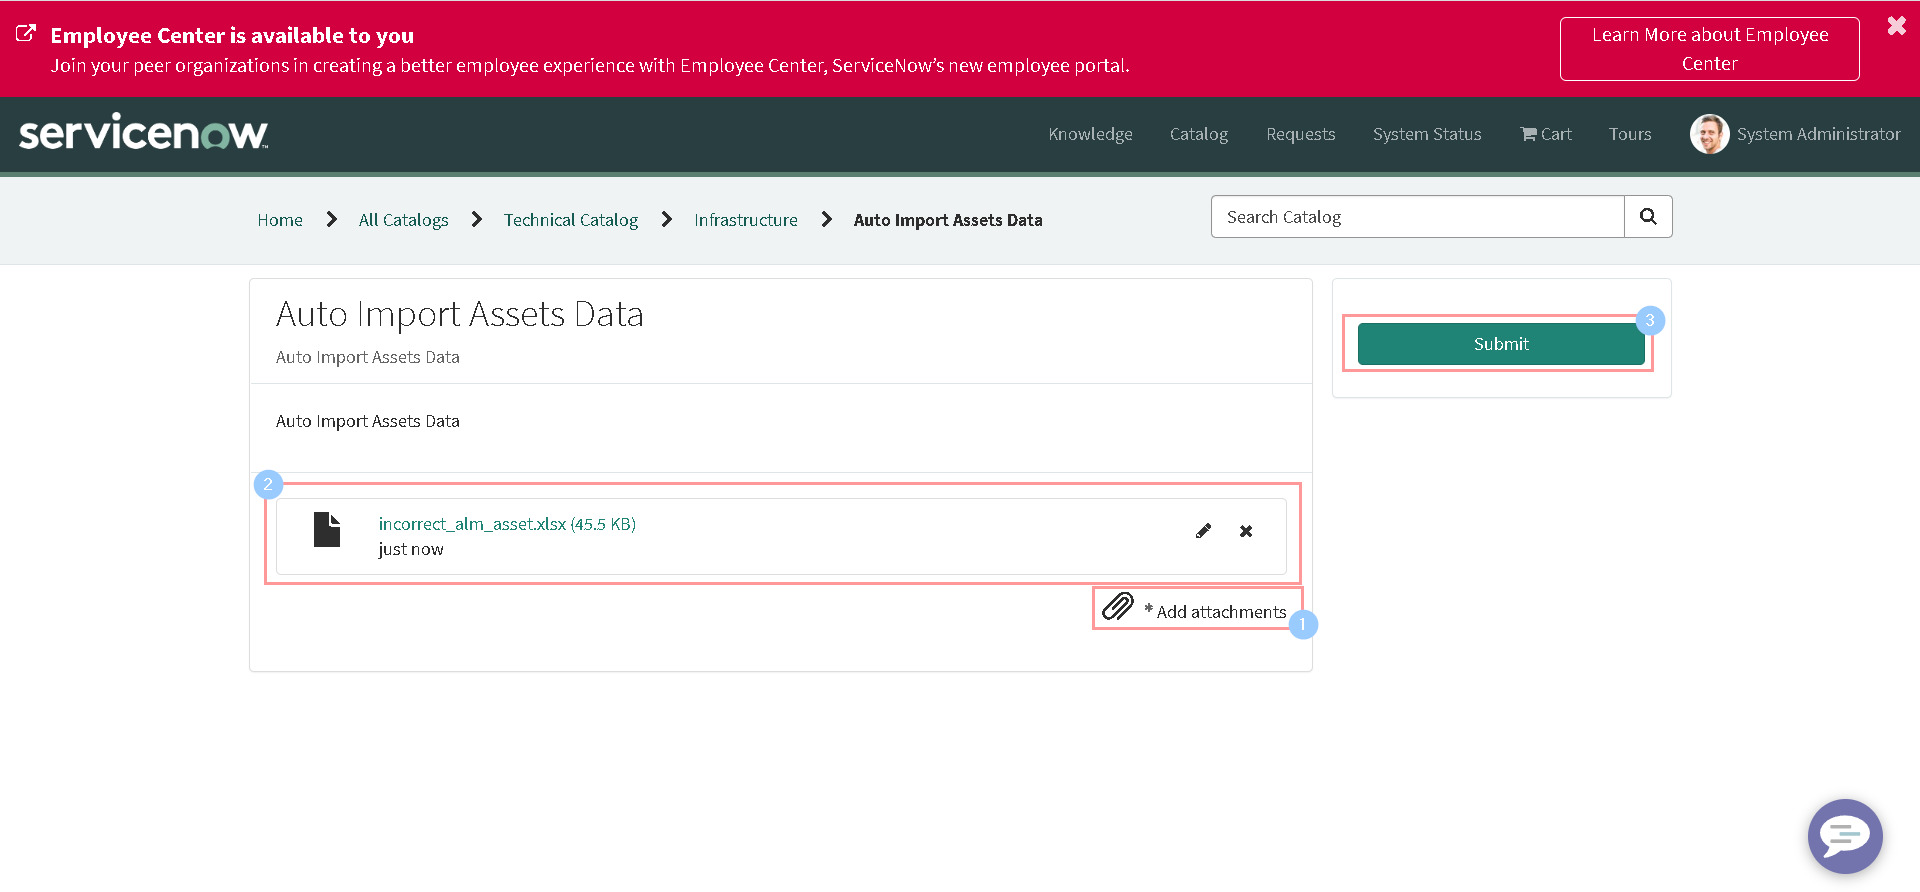
-
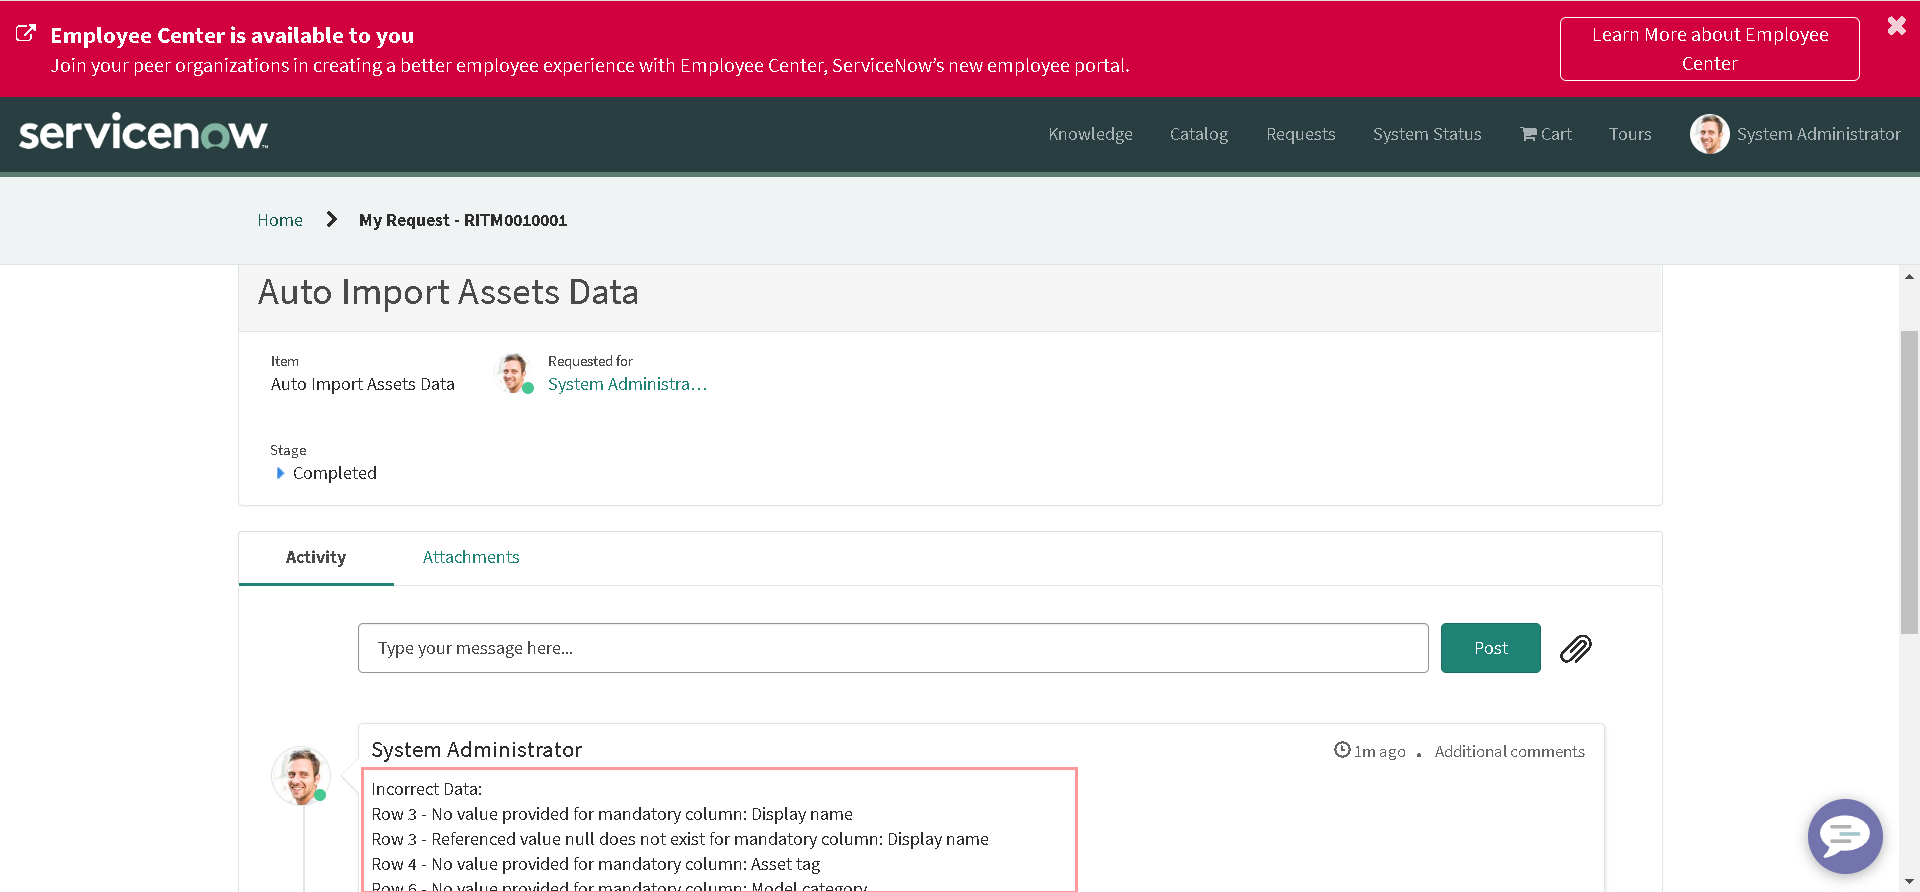
Click on the catalog item name on the Ticket summary form to see the additional comments with error logs:
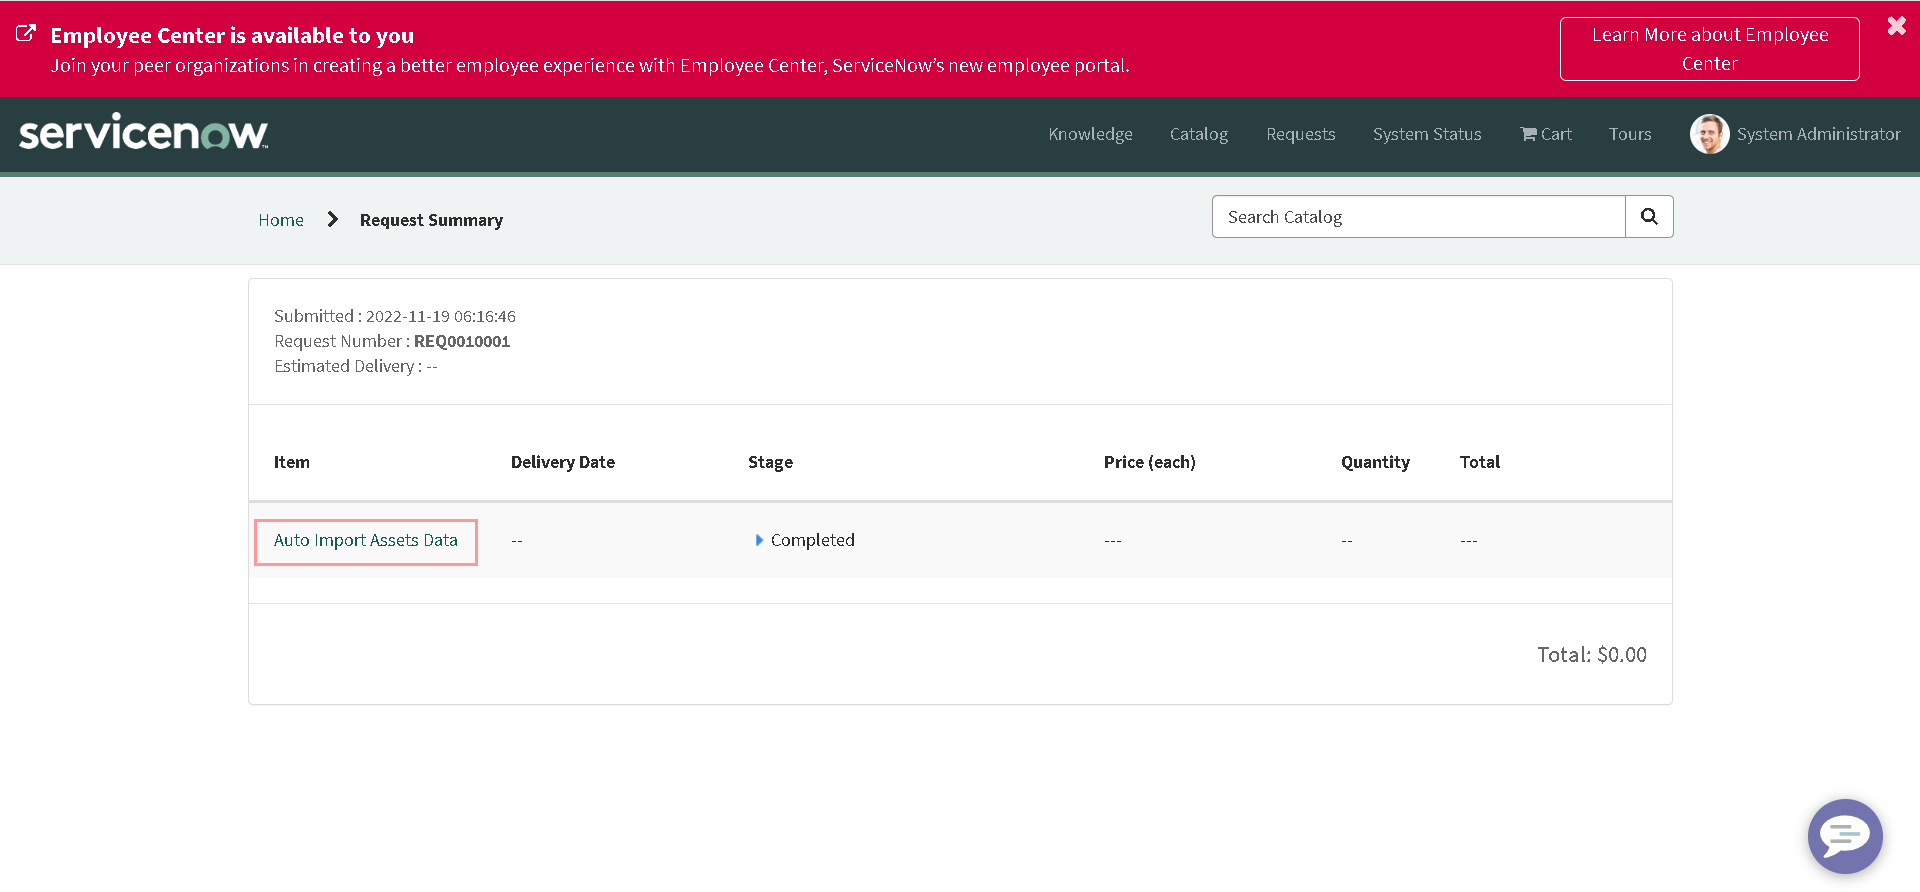
-
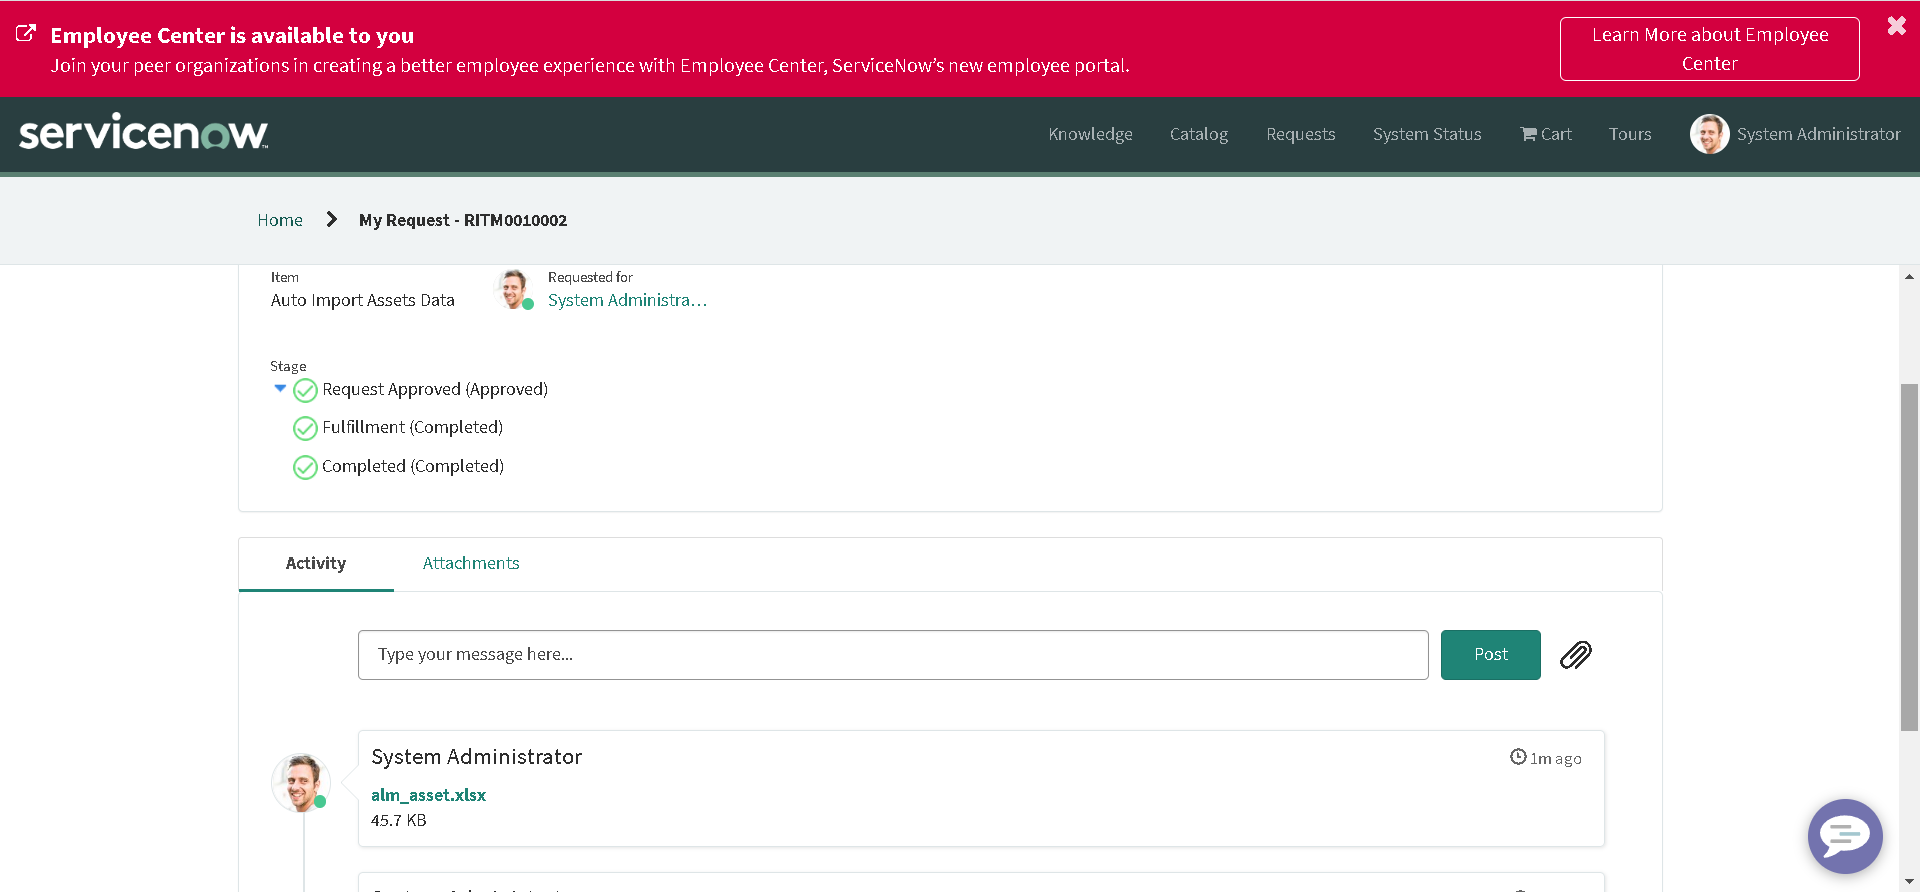
Perform another test with correct sheet to make sure that data is loaded correctly to asset table:
Time's up!
So we have successfully fulfilled our business requirement. For the sake of this article, we have done very basic configurations. But in real life scenerio, you might need to have error handling mechanism, additional approvals, user criterias etc. But we won't go to that. Now, it is time to go back to our GlideExcelParserAPIs.
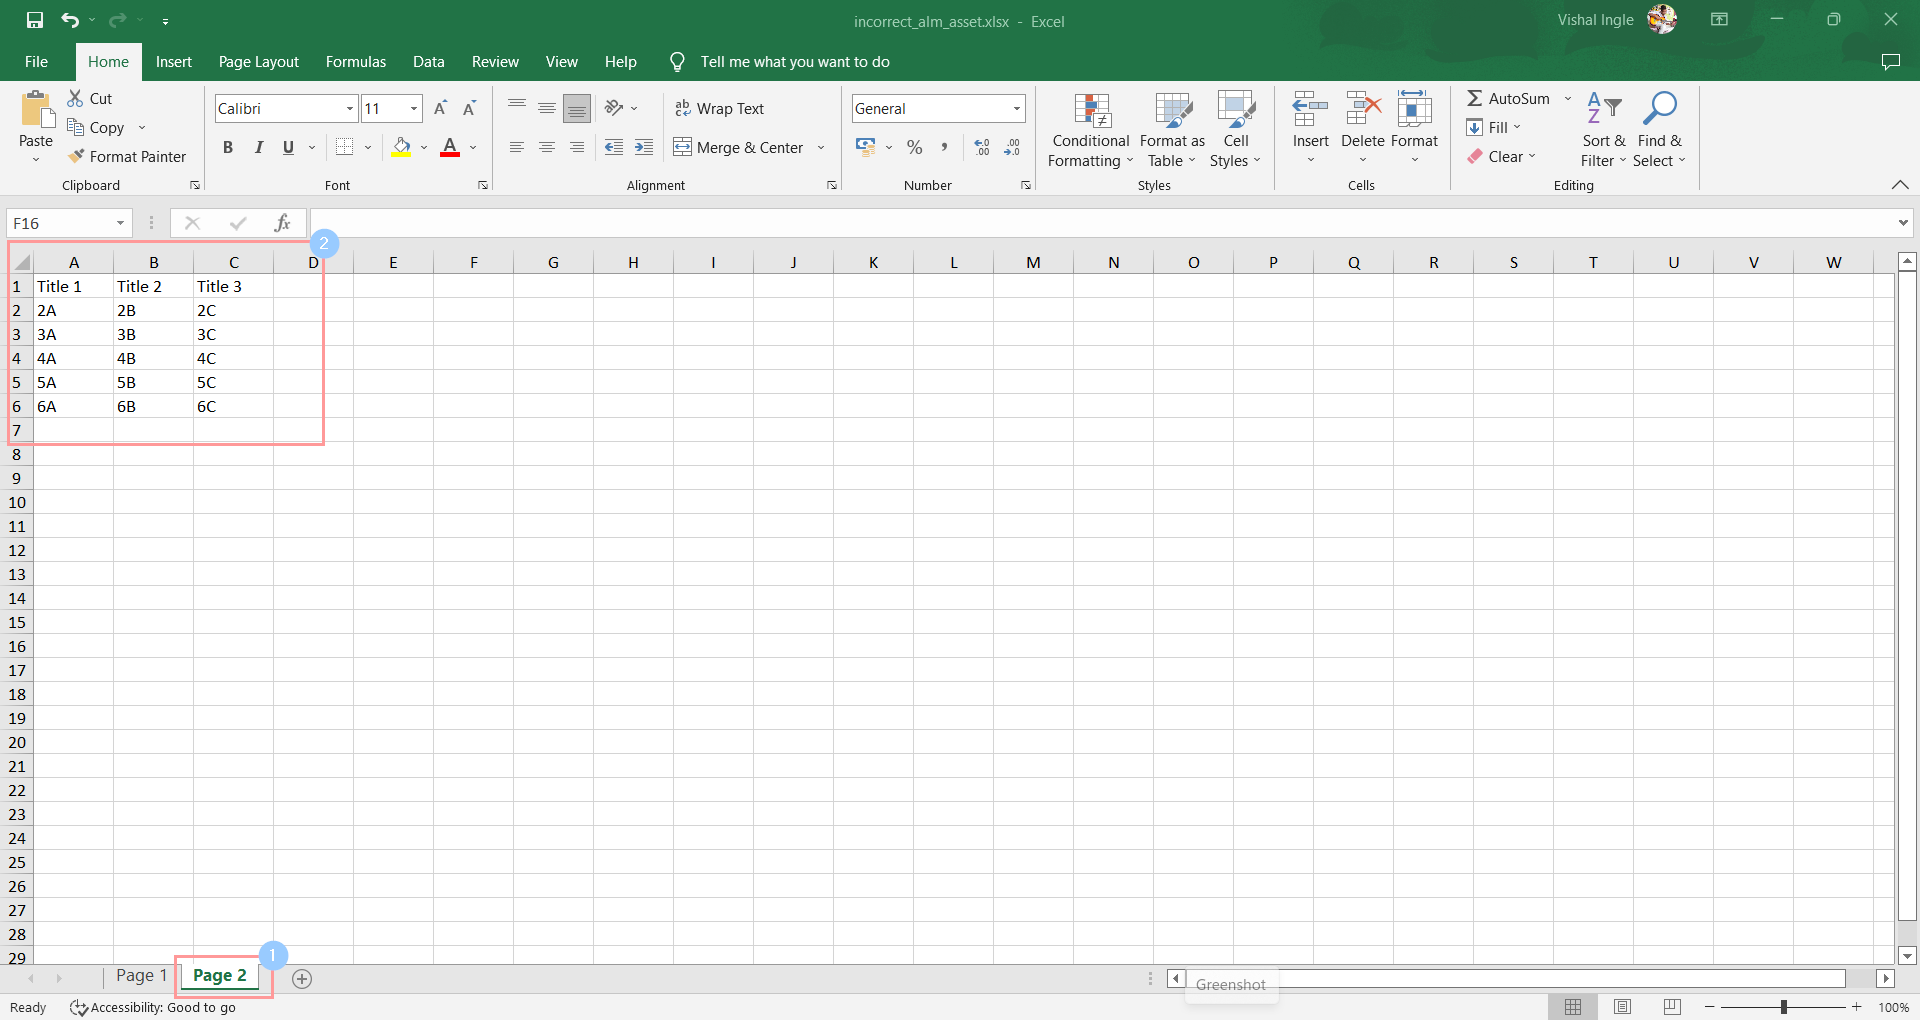
Let us modify our incorrect demo data sheet before proceeding furthur. Add another sheet with some demo data. E.g.:
Now navigate back to our fix script created in step one and replace the attachment with new updated sheet:
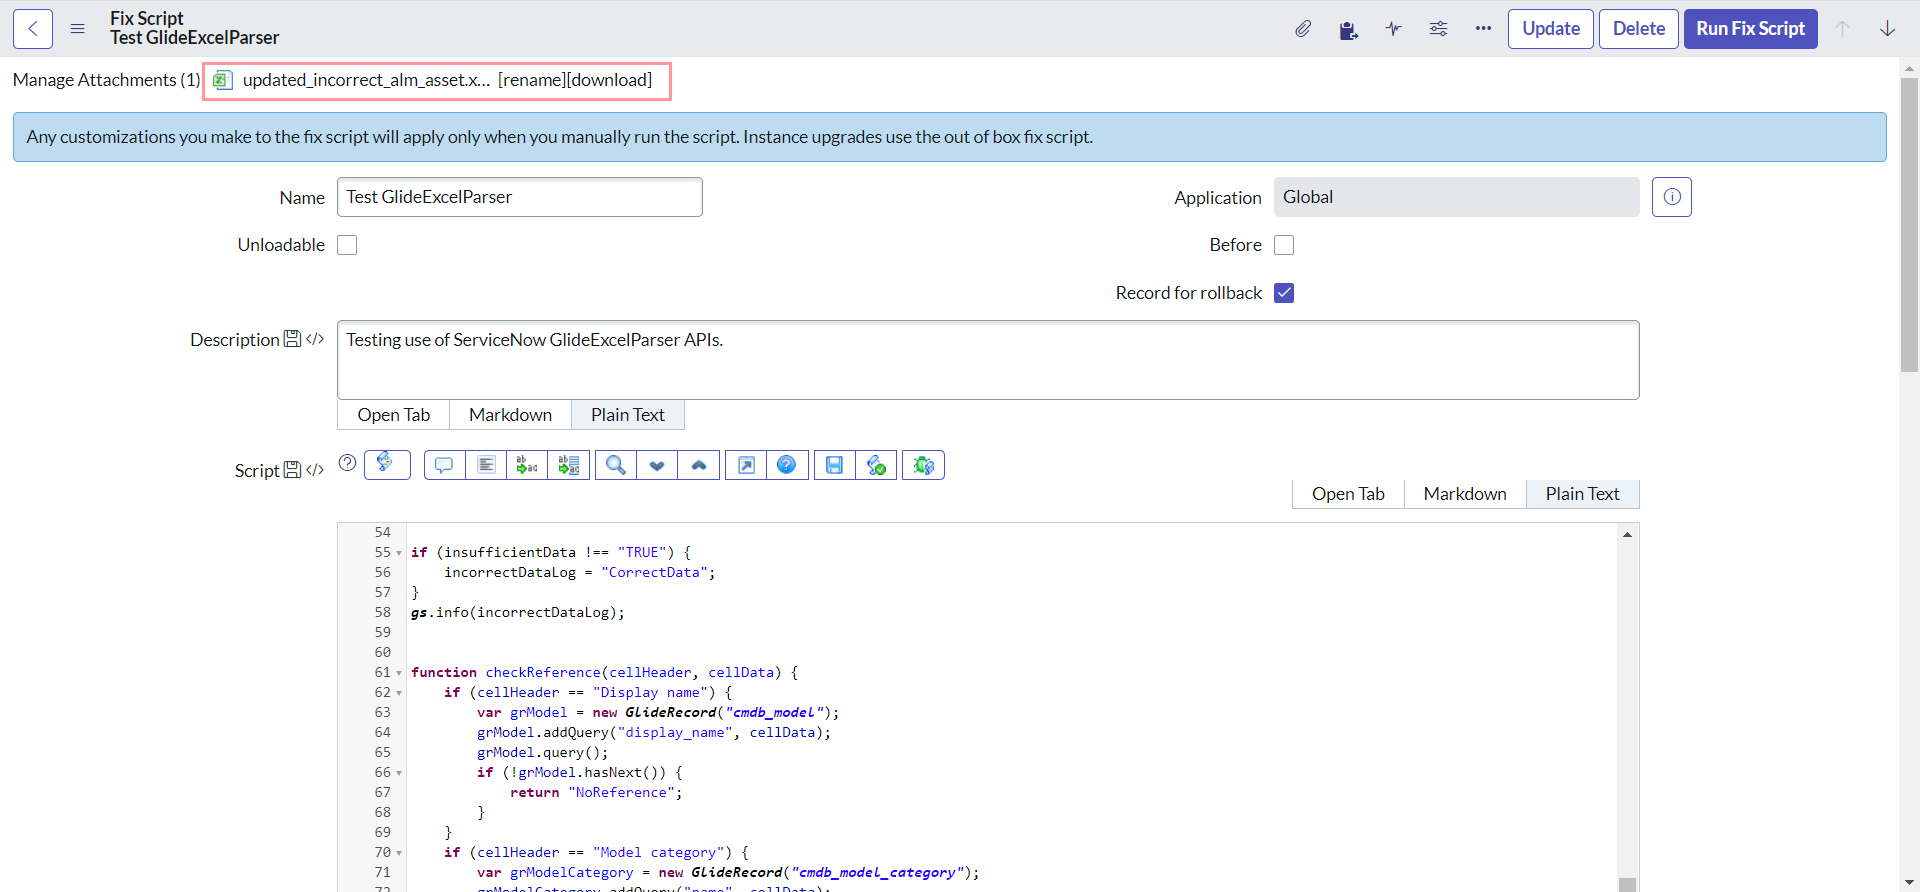
Lets remove the entire code from line number 19, as we do not need it for furthur testing:
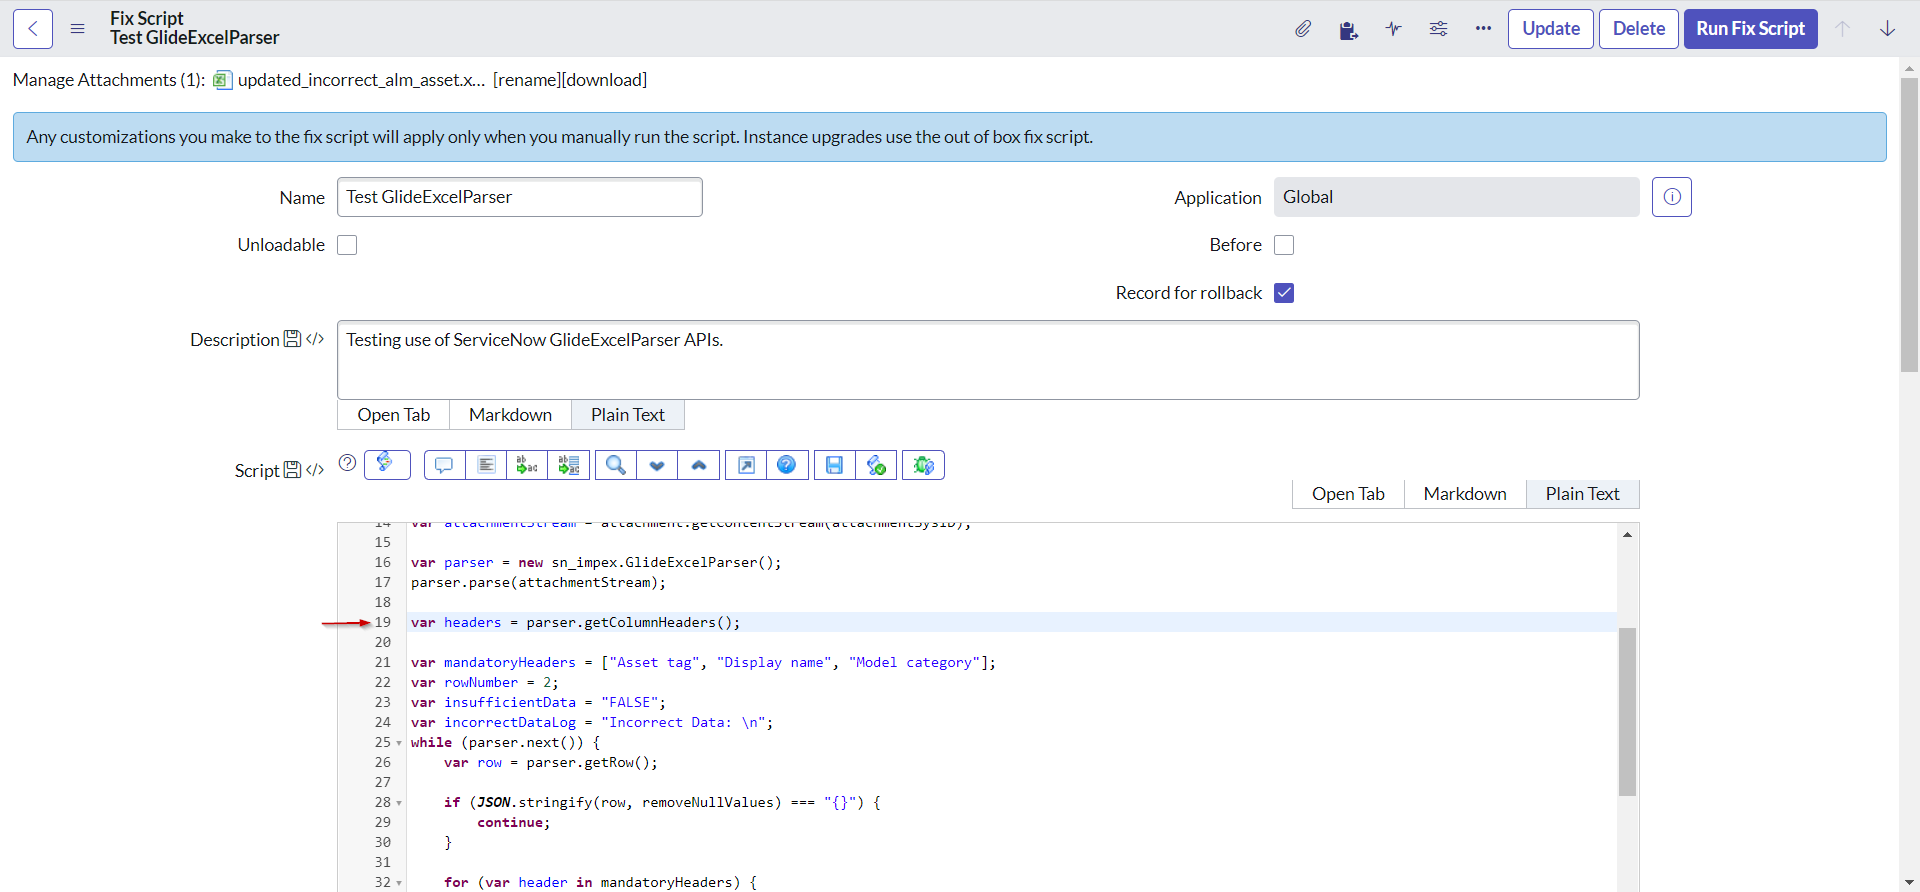
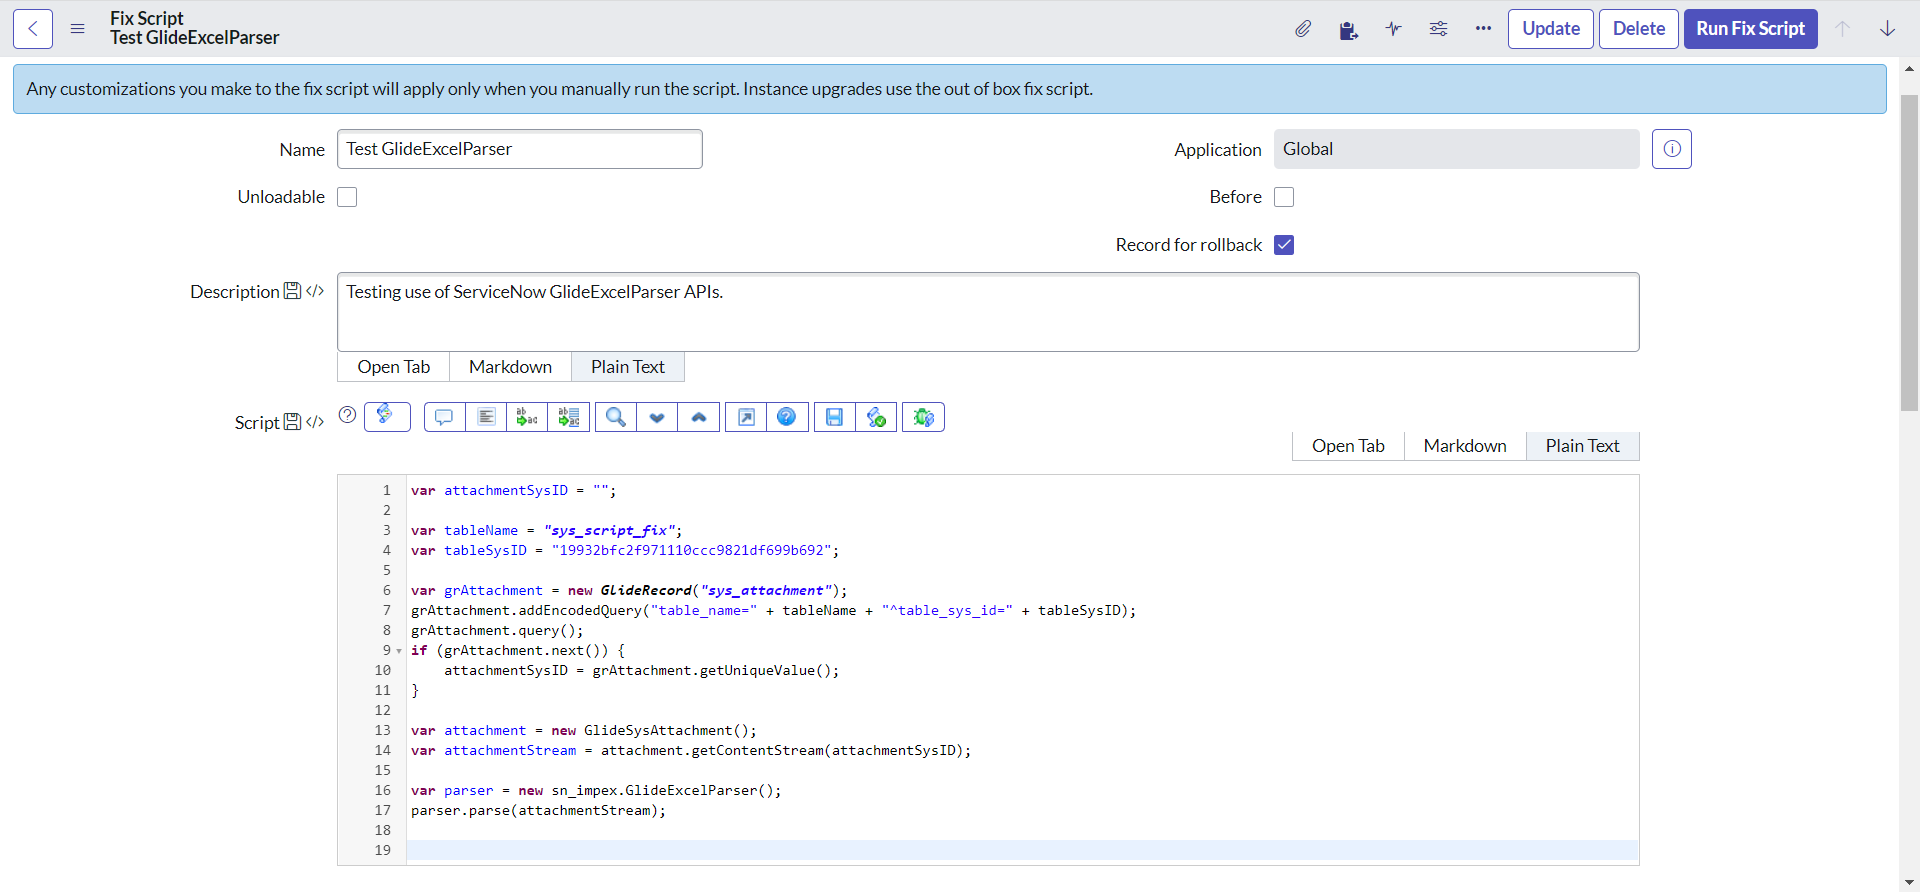
Our new script now should look like this:
var attachmentSysID = "";

var tableName = "sys_script_fix";
var tableSysID = "19932bfc2f971110ccc9821df699b692";

var grAttachment = new GlideRecord("sys_attachment");
grAttachment.addEncodedQuery("table_name=" + tableName + "^table_sys_id=" + tableSysID);
grAttachment.query();
if (grAttachment.next()) {
    attachmentSysID = grAttachment.getUniqueValue();
}

var attachment = new GlideSysAttachment();
var attachmentStream = attachment.getContentStream(attachmentSysID);

var parser = new sn_impex.GlideExcelParser();
parser.parse(attachmentStream);
setSheetName() & setSheetNumber()
setSheetName() sets the name of the sheet to be retrieved. Whereas, setSheetNumber() sets the number of the Excel sheet to be retrieved. However, It worths remembering that if both setSheetNumber() and setSheetName() are set, setSheetName() is used.
Add the following lines of code at the end of our sheet to retrive all sheet names:
// Get the worksheet names to be parsed in the Excel document
var list_sheet_name = parser.getSheetNames();

gs.info(" Sheet Names " + list_sheet_name.join(", "));
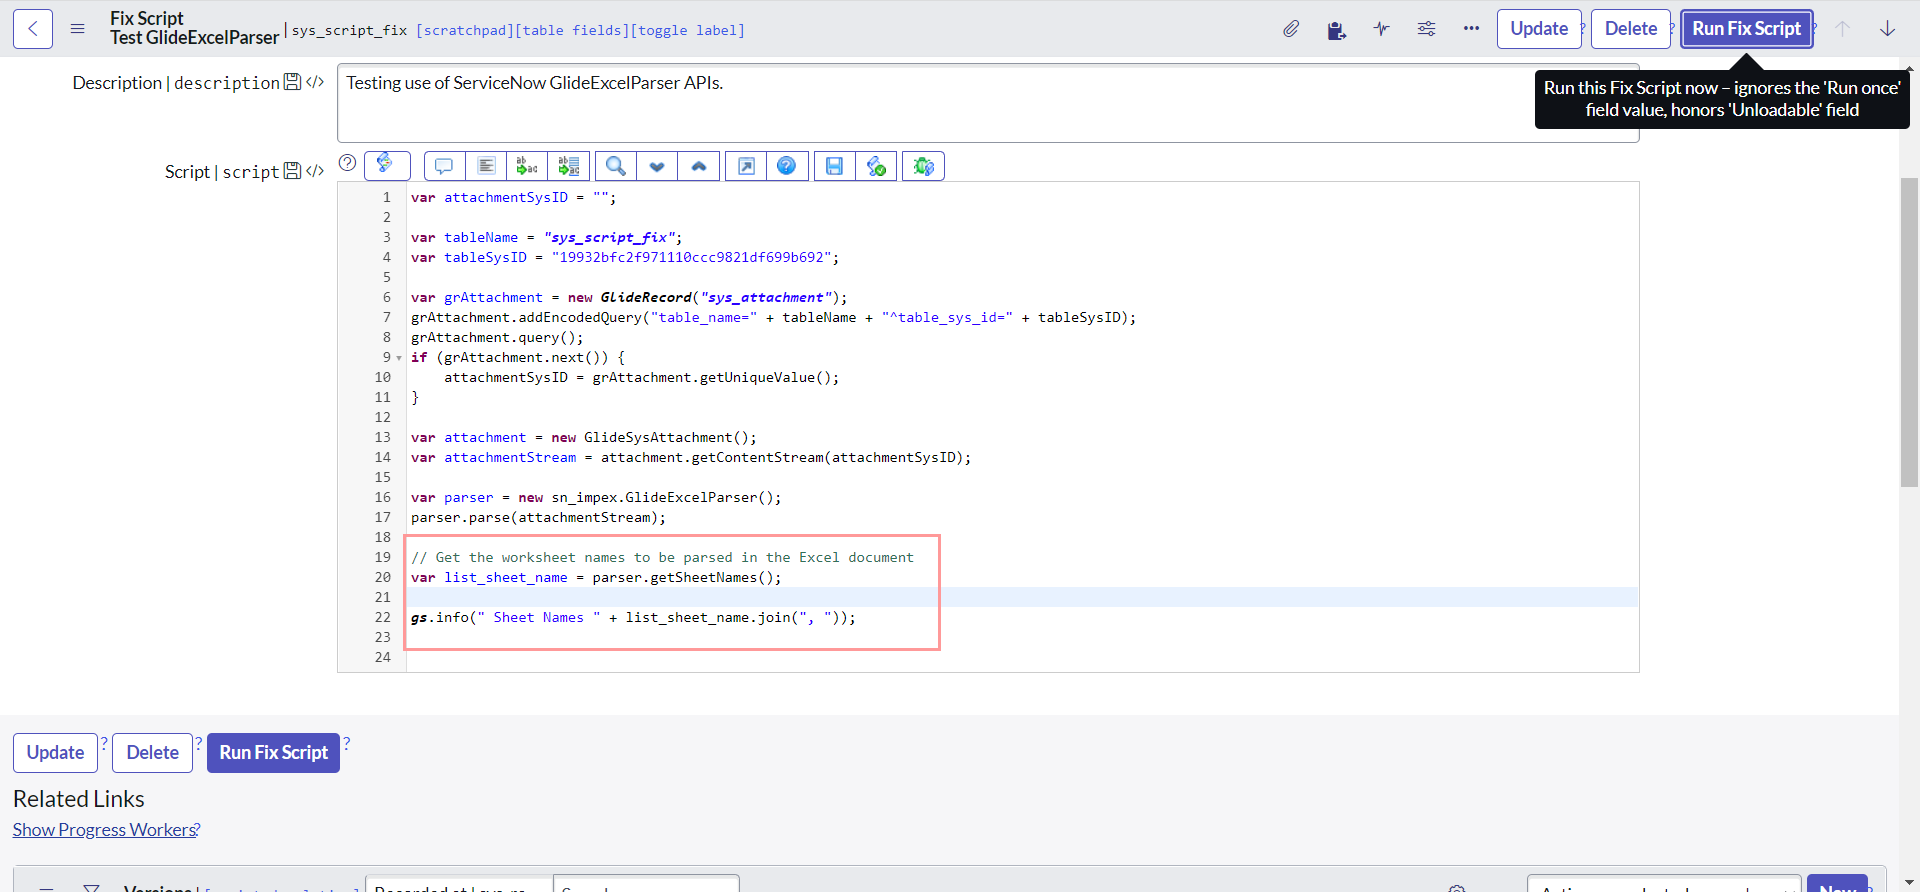
After executing the code, we should be able to see both of our the sheet names in the output:
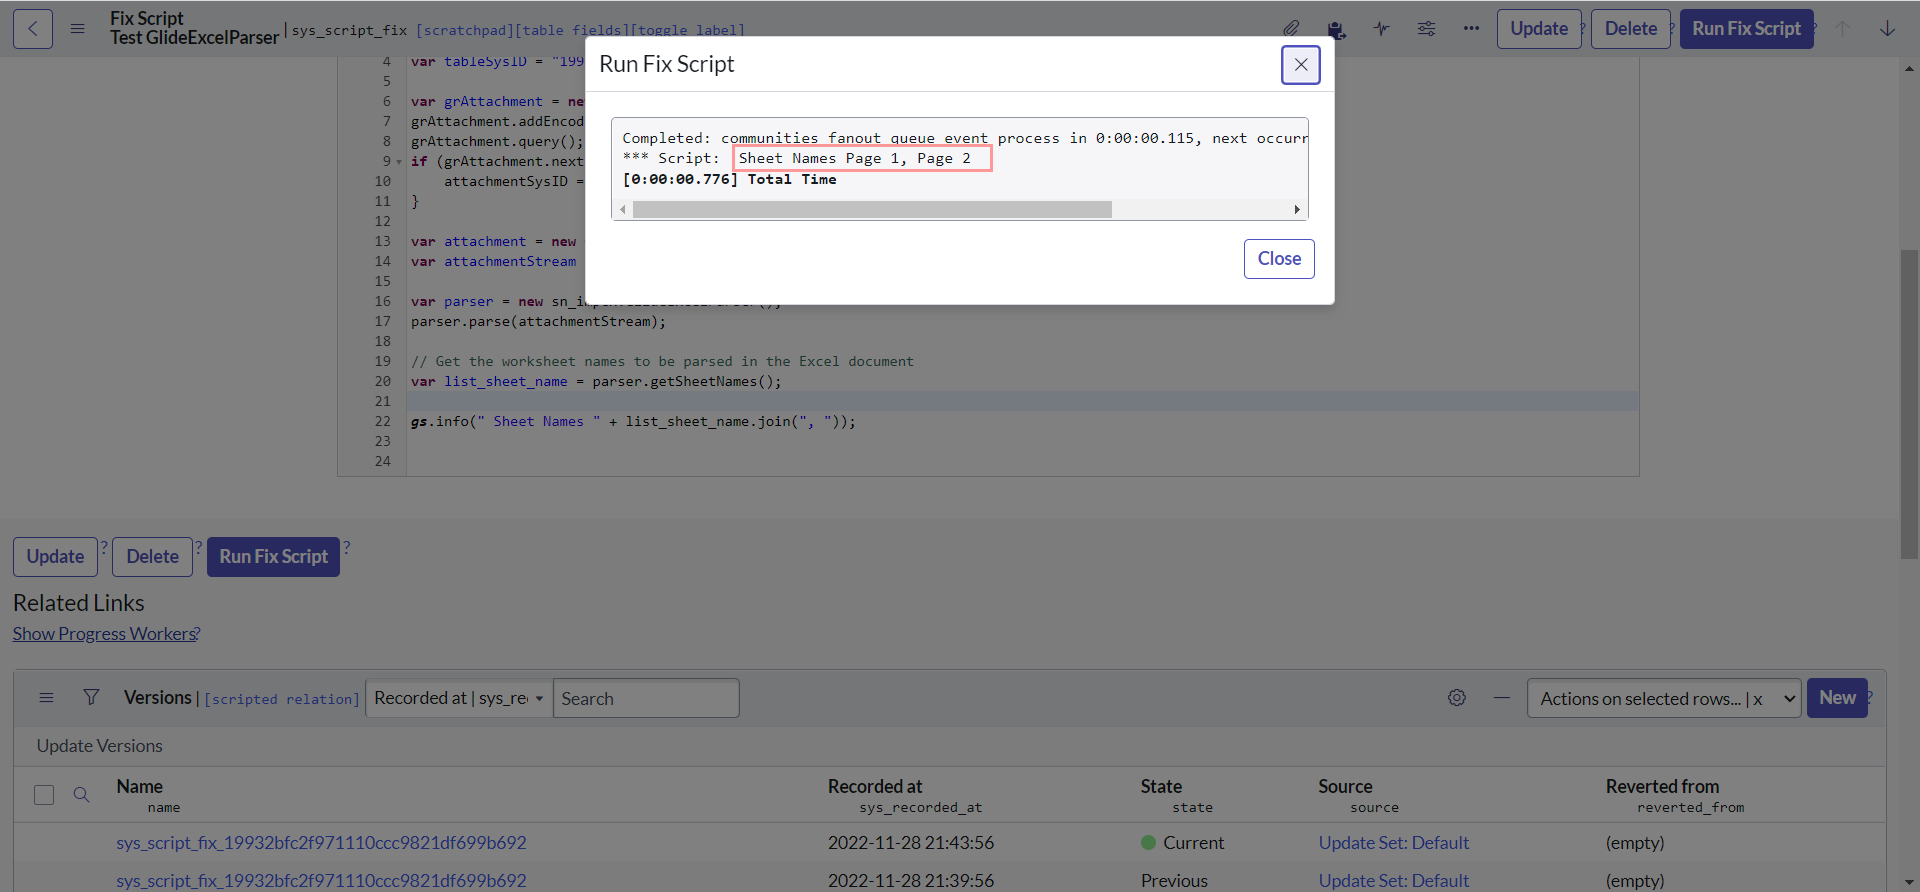
Now to test setSheetName first, Let's modify our code as below:
var attachmentSysID = "";

var tableName = "sys_script_fix";
var tableSysID = "19932bfc2f971110ccc9821df699b692";

var grAttachment = new GlideRecord("sys_attachment");
grAttachment.addEncodedQuery("table_name=" + tableName + "^table_sys_id=" + tableSysID);
grAttachment.query();
if (grAttachment.next()) {
    attachmentSysID = grAttachment.getUniqueValue();
}

var attachment = new GlideSysAttachment();
var attachmentStream = attachment.getContentStream(attachmentSysID);

var parser = new sn_impex.GlideExcelParser();
parser.setSource(attachmentStream);
parser.setSheetName("Page 2");
parser.parse();

// Get the worksheet names to be parsed in the Excel document
// var list_sheet_name = parser.getSheetNames();

// gs.info(" Sheet Names " + list_sheet_name.join(", "));

var headers = parser.getColumnHeaders();
while (parser.next()) {
    var row = parser.getRow();
    var currentRowCellData = "";
    for (var header in headers) {
        var currentHeader = headers[header];
        currentRowCellData += row[currentHeader] + "\t";
    }
    gs.info("currentRowCellData: " + currentRowCellData);
}
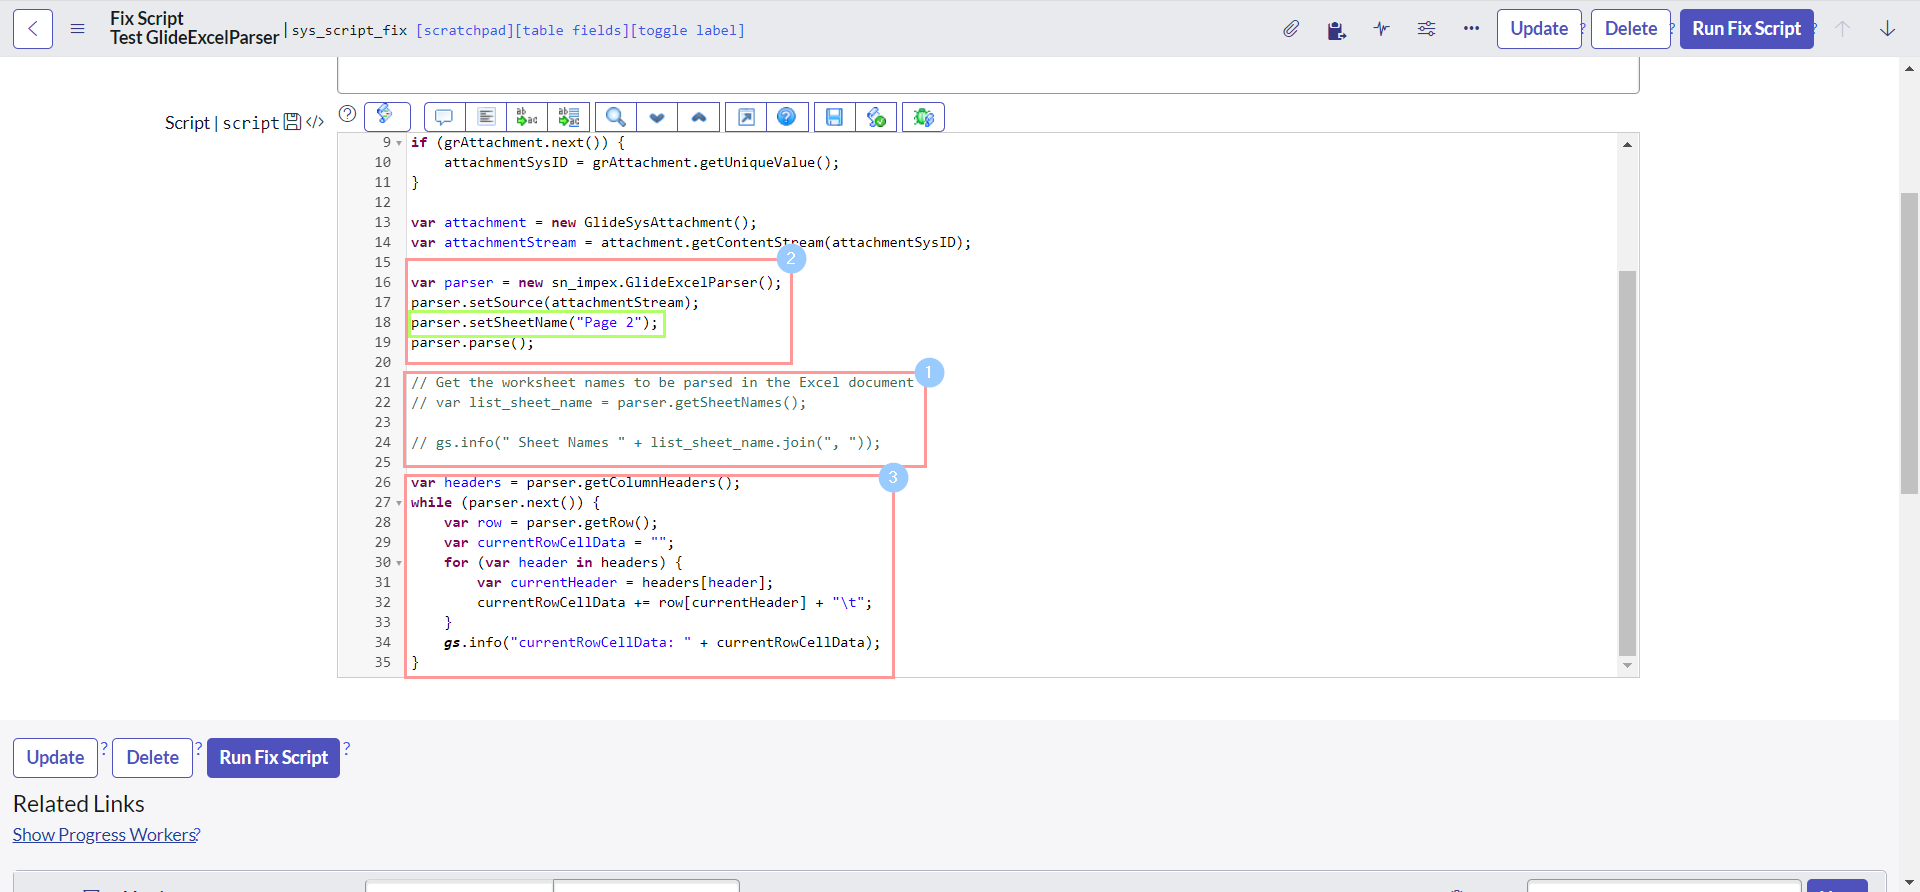
After executing the code, we should be able to see the data from sheet "Page 2" :
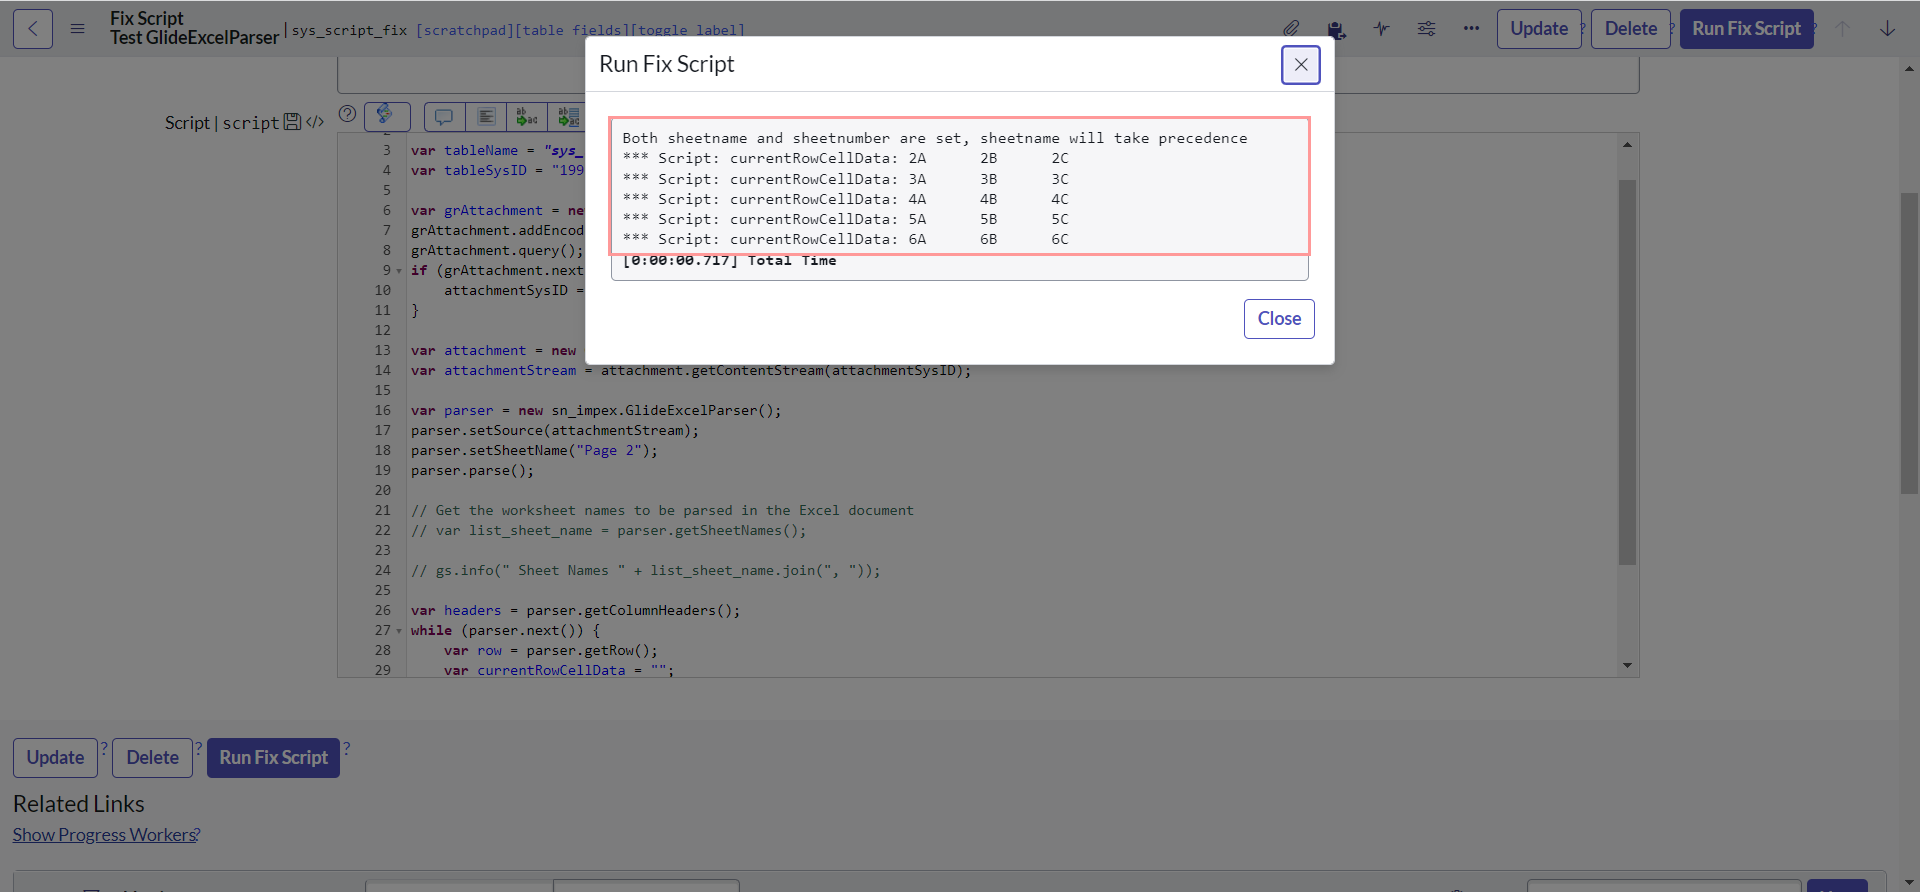
If you are paying an attention so far, we have an additional method setSource that we did not yet discussed and slightly different version of parse (without parameter); but they play very important role in this case. We will talk about them next, but first let test our next API i.e. setSheetNumber.
Let's modify our code to use setSheetNumber instead of setSheetName. Please note that 0 denotes sheet 1, 1 denotes sheet 2 & so on...:
parser.setSheetNumber(1);
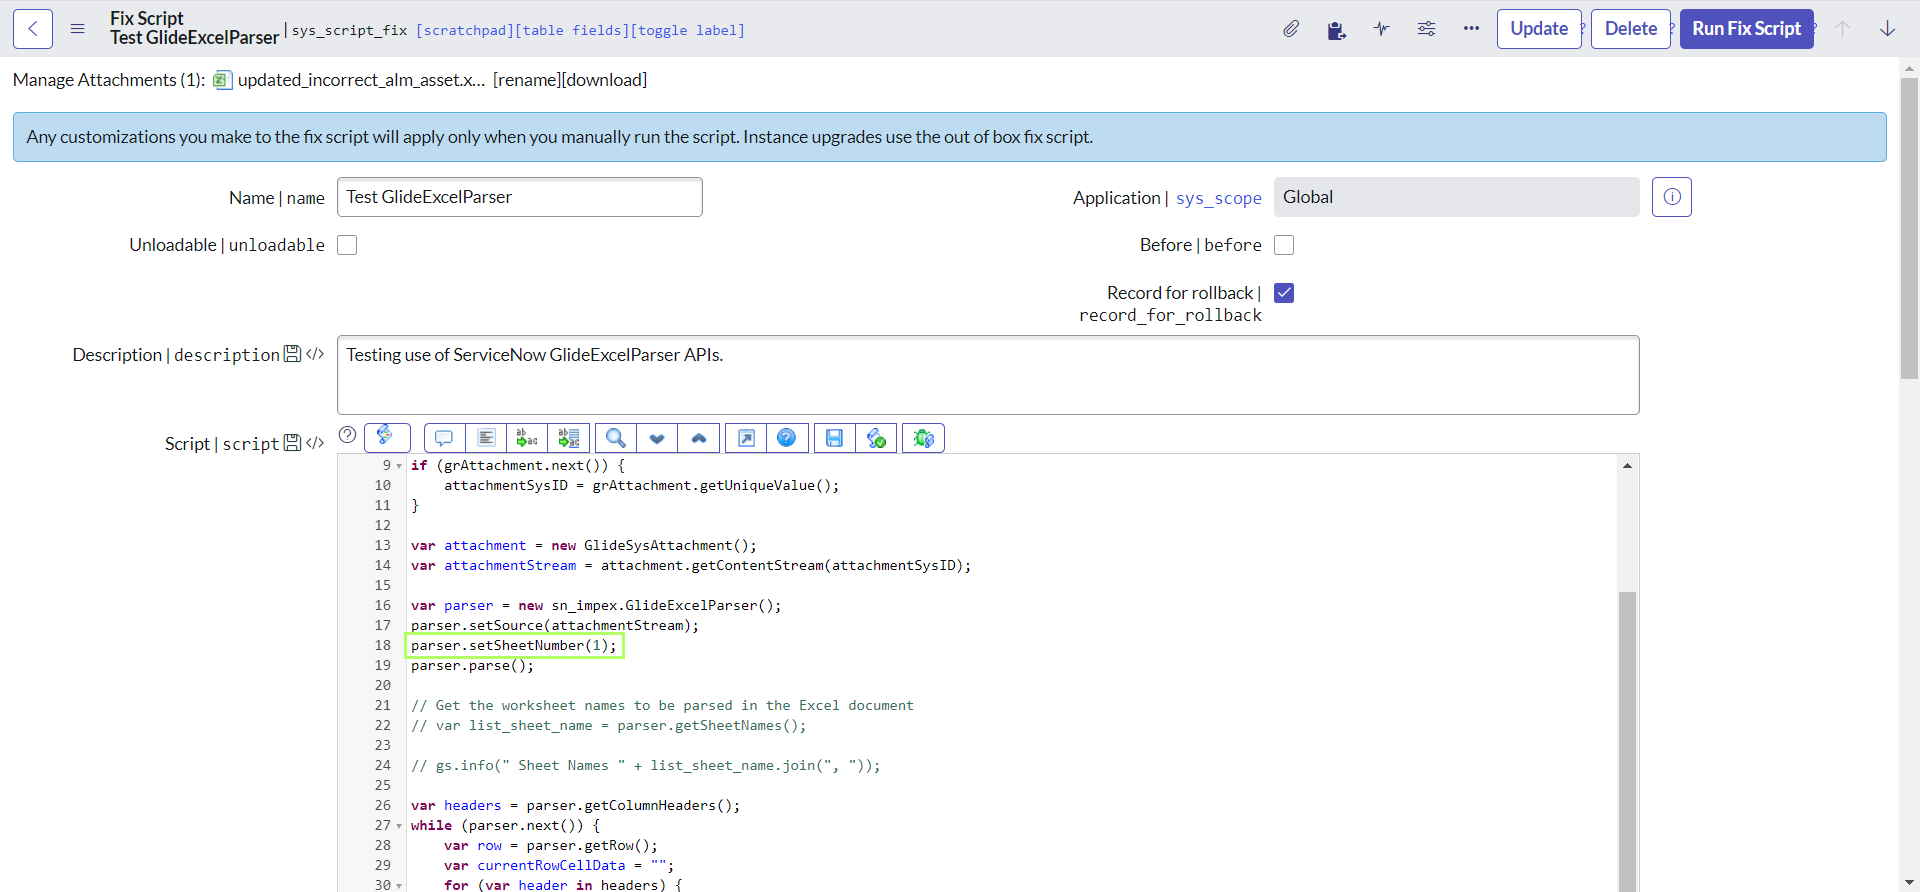
After executing the code, we should be able to see the same output as above:
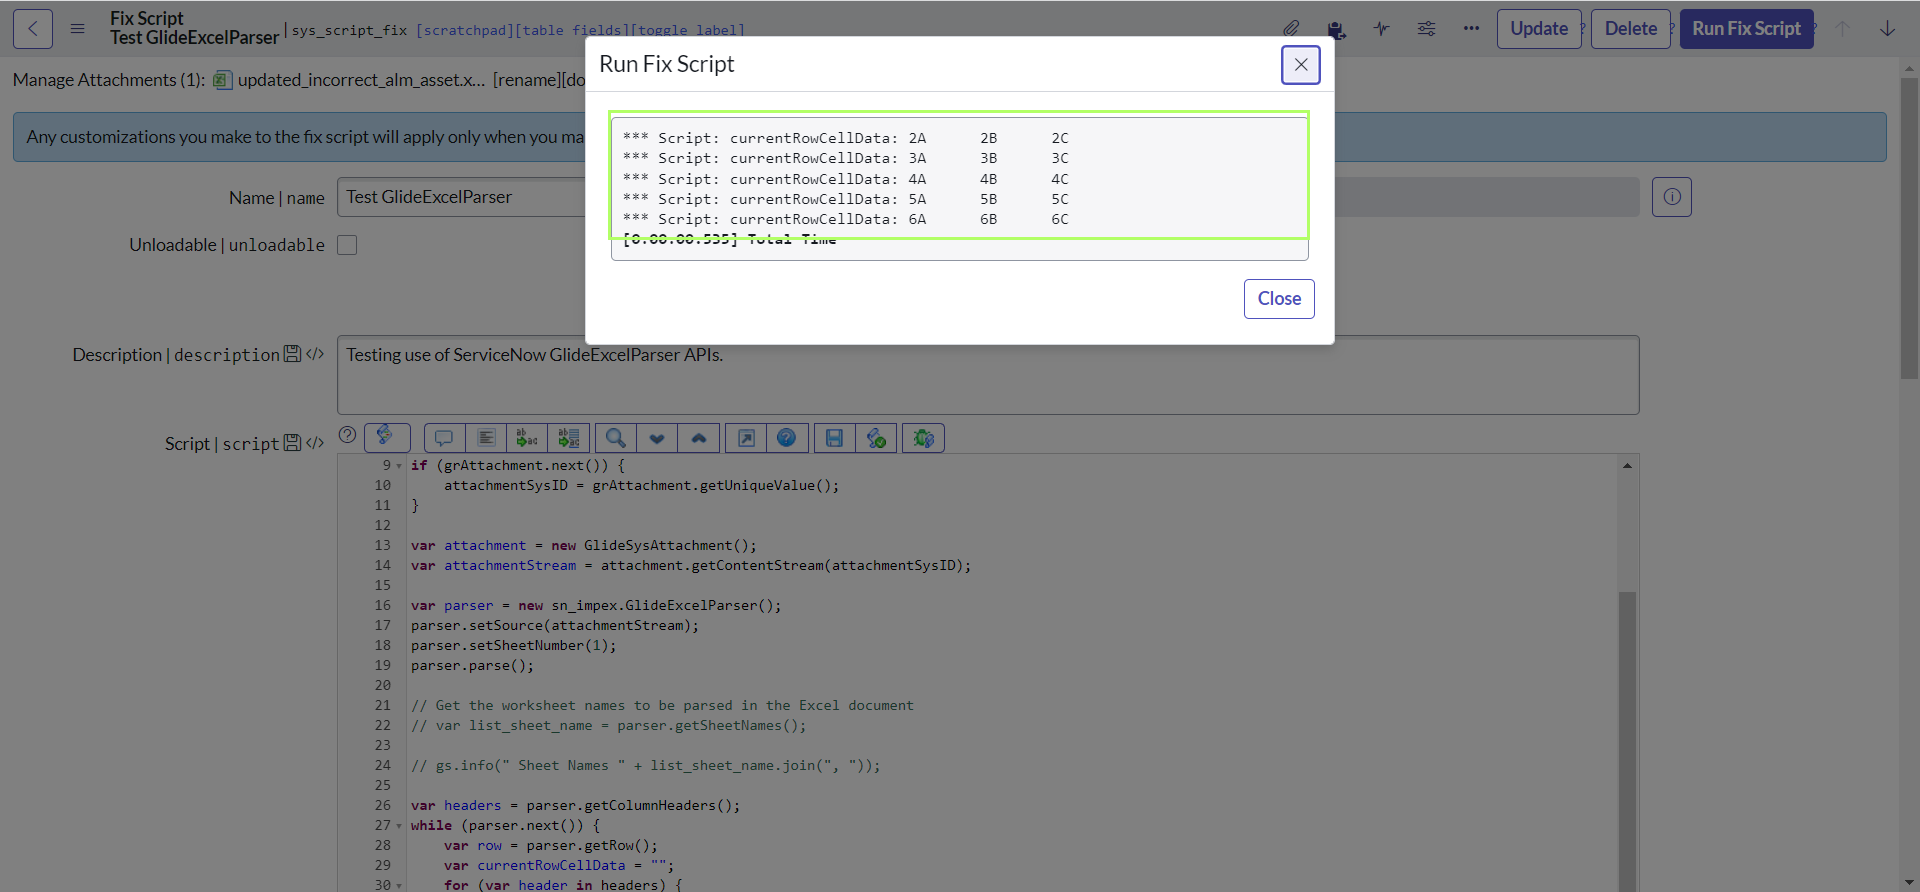
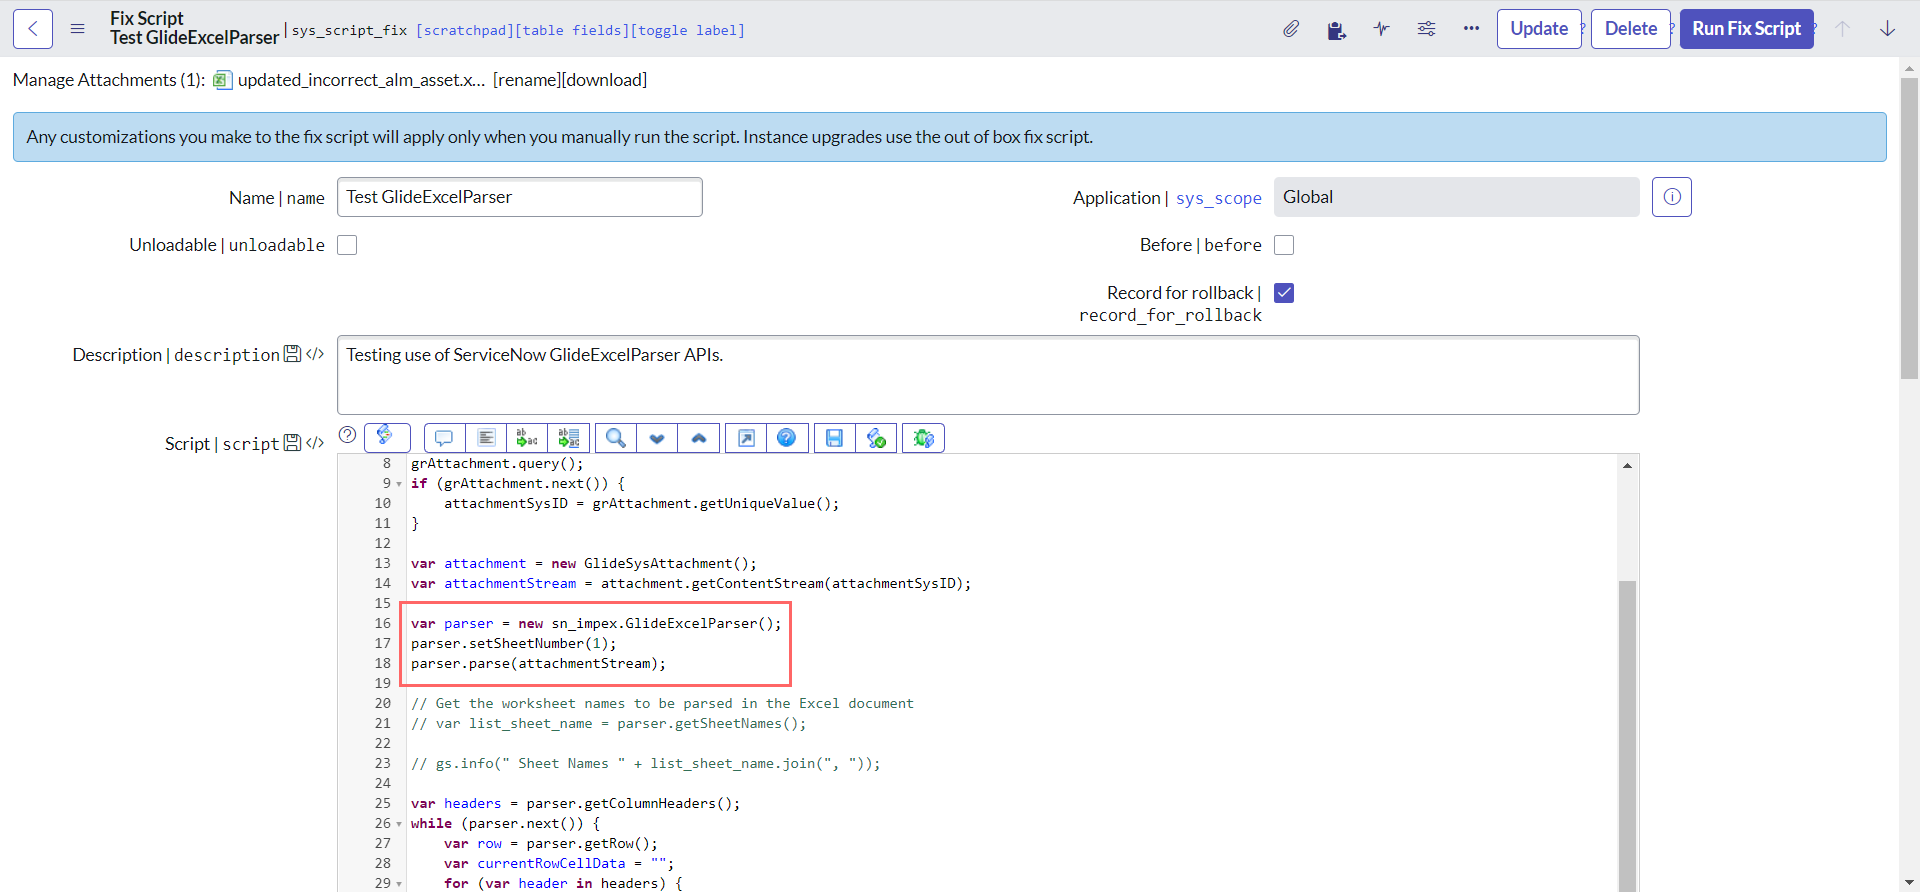
It worth mentioning that, it is not necessary to use setSource and we can as well do it the old way as shown below:
var attachmentSysID = "";

var tableName = "sys_script_fix";
var tableSysID = "19932bfc2f971110ccc9821df699b692";

var grAttachment = new GlideRecord("sys_attachment");
grAttachment.addEncodedQuery("table_name=" + tableName + "^table_sys_id=" + tableSysID);
grAttachment.query();
if (grAttachment.next()) {
    attachmentSysID = grAttachment.getUniqueValue();
}

var attachment = new GlideSysAttachment();
var attachmentStream = attachment.getContentStream(attachmentSysID);

var parser = new sn_impex.GlideExcelParser();
parser.setSheetNumber(1);
parser.parse(attachmentStream);

// Get the worksheet names to be parsed in the Excel document
// var list_sheet_name = parser.getSheetNames();

// gs.info(" Sheet Names " + list_sheet_name.join(", "));

var headers = parser.getColumnHeaders();
while (parser.next()) {
    var row = parser.getRow();
    var currentRowCellData = "";
    for (var header in headers) {
        var currentHeader = headers[header];
        currentRowCellData += row[currentHeader] + "\t";
    }
    gs.info("currentRowCellData: " + currentRowCellData);
}
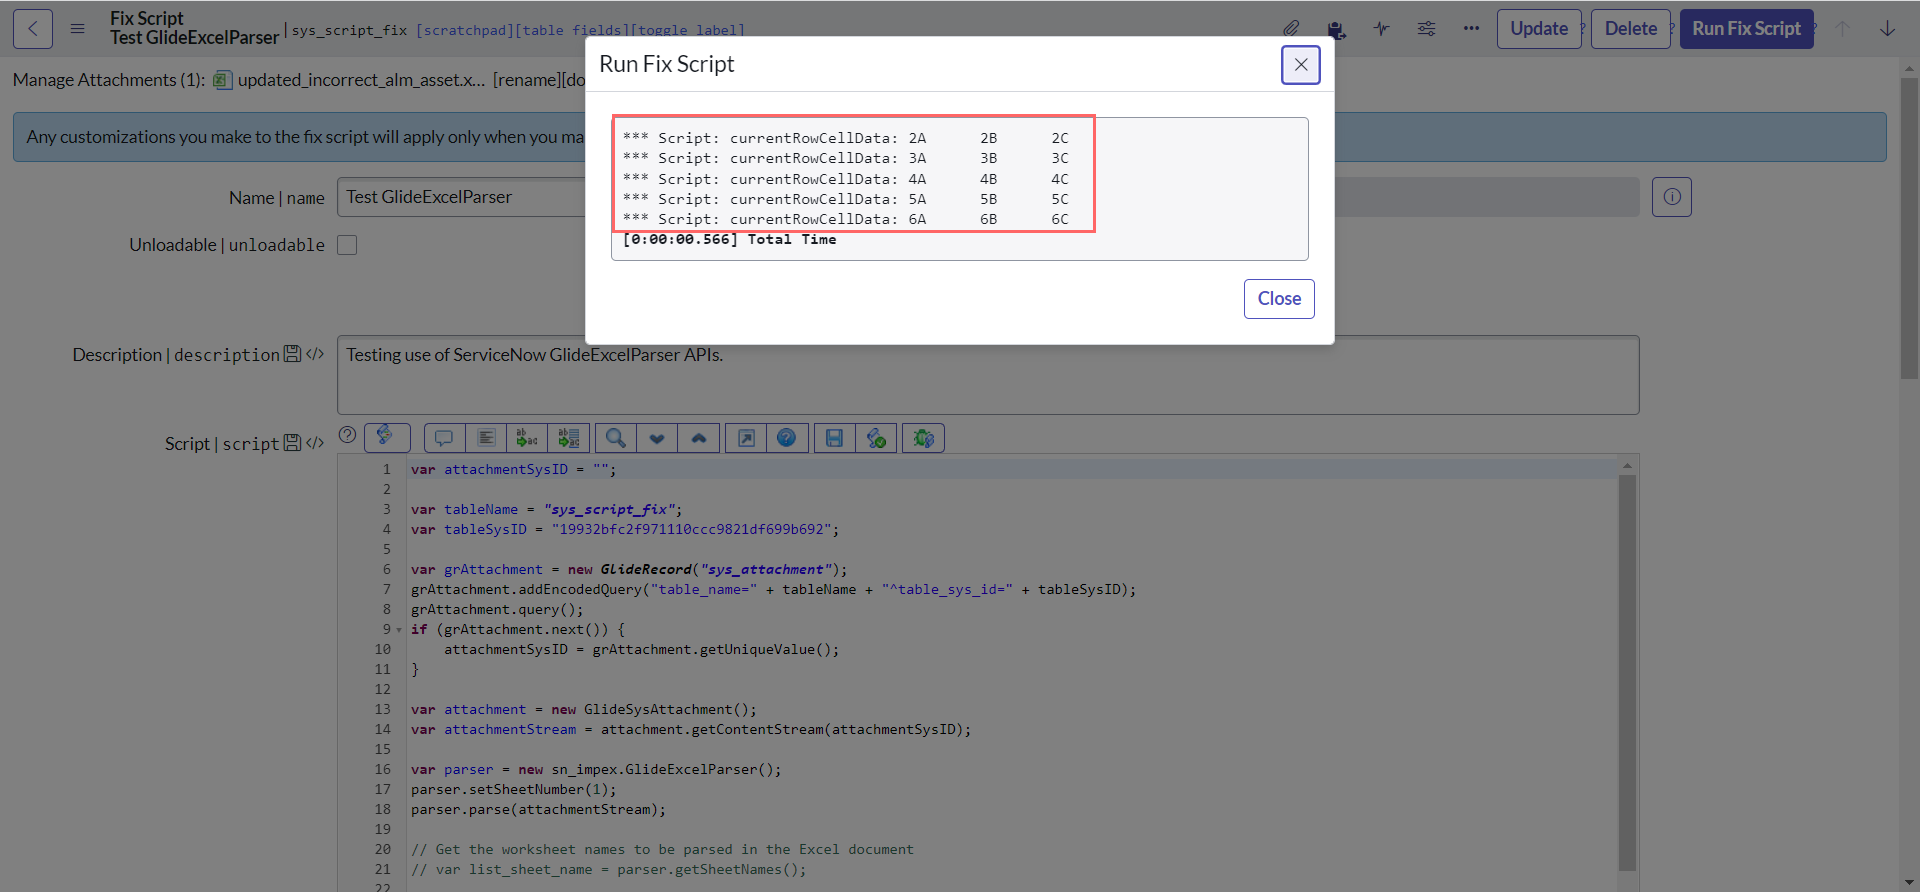
setSource()
setSource() defines an input source for parsing multiple times or parsing each worksheet in an Excel file.
E.g. In our demo sheet, we have two sheets "Page 1" & "Page 2". We can use setSource to parse an Excel file attachment multiple times to retrieve column headers and print values of each row for each worksheet.
Let's copy a part of code and paste it again at the end of the script and just change the sheet number. We will get some warnings as we are not following the coding best practices, but let's ignore them for a moment:
var attachmentSysID = "";

var tableName = "sys_script_fix";
var tableSysID = "19932bfc2f971110ccc9821df699b692";

var grAttachment = new GlideRecord("sys_attachment");
grAttachment.addEncodedQuery("table_name=" + tableName + "^table_sys_id=" + tableSysID);
grAttachment.query();
if (grAttachment.next()) {
    attachmentSysID = grAttachment.getUniqueValue();
}

var attachment = new GlideSysAttachment();
var attachmentStream = attachment.getContentStream(attachmentSysID);

var parser = new sn_impex.GlideExcelParser();
parser.setSource(attachmentStream);
parser.setSheetNumber(1);
parser.parse();

var headers = parser.getColumnHeaders();
while (parser.next()) {
    var row = parser.getRow();
    var currentRowCellData = "";
    for (var header in headers) {
        var currentHeader = headers[header];
        currentRowCellData += row[currentHeader] + "\t";
    }
    gs.info("currentRowCellData: " + currentRowCellData);
}

parser.setSheetNumber(0);
parser.parse();

var headers = parser.getColumnHeaders();
while (parser.next()) {
    var row = parser.getRow();
    var currentRowCellData = "";
    for (var header in headers) {
        var currentHeader = headers[header];
        currentRowCellData += row[currentHeader] + "\t";
    }
    gs.info("currentRowCellData: " + currentRowCellData);
}
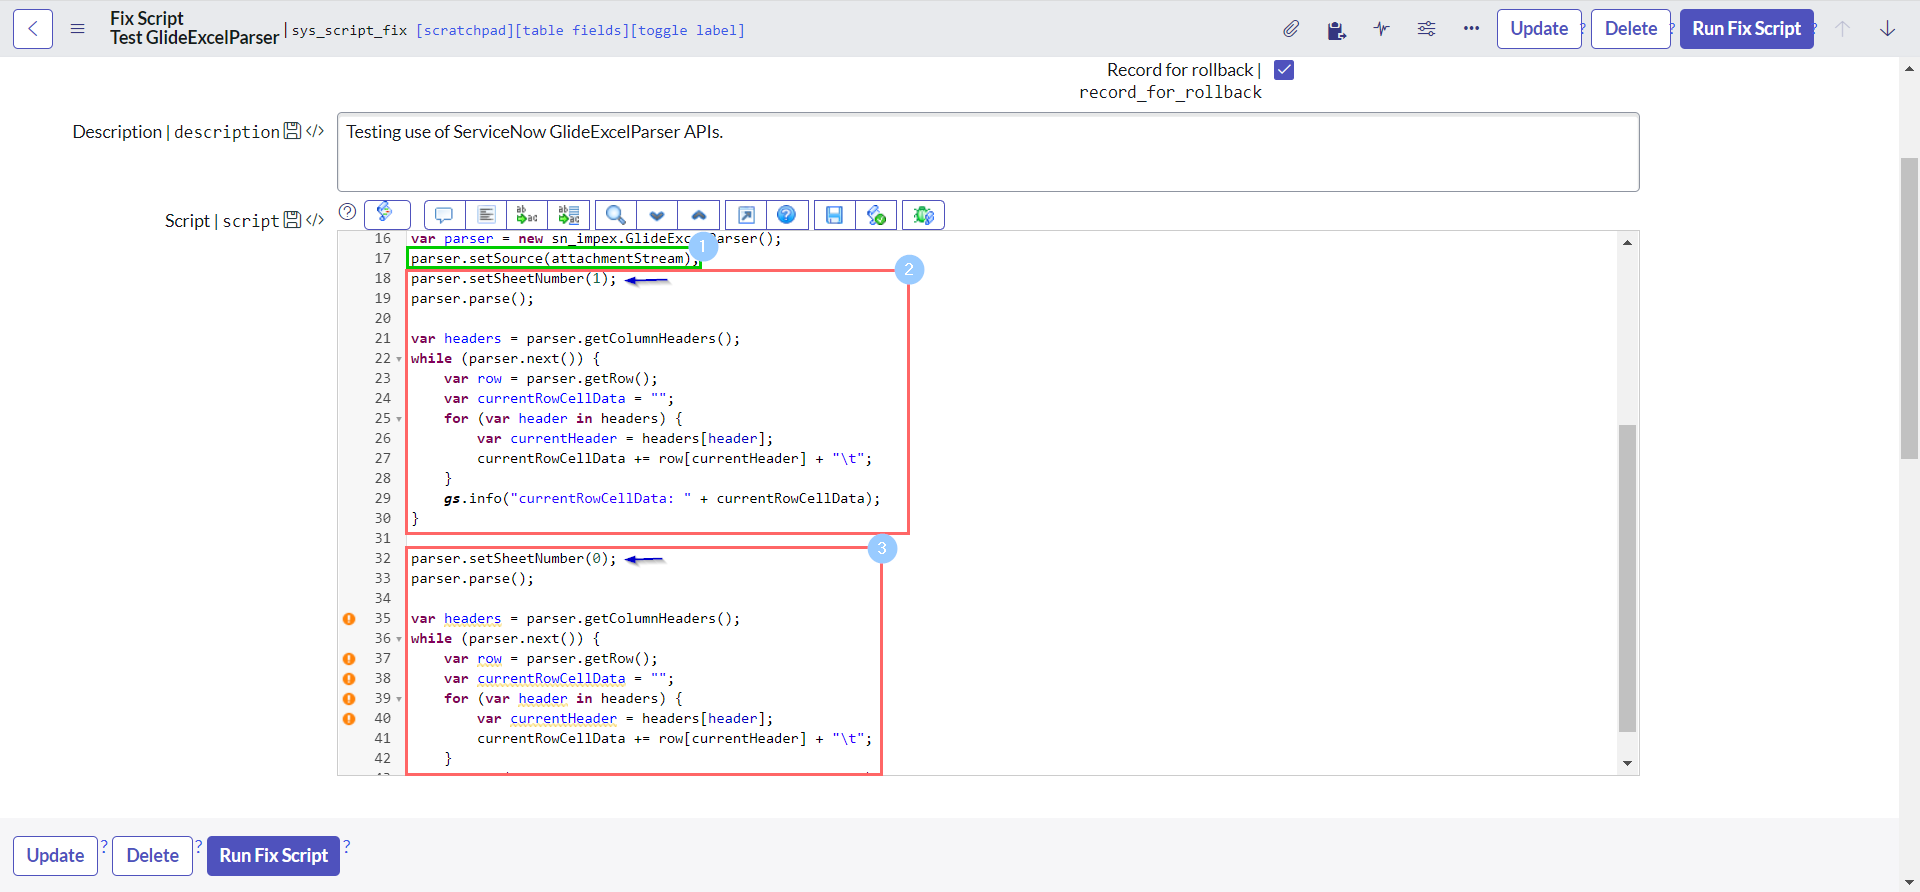
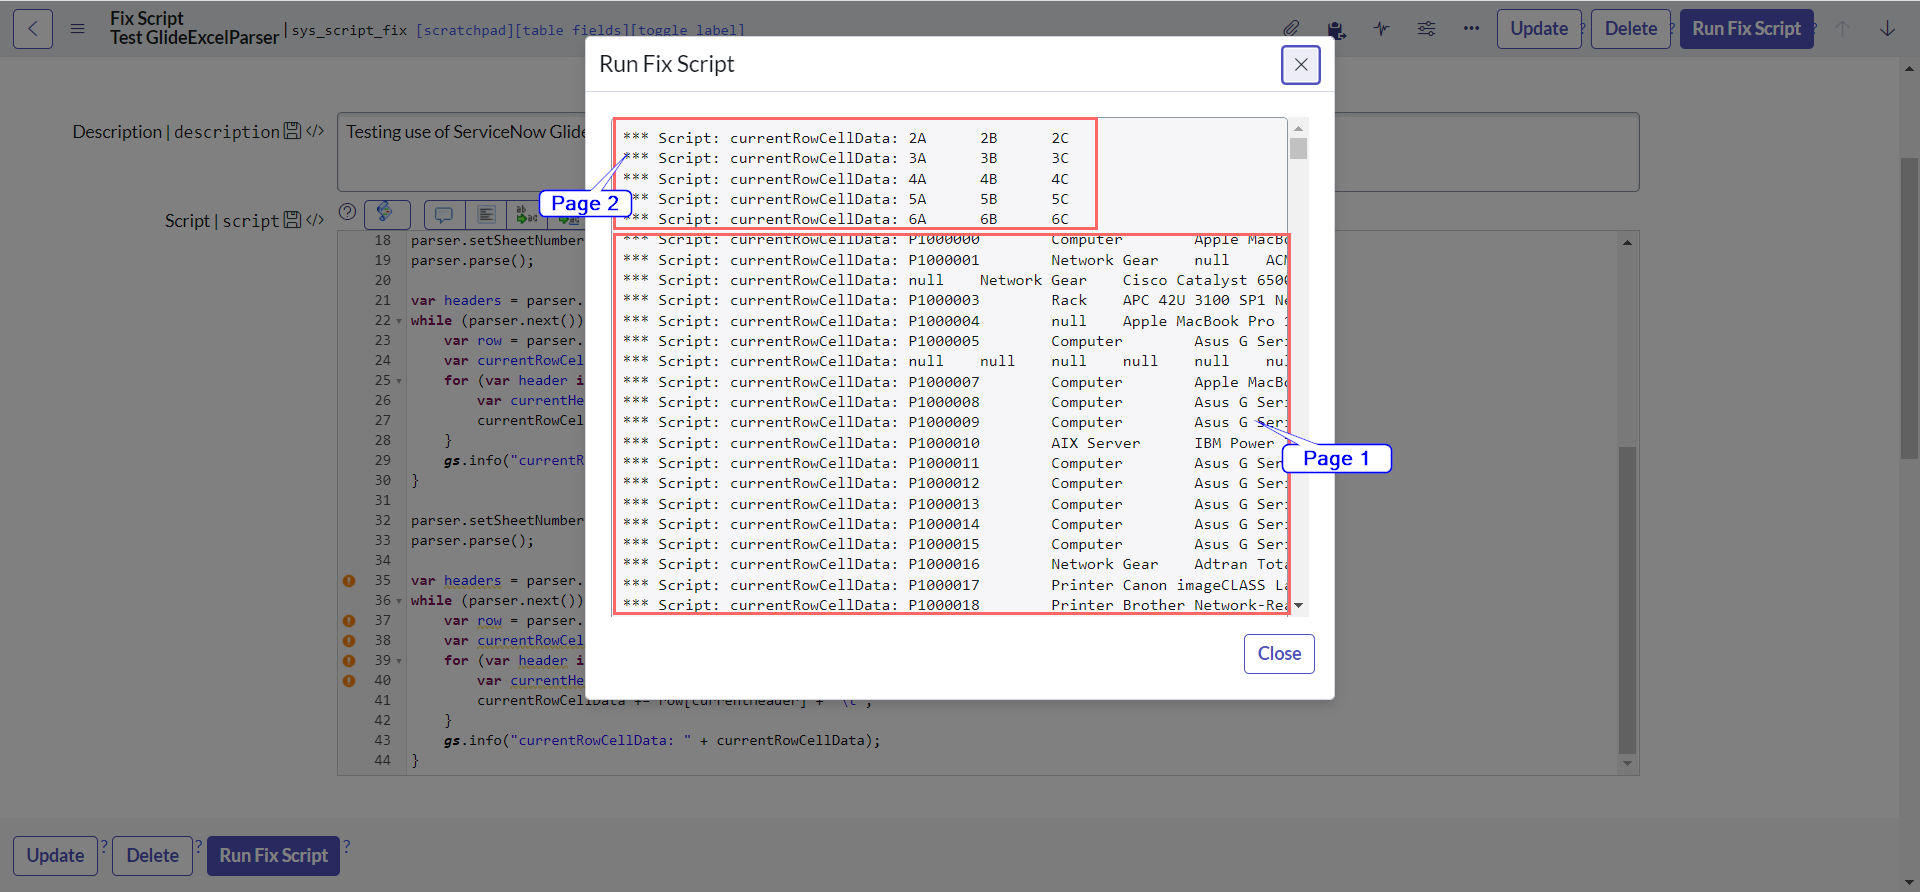
Observe that we did parse each of the sheet using same parser and were able to retrieve the data:
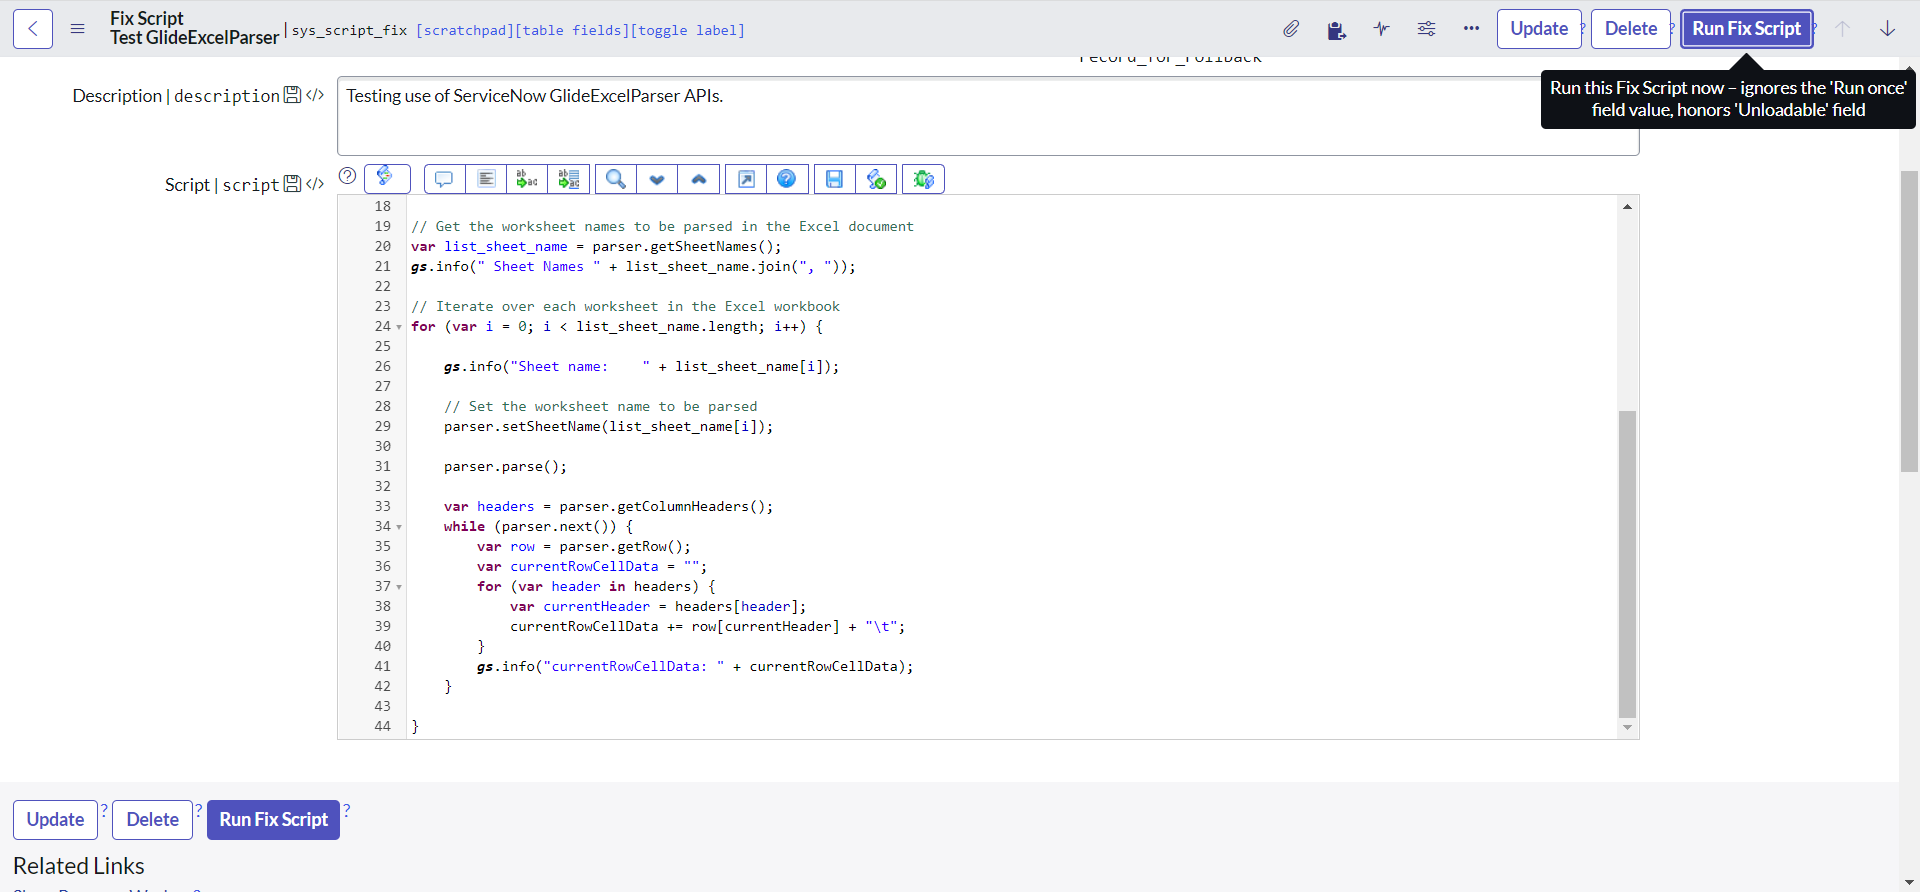
Lets modify our code to be better and parse all sheet's data automatically:
var attachmentSysID = "";

var tableName = "sys_script_fix";
var tableSysID = "19932bfc2f971110ccc9821df699b692";

var grAttachment = new GlideRecord("sys_attachment");
grAttachment.addEncodedQuery("table_name=" + tableName + "^table_sys_id=" + tableSysID);
grAttachment.query();
if (grAttachment.next()) {
    attachmentSysID = grAttachment.getUniqueValue();
}

var attachment = new GlideSysAttachment();
var attachmentStream = attachment.getContentStream(attachmentSysID);

var parser = new sn_impex.GlideExcelParser();
parser.setSource(attachmentStream);

// Get the worksheet names to be parsed in the Excel document
var list_sheet_name = parser.getSheetNames();
gs.info(" Sheet Names " + list_sheet_name.join(", "));

// Iterate over each worksheet in the Excel workbook
for (var i = 0; i < list_sheet_name.length; i++) {

    gs.info("Sheet name:    " + list_sheet_name[i]);

    // Set the worksheet name to be parsed
    parser.setSheetName(list_sheet_name[i]);

    parser.parse();

    var headers = parser.getColumnHeaders();
    while (parser.next()) {
        var row = parser.getRow();
        var currentRowCellData = "";
        for (var header in headers) {
            var currentHeader = headers[header];
            currentRowCellData += row[currentHeader] + "\t";
        }
        gs.info("currentRowCellData: " + currentRowCellData);
    }

}
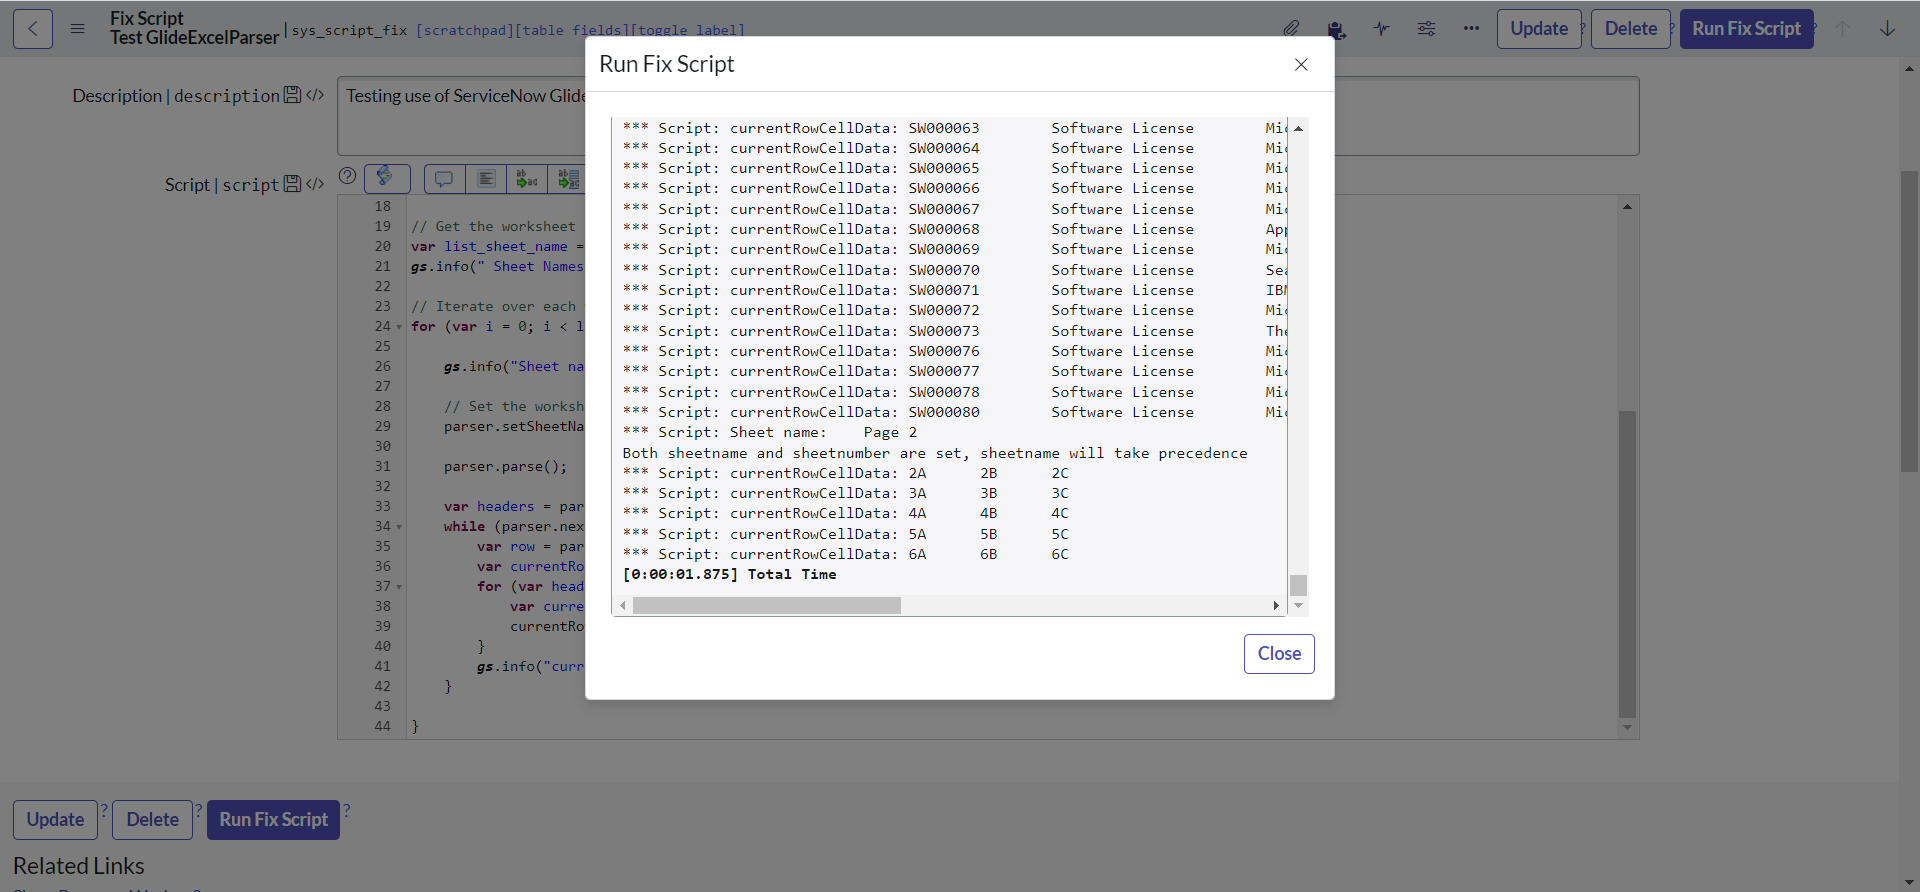
Observe that we did parse each of the sheet using same parser and were able to retrieve the data:
The best example for this API can be found at Developer portal, I encourage you to have a look at that.
The one of the important point to note here (and you might have already understood): we don't pass parameter to parse when used along with setSource.
setNullToEmpty()
setNullToEmpty() accepts one parameter which when true, return an empty value instead of null when an Excel cell is not present.
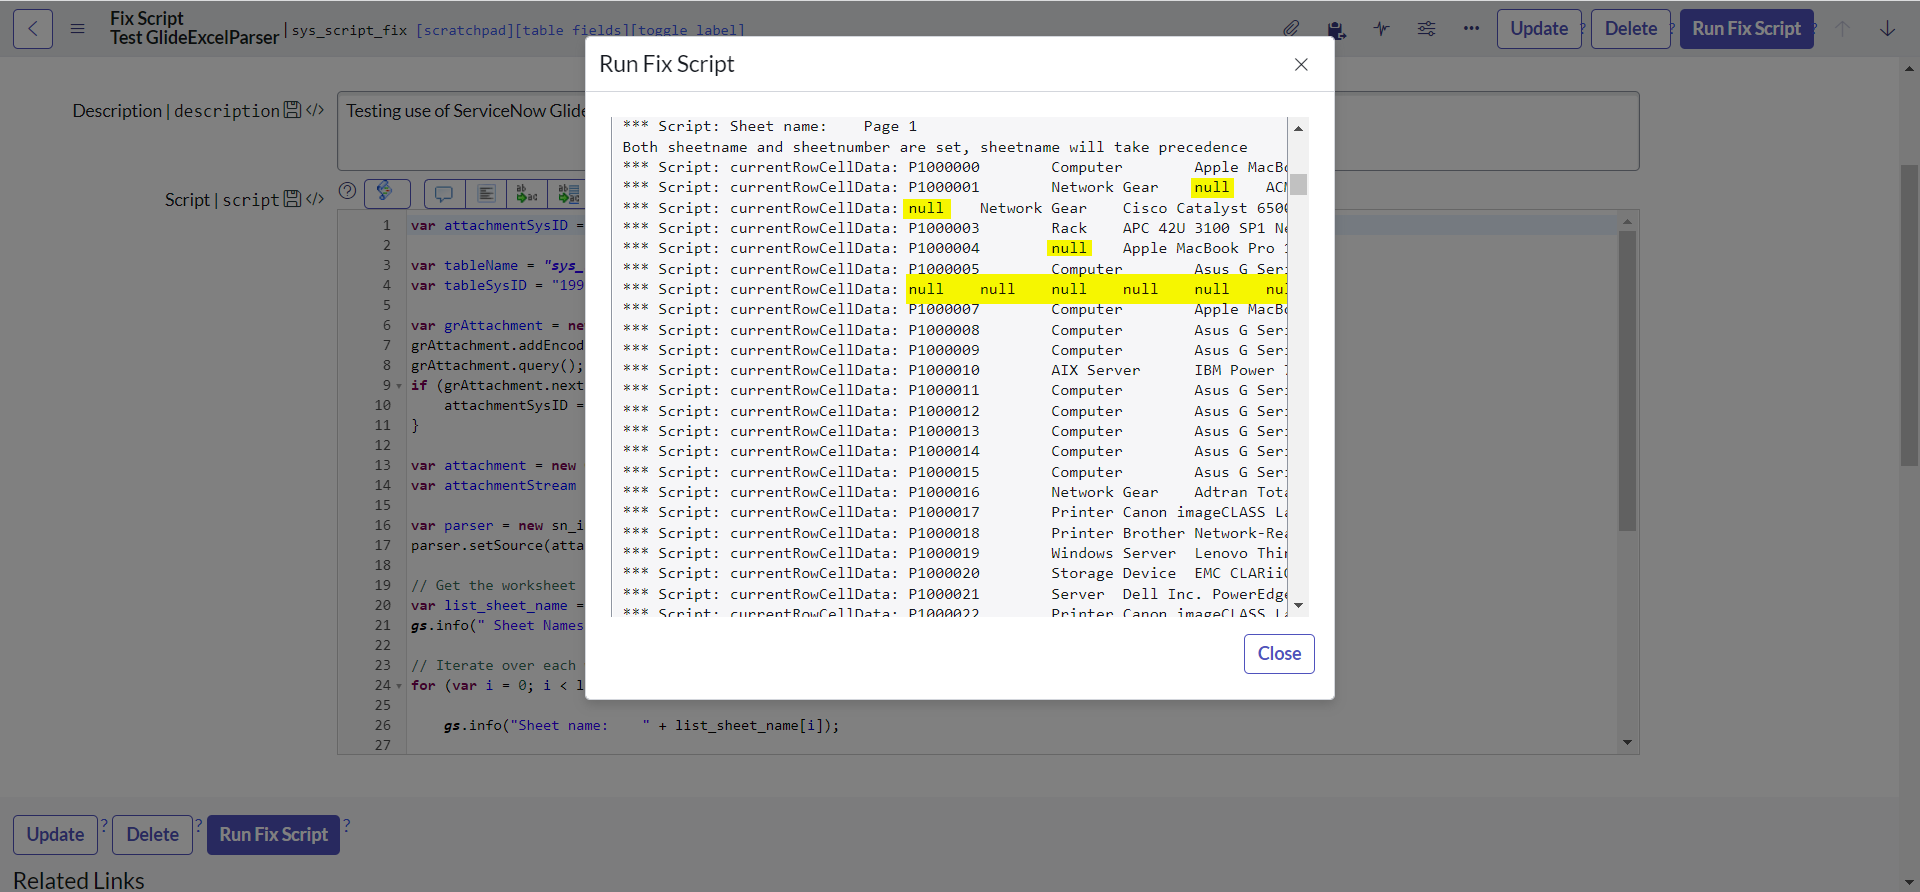
In our excel sheet there are certain cells that are empty and our script currently prints them as null:
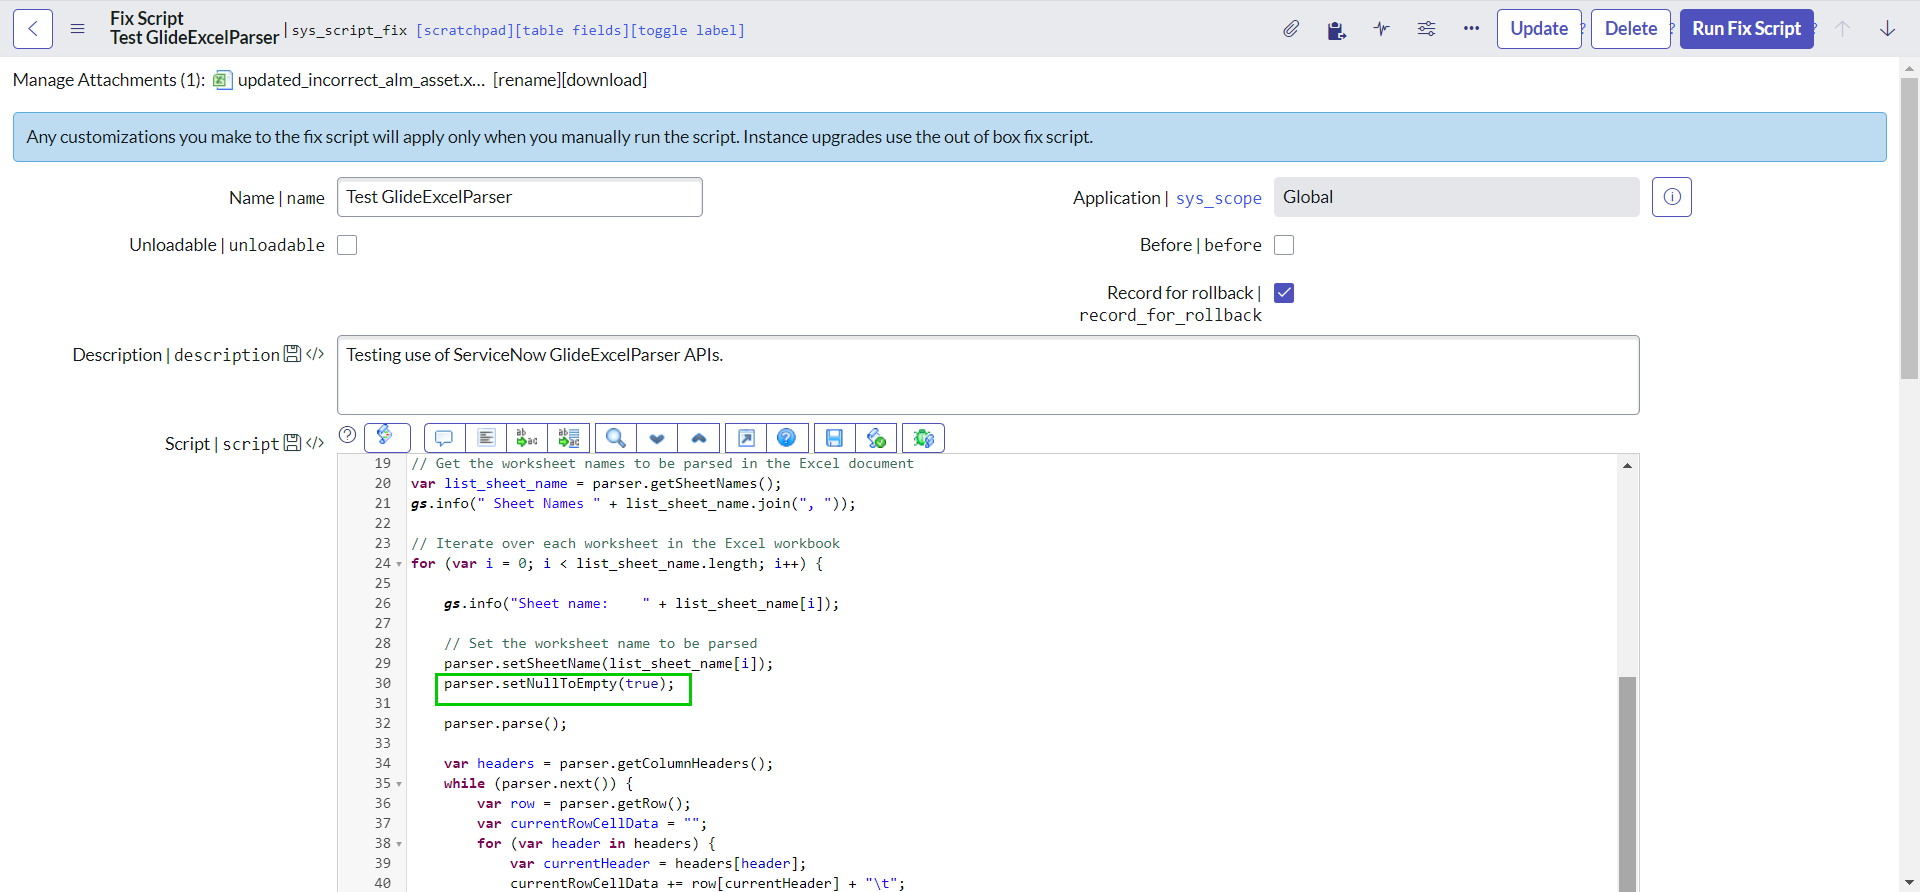
Lets add the following line of code to our script:
parser.setNullToEmpty(true);
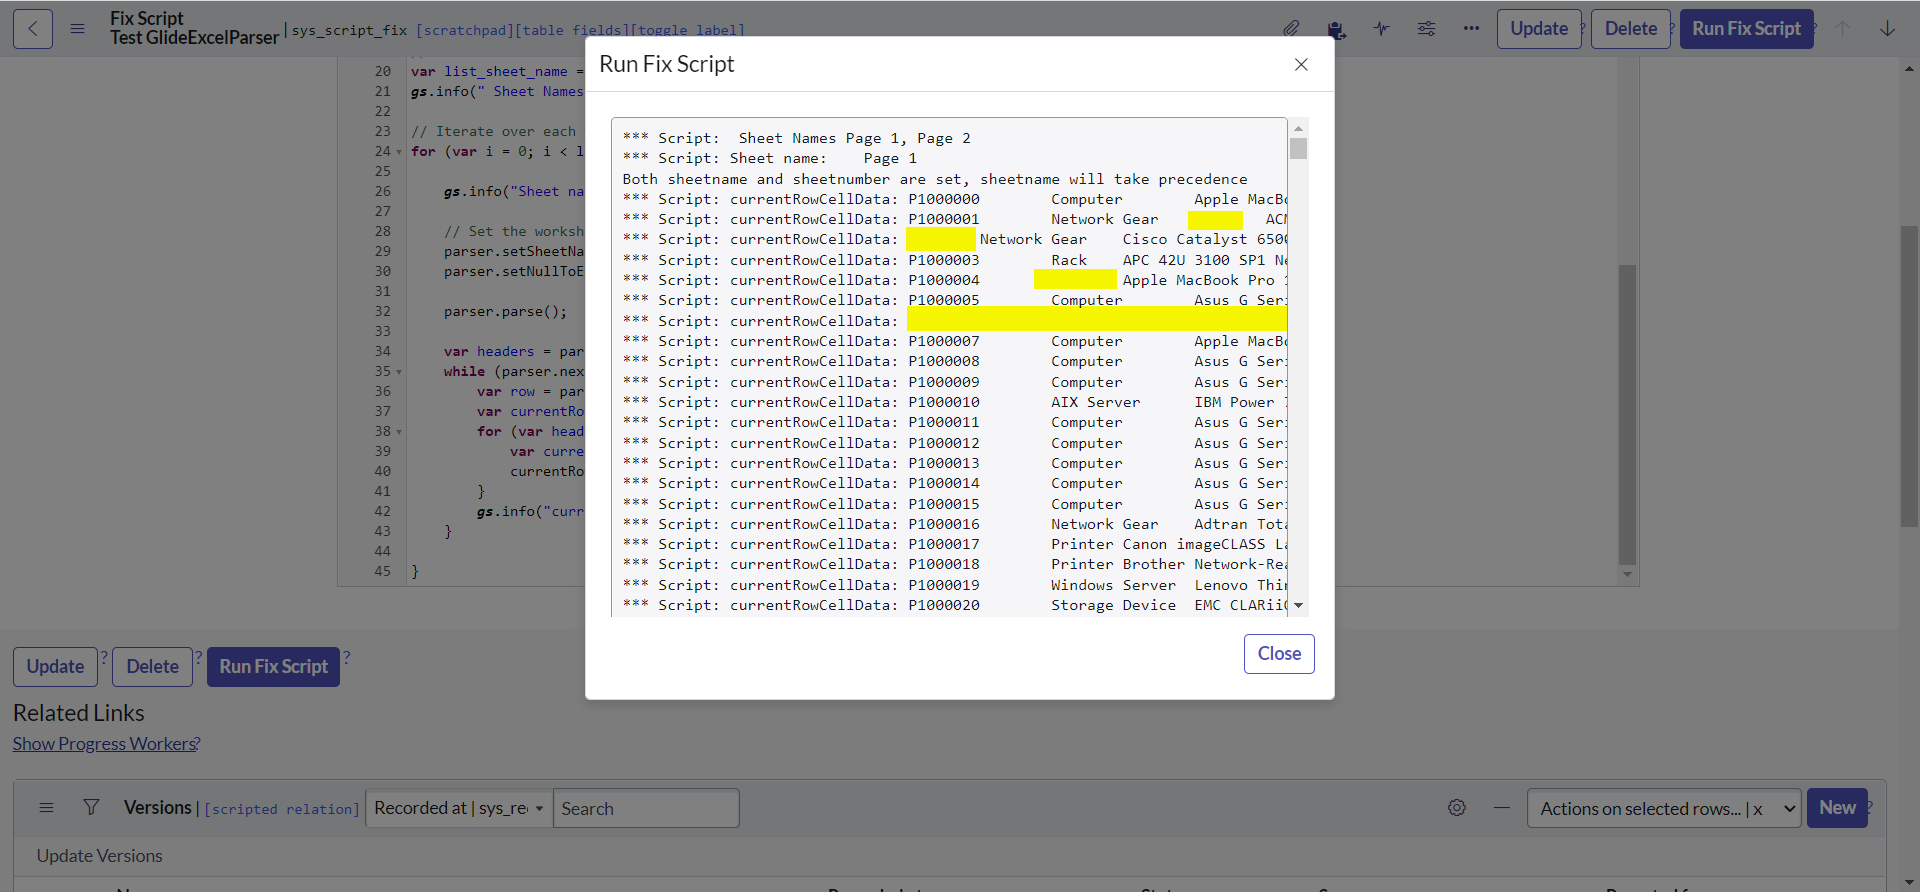
Now, executing the script again should display empty value instead of null:
close()
As name suggests, close() close the connection to the input stream and release the document.
All we need to do is just adding the following line at the end of the code:
parser.close();