Chapter 3
REST API Explorer
A good API Documentation
Somehow, I cant resist myself from quoting the famous quote from Dick Brandon :
Documentation is like sex; when it's good, it's very, very good, and when it's bad, it's better than nothing.
The most important feature of API is it's documentation. Rather you can say, an API is only as good as it's documentation. If you are one of those, who did work or atleast tried to read API references for some tool and have struggled badly understanding it, you probably know it already. A bad documentation makes it hard to understand the artifacts and makes it unnecessarily difficult for you. While in other case, A good documentation explains how to effectively use the API, saves time and efforts, and enhances your development experience.
What is API documentation?
API documentation is a reference document that outlines how to use the API. It’s a technical manual that contains information about the services the API offers, how to use its various endpoints and parameters, and other implementation instructions. With good API documentation, developers can understand the usage of an API and incorporate it into their use cases without experiencing programming obstacles.
API Documentation Best Practices
Sometimes, you can see the documentions where the APIs are fully documented, but it is still terribly confusing. I would like to name few best practices that makes API documentation great :
- A good documentation is consistent with universally accepted naming conventions and terminologies.
- It uses a language that is simple and easily understandable by users.
- It offers useful, human-readable information about the possible error messages a user may encounter when interacting with your API—besides just correct error codes, to allow users to learn and integrate your technology easily.It also includes explanations on how the errors can be resolved.
- It allows you to test what you read in the documentation and see how it works.
- It includes interactive sample codes in the most popular programming languages to reduce the friction in implementing your API.
- It is constantly updated and remains accurate.
Another important feature that makes a documentation more better is it's user interface, If you don't have a visible user interface and you can't know how to use an API just by looking at it.
ServiceNow REST API Explorer
Though many documentations are crap, ServiceNow did a great job to maintain the documentation and following all the best practices. The REST API Explorer allows you to discover ServiceNow REST APIs, quickly construct and execute requests, and view responses from ServiceNow REST APIs within your browser.

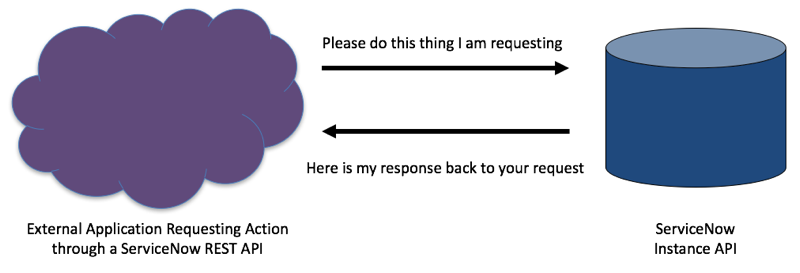
Before we step forward, let us step back a little and recall what is "Inbound REST Integration"? In an inbound request, a third-party application requests an action through a ServiceNow API. ServiceNow processes the request and returns a status code and a response body. When the response body is returned, the Client application can extracts information from the response body and take action on the extracted data. The REST API Explorer helps us to test Inbound requests. In fact, you need to always refer the documentation of destination ServiceNow instance/3rd party application or server.
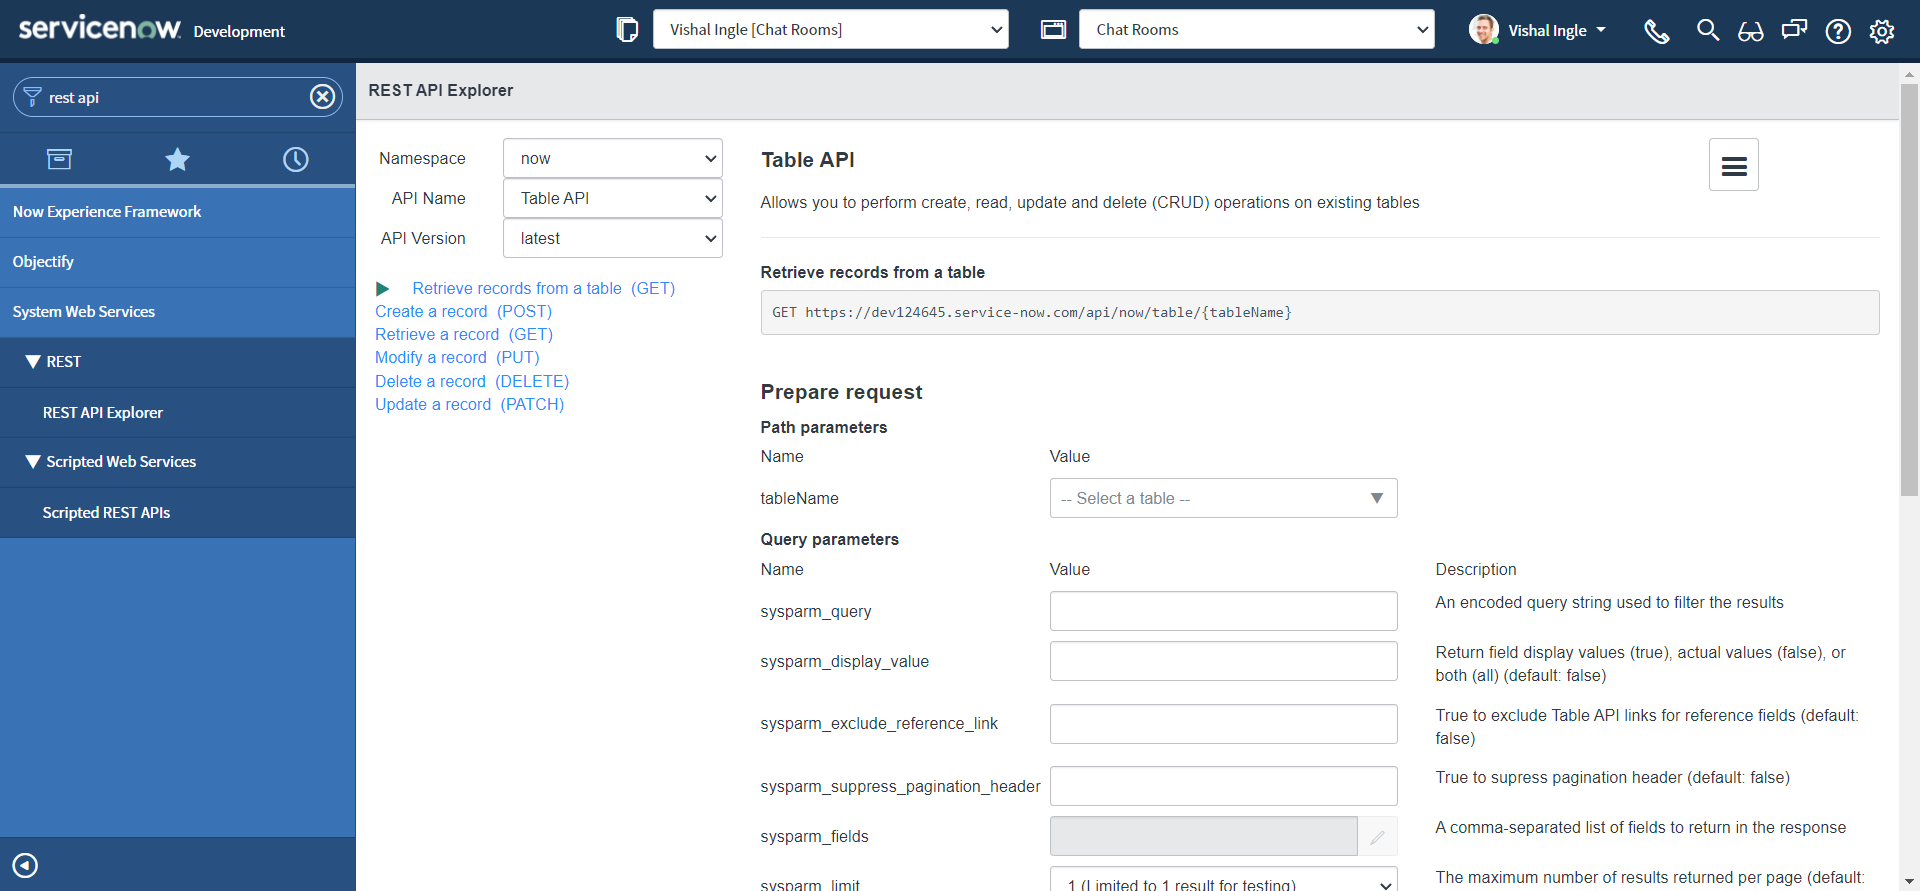
To open REST API Explorer, Navigate to System Web Services > REST > REST API Explorer. It displays all available APIs, API versions, and methods for each API. We can use the REST API Explorer to find an end point URL, method and variables that will get us the results that we need.
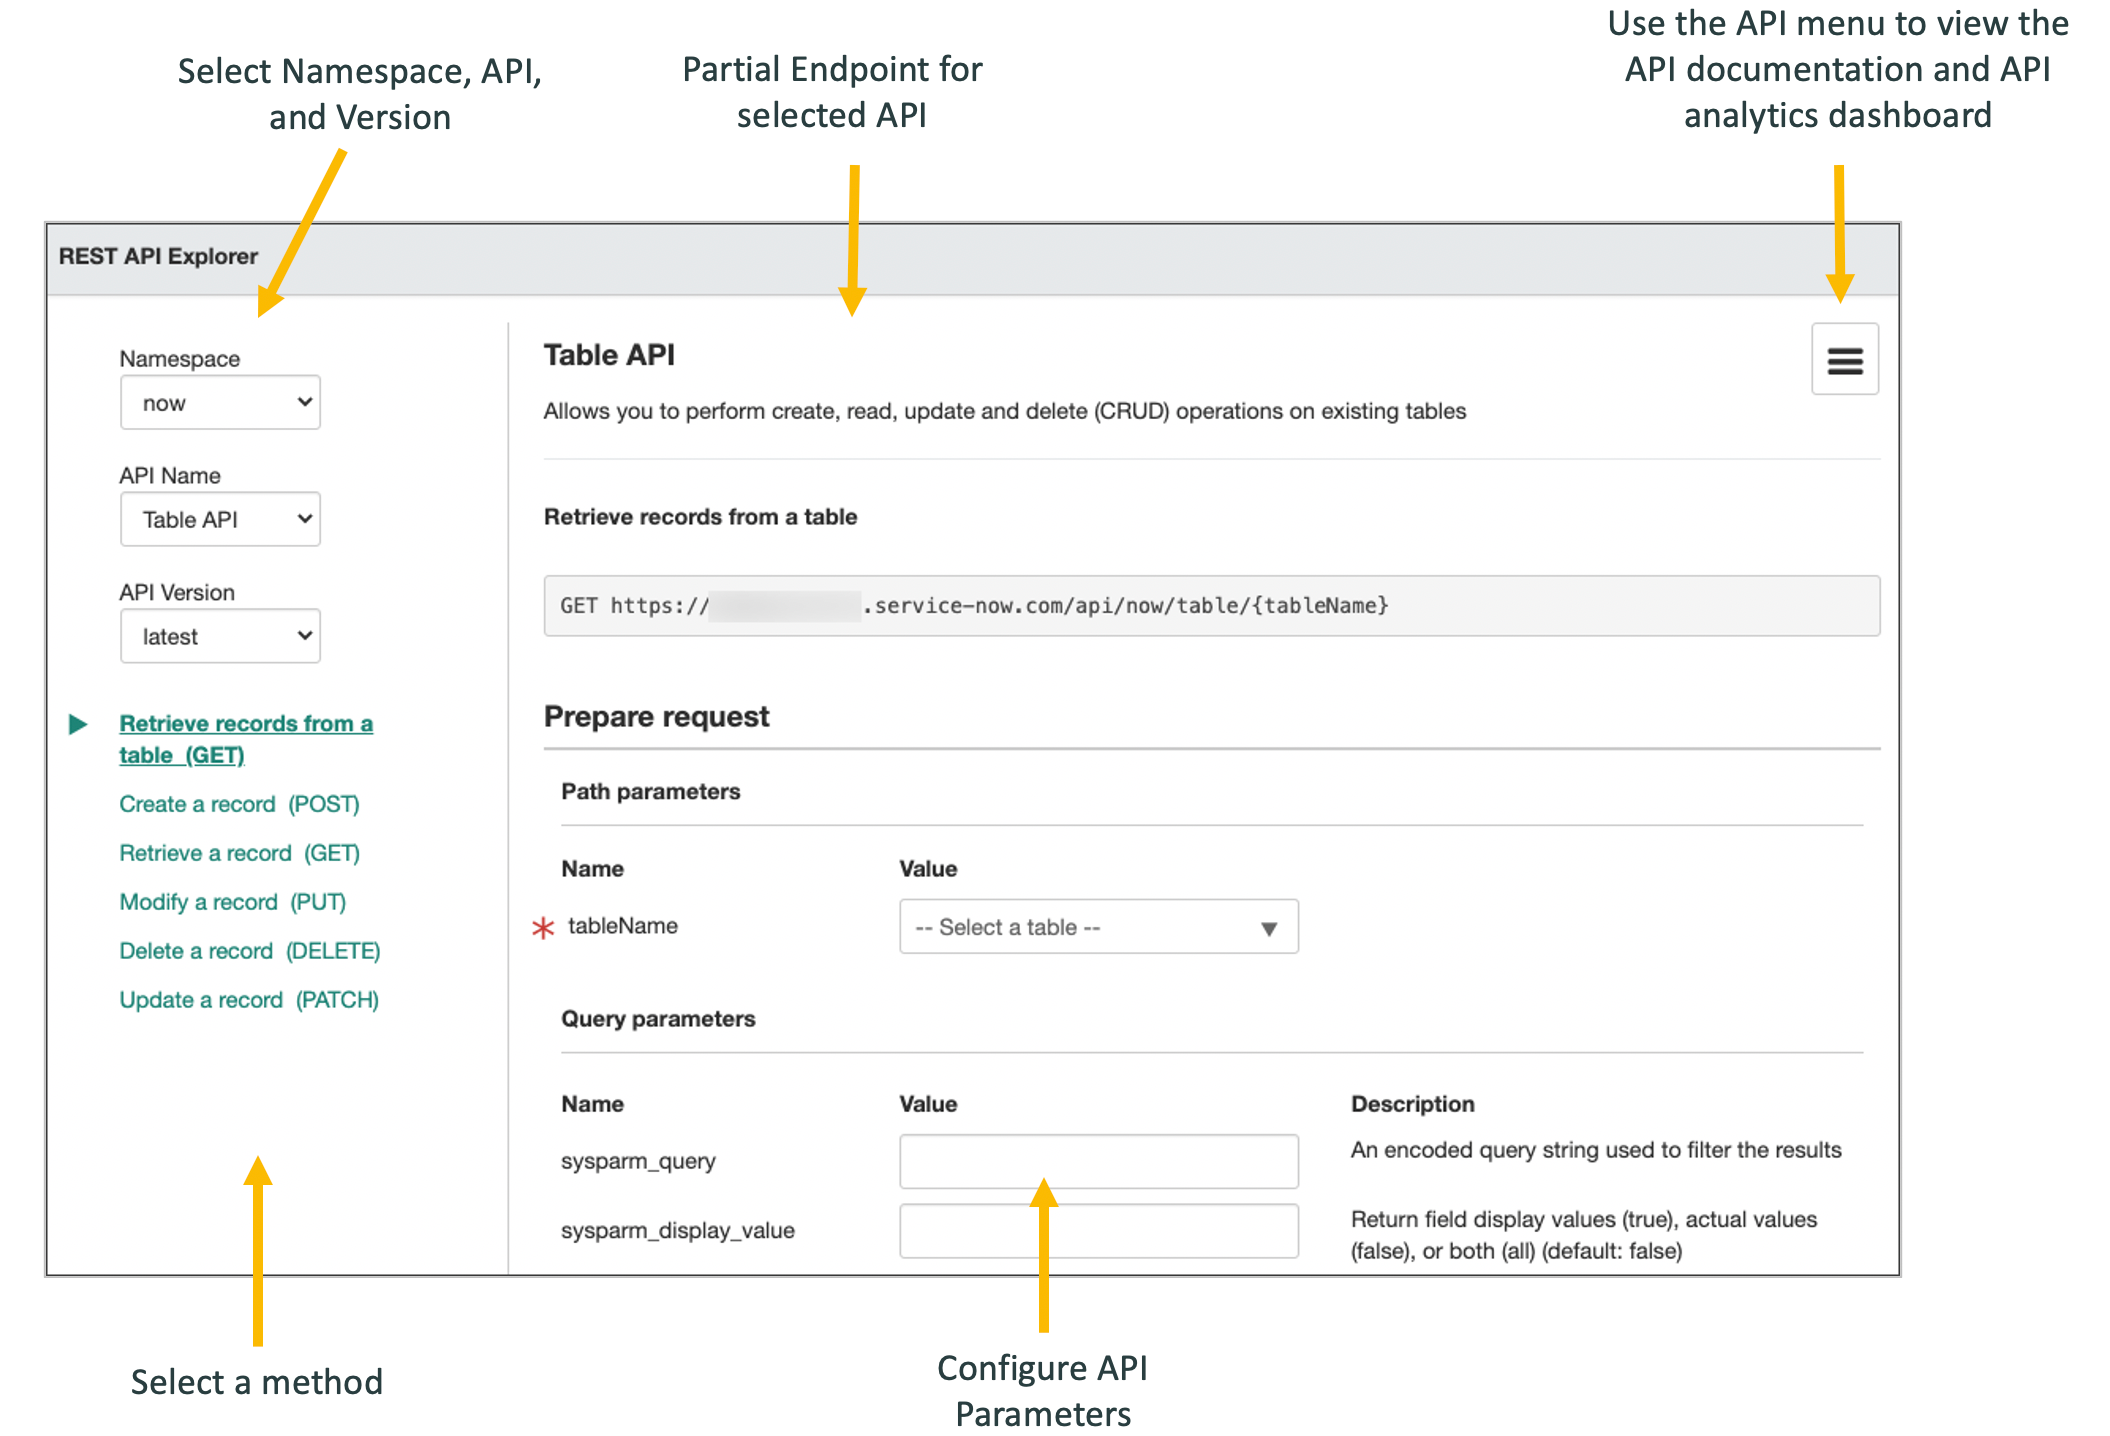
The REST API Explorer consists of:
-
A pane to select the Namespace, API Name, API Version, and REST method
-
A listpane to view and configure the endpoint
-
A menu to access documentation for the selected API and an API analytics dashboard
-
A section to test the endpoint
Understanding how to use the REST API Explorer
There is no better way of learning something new than trying it, so let us try some simple use cases :
GET request
Lets say, we want to retrieve all of the active incidents from the server instance, but we will only need a couple of the fields back in our response. We can test it within REST API Explorer :
- Navigate to System Web Services > REST > REST API Explorer.

-
In the top-left of the REST API Explorer, select Namespace as now, API Name as Table API & API Version as latest.
-
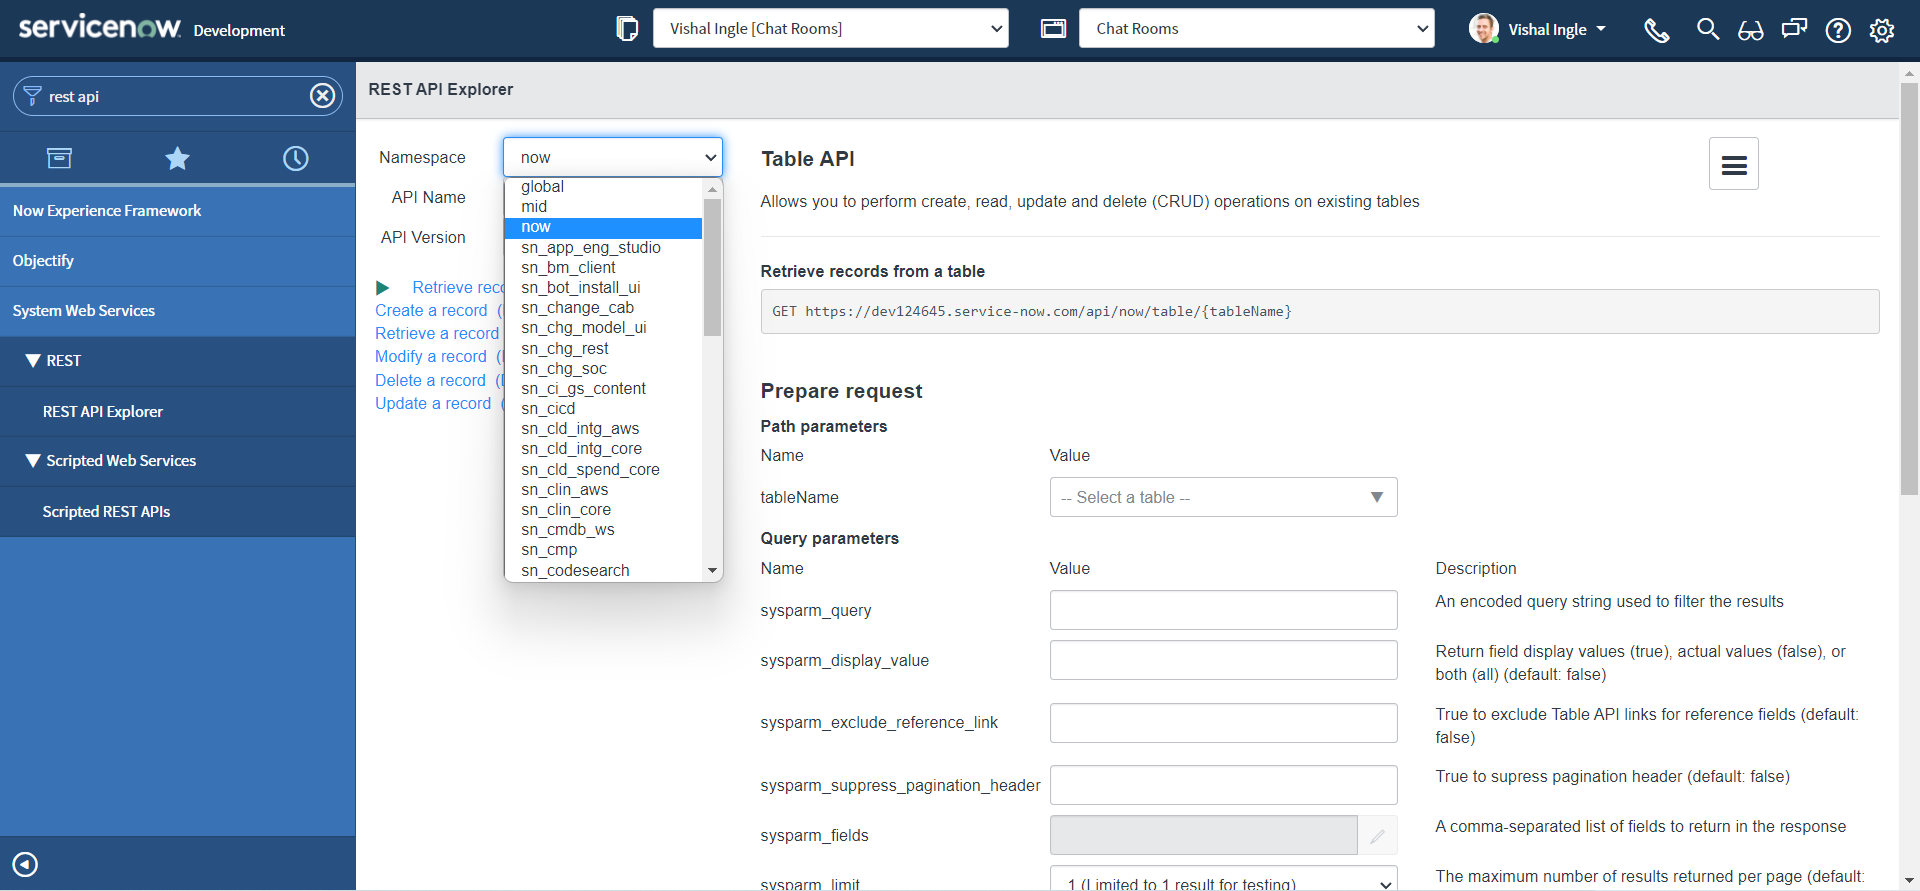
Namespace specifies the scope of the web service :
- global indicates Globally scoped APIs
- now indicates REST APIs that are provided by ServiceNow
- private_scope_name indicates APIs (scripted web services) in privately-scoped applications
-
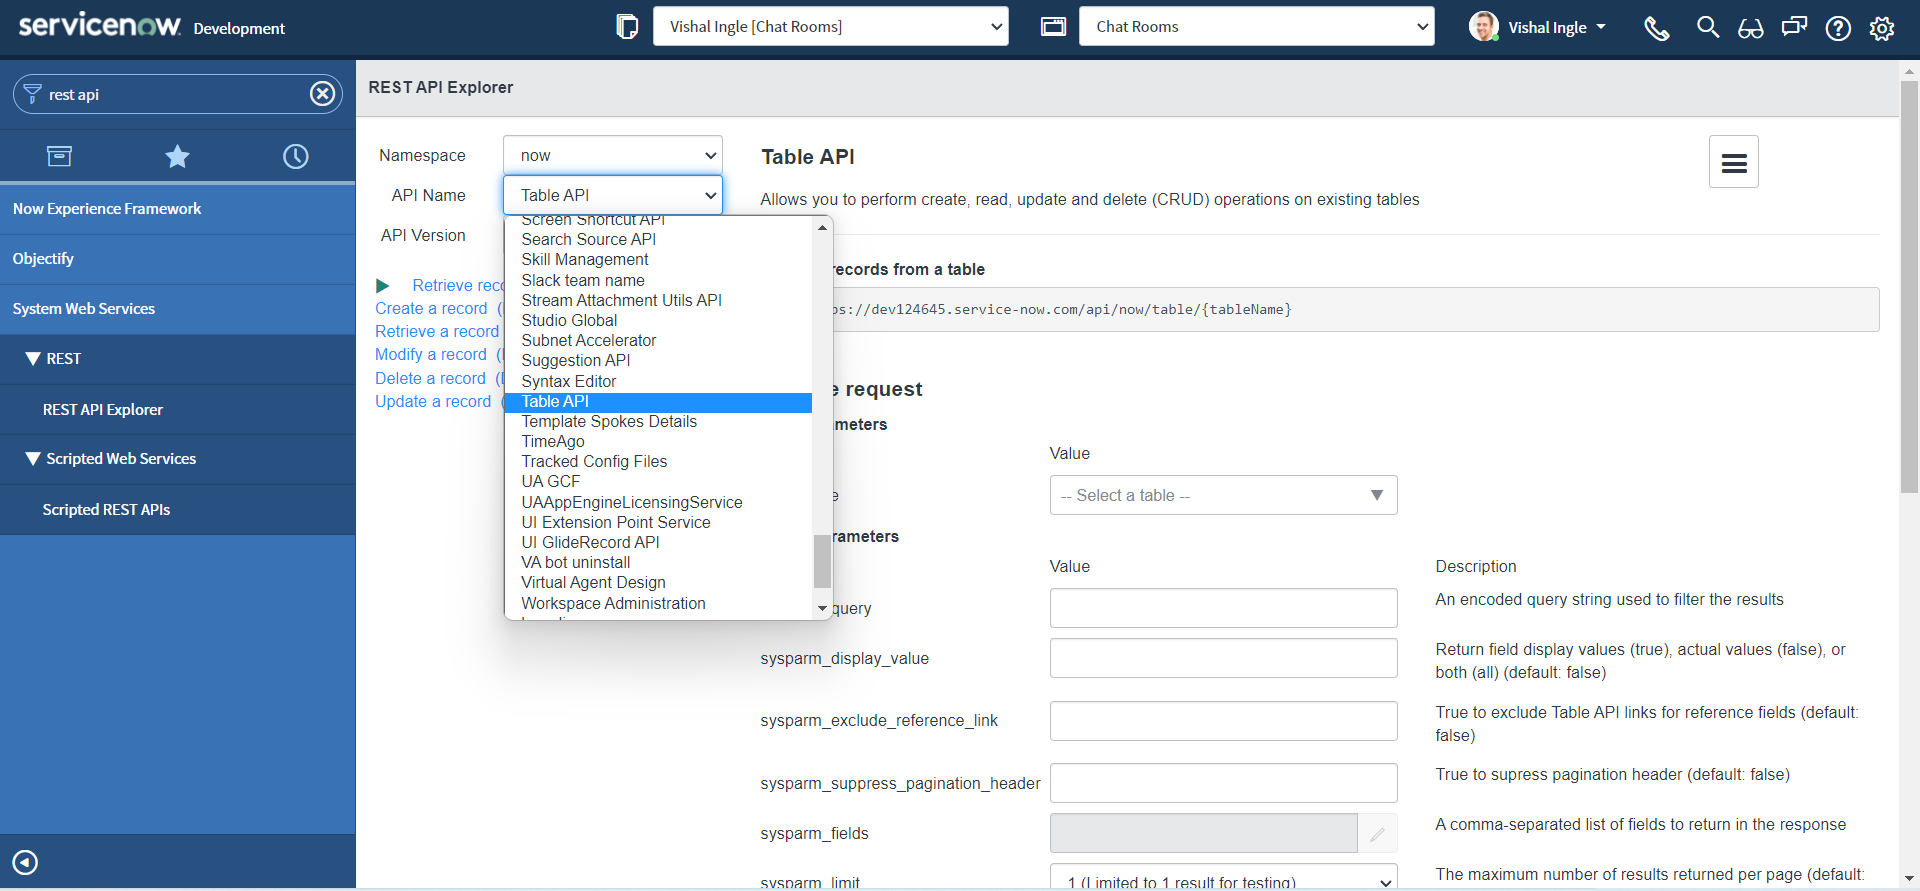
API Name specifies API to configure and test in the REST API Explorer.
- The Table API provides endpoints that allow you to perform create, read, update, and delete (CRUD) operations on existing tables.
-
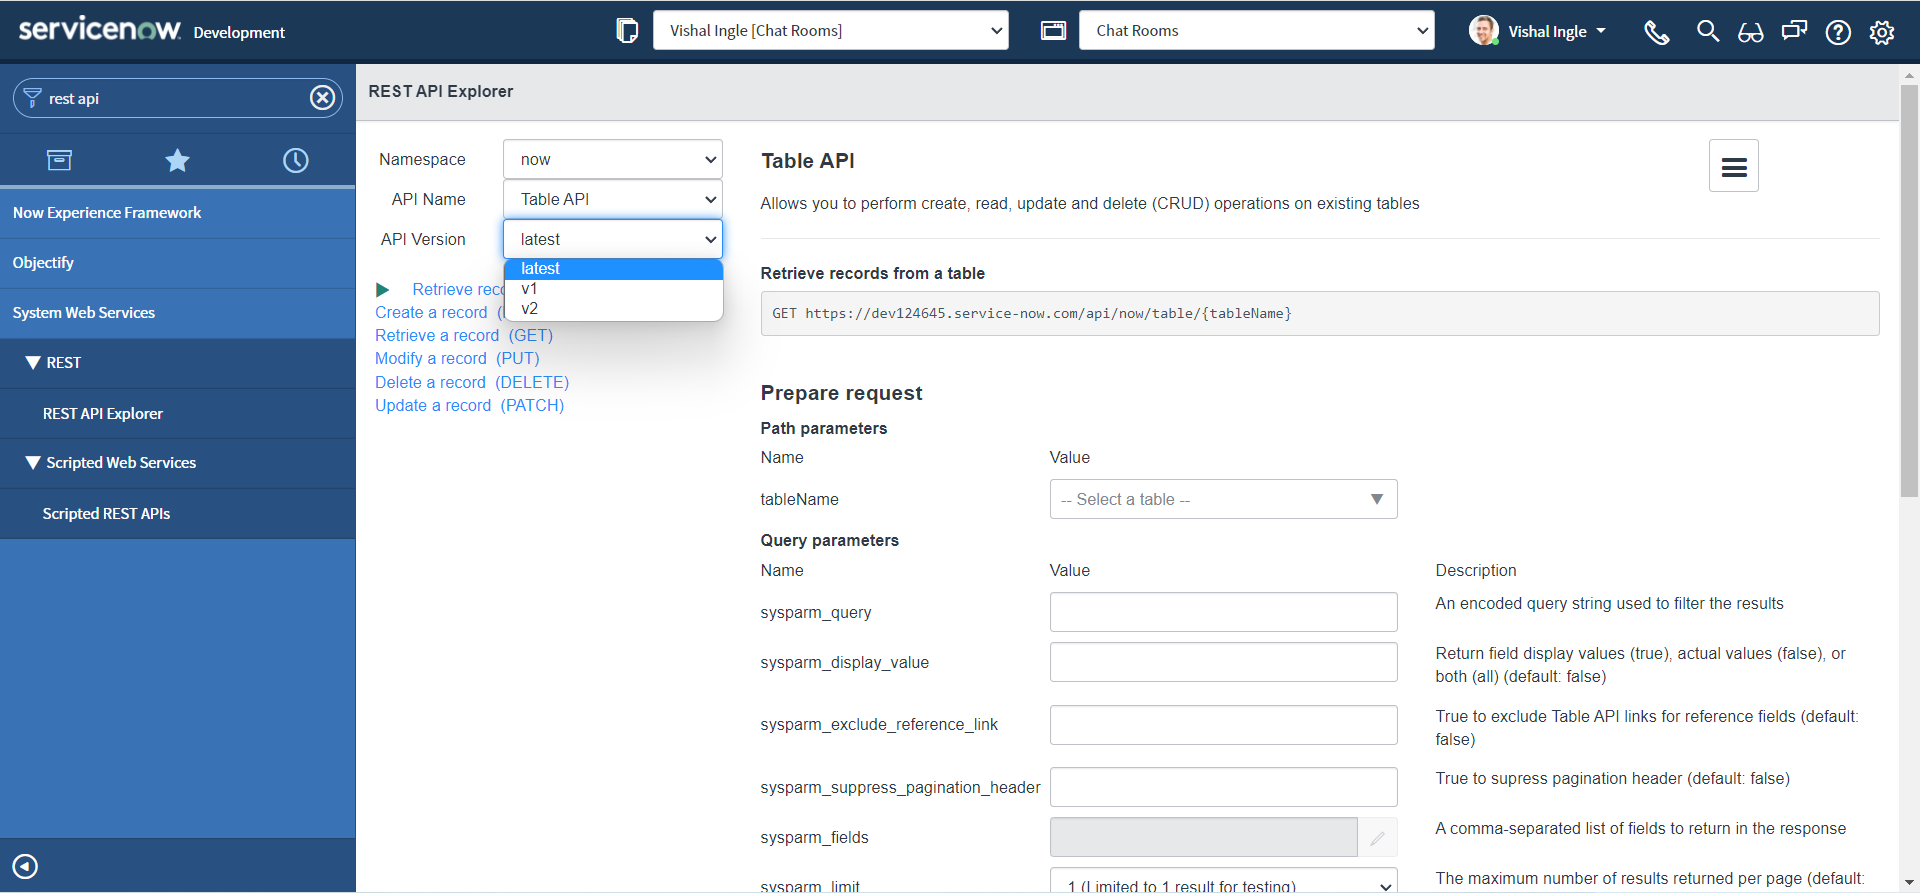
API Version allows you to select a specific API version or use latest version.
- Depending on the version, endpoint returns different results on a valid query.
-
-
Click Retrieve records from a table (GET)
- "Retrieve records from a table" is a HTTP GET method that retrieves multiple records from the specified table.
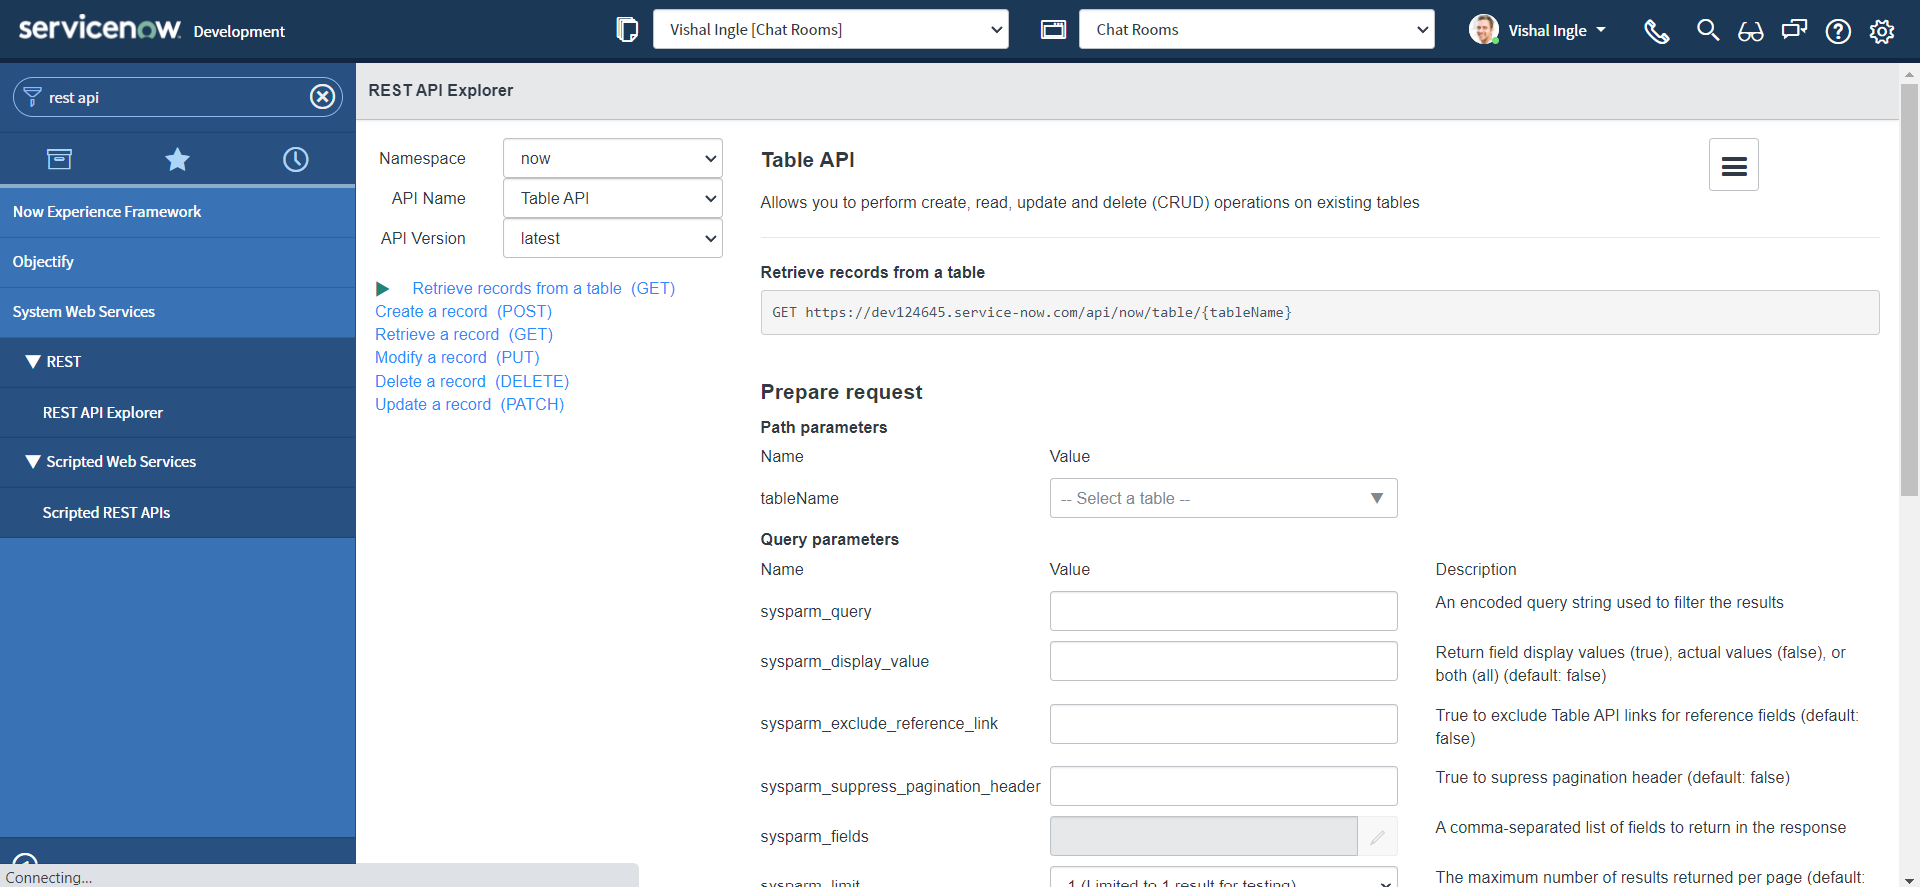
The fields in the Prepare request section of the REST API Explorer form are determined by which Namespace, API Name, API Version, and REST method is selected.
Request Parameters consist of:
- Path parameters
- Query parameters
- Request headers
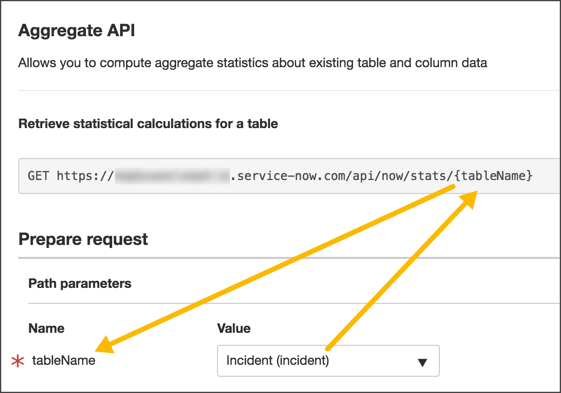
- In the Path Parameters section, select the Incident (incident) table.
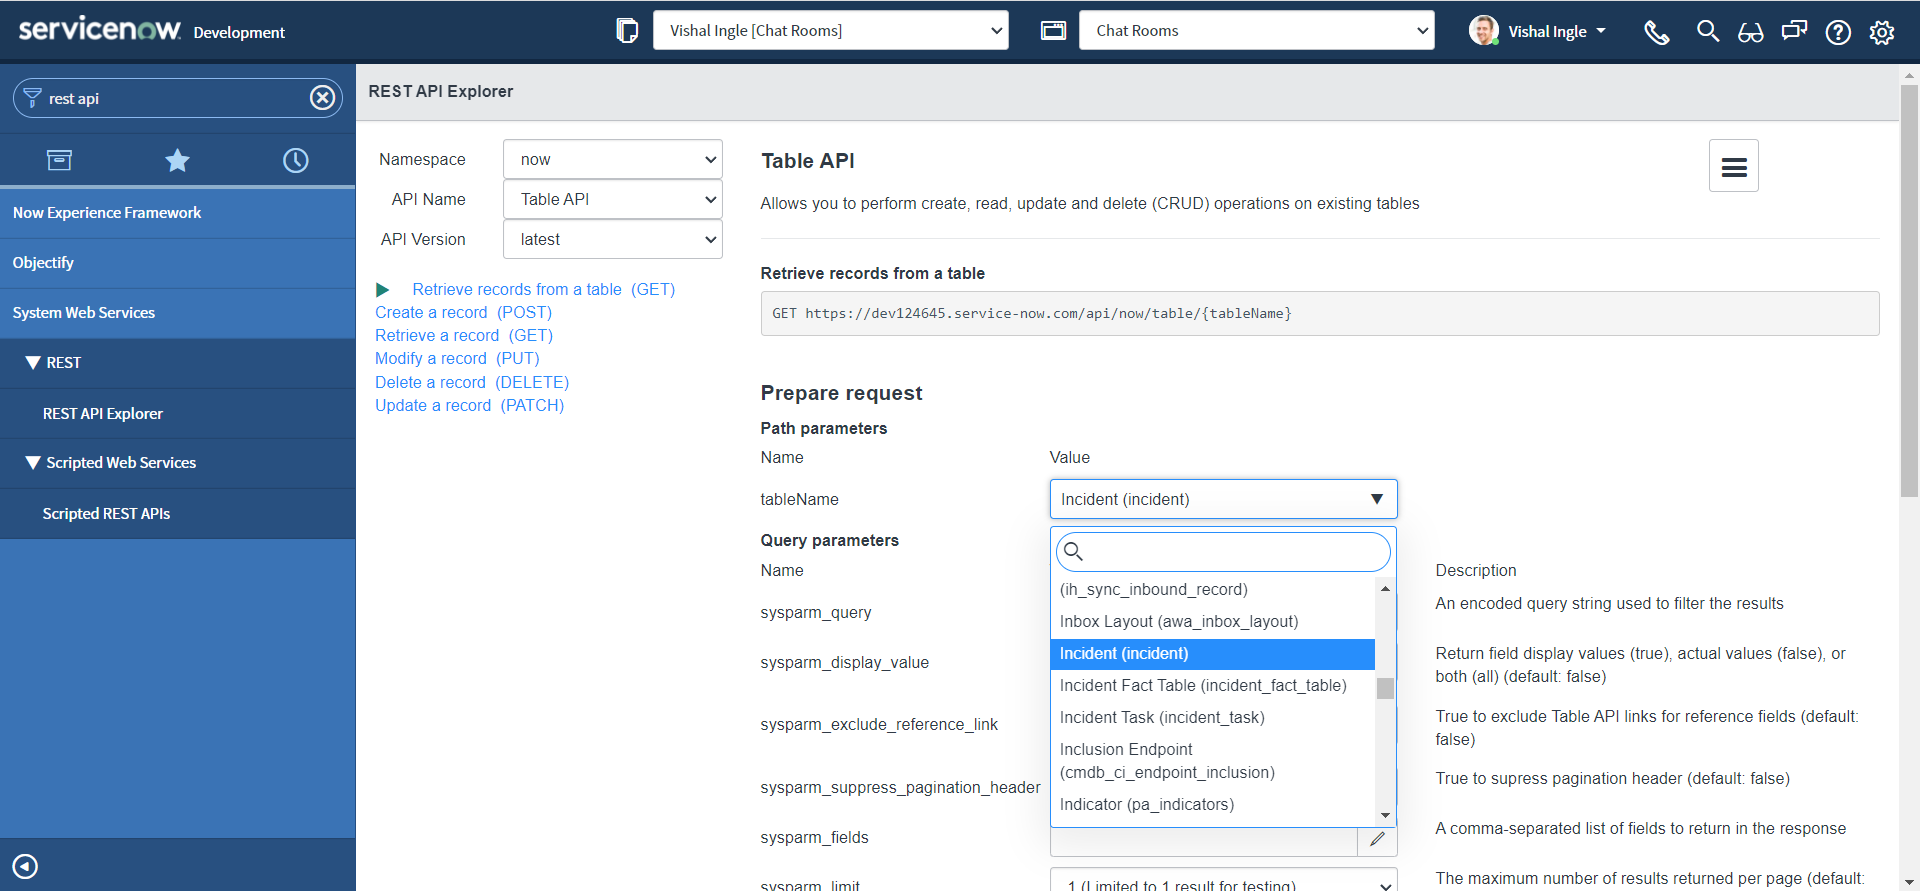
- The list of path parameters depends on the endpoint URL.
- Path parameters are enclosed in curly braces in the endpoint URL.
- The values set in the path parameter field are substituted into the endpoint URL when a request is sent.
-
Scroll to the bottom of the page and click Send.
- After configuring the REST method, one can click the Send button to send the request to the API.
- The REST API Explorer constructs the request to send to the ServiceNow API using the settings configured by the developer.

-
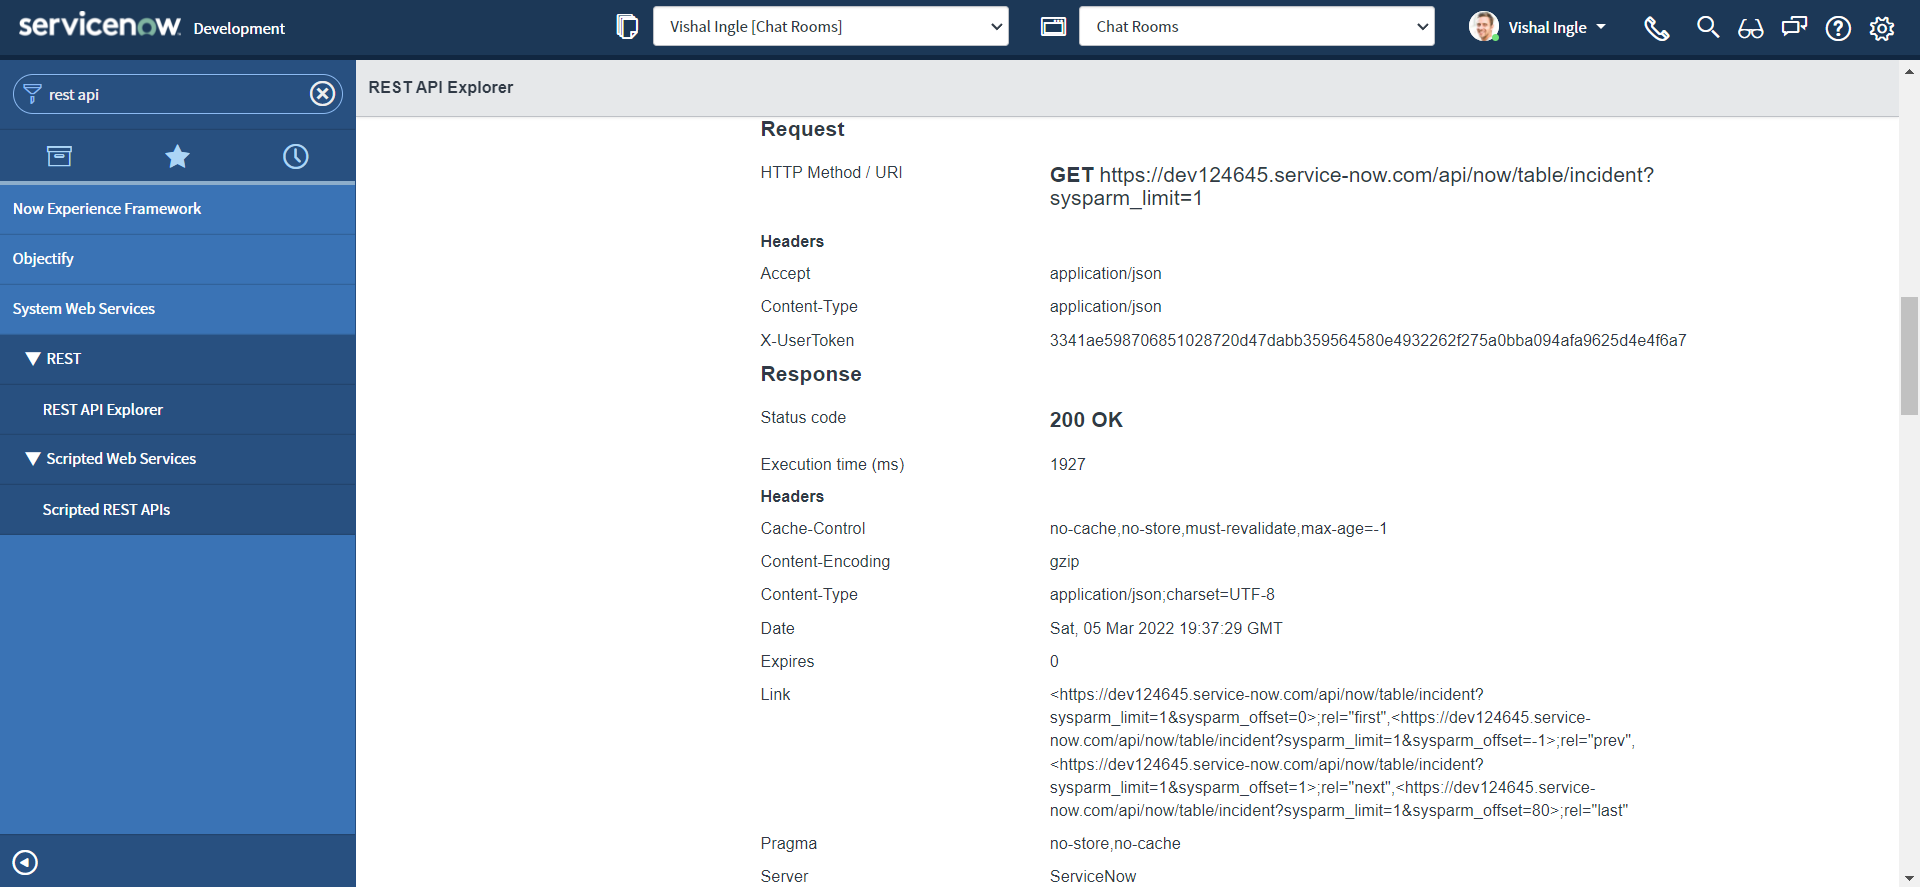
Observe the request that is sent and recieved response.

-
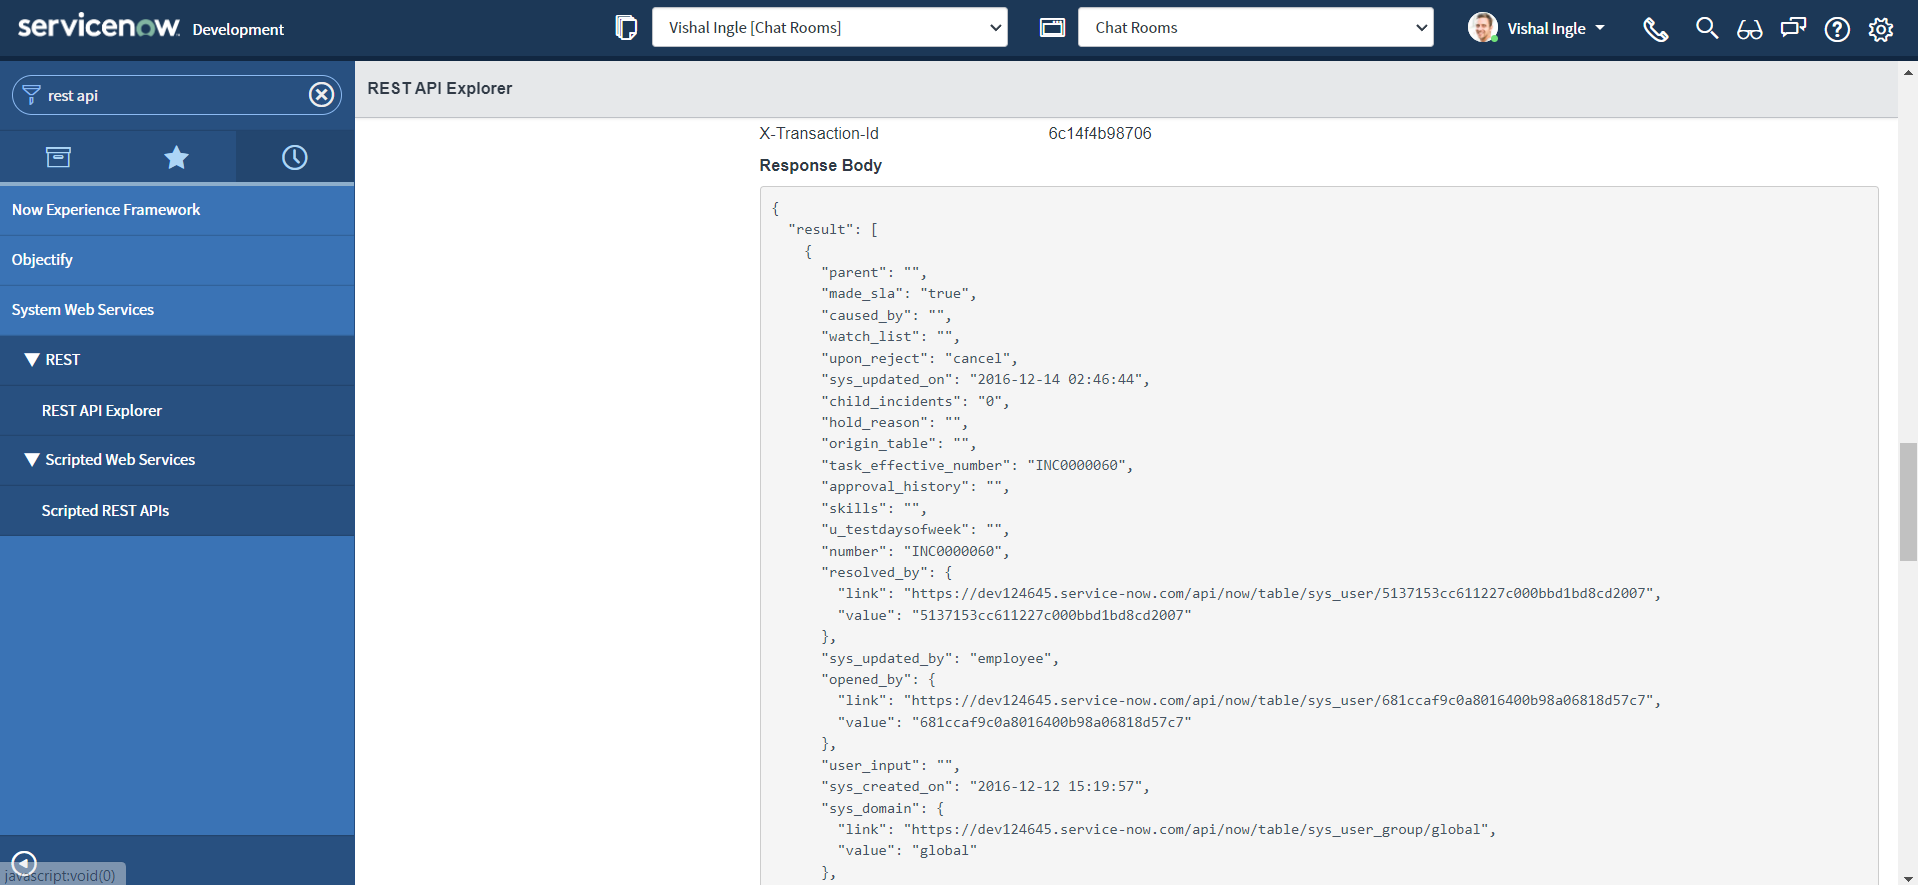
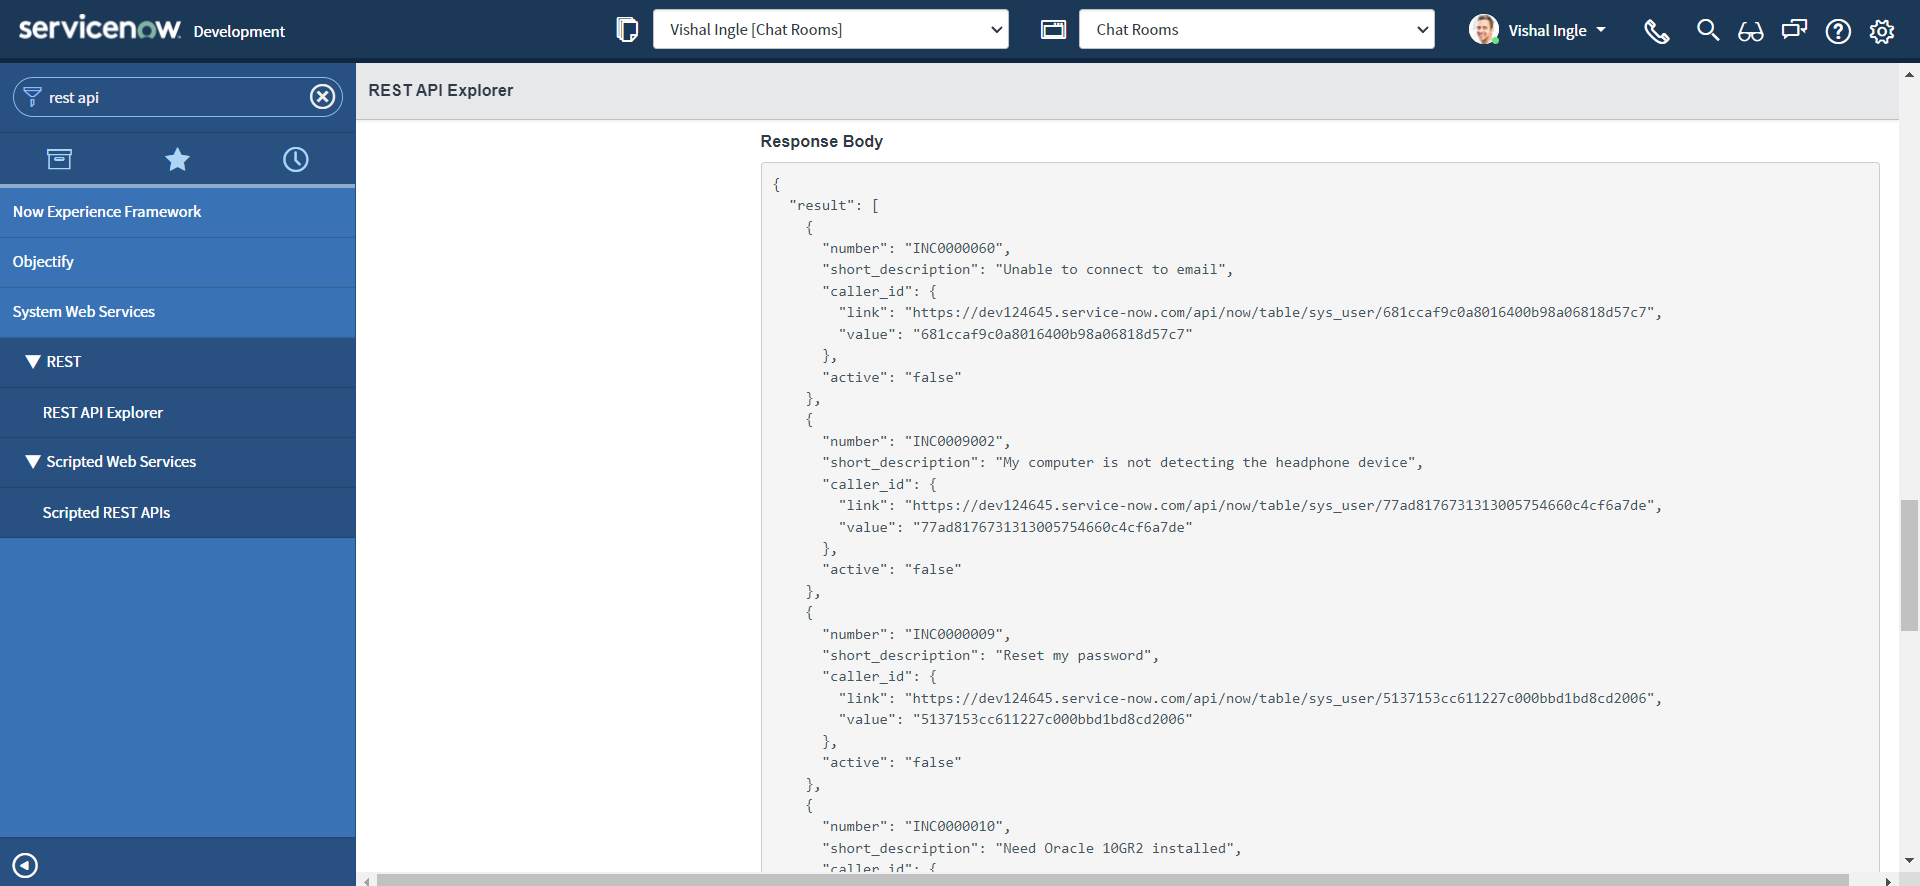
The response includes incident records from the instance.
-
The response also indicates the Status code and Execution time (in milliseconds) of the request.
-
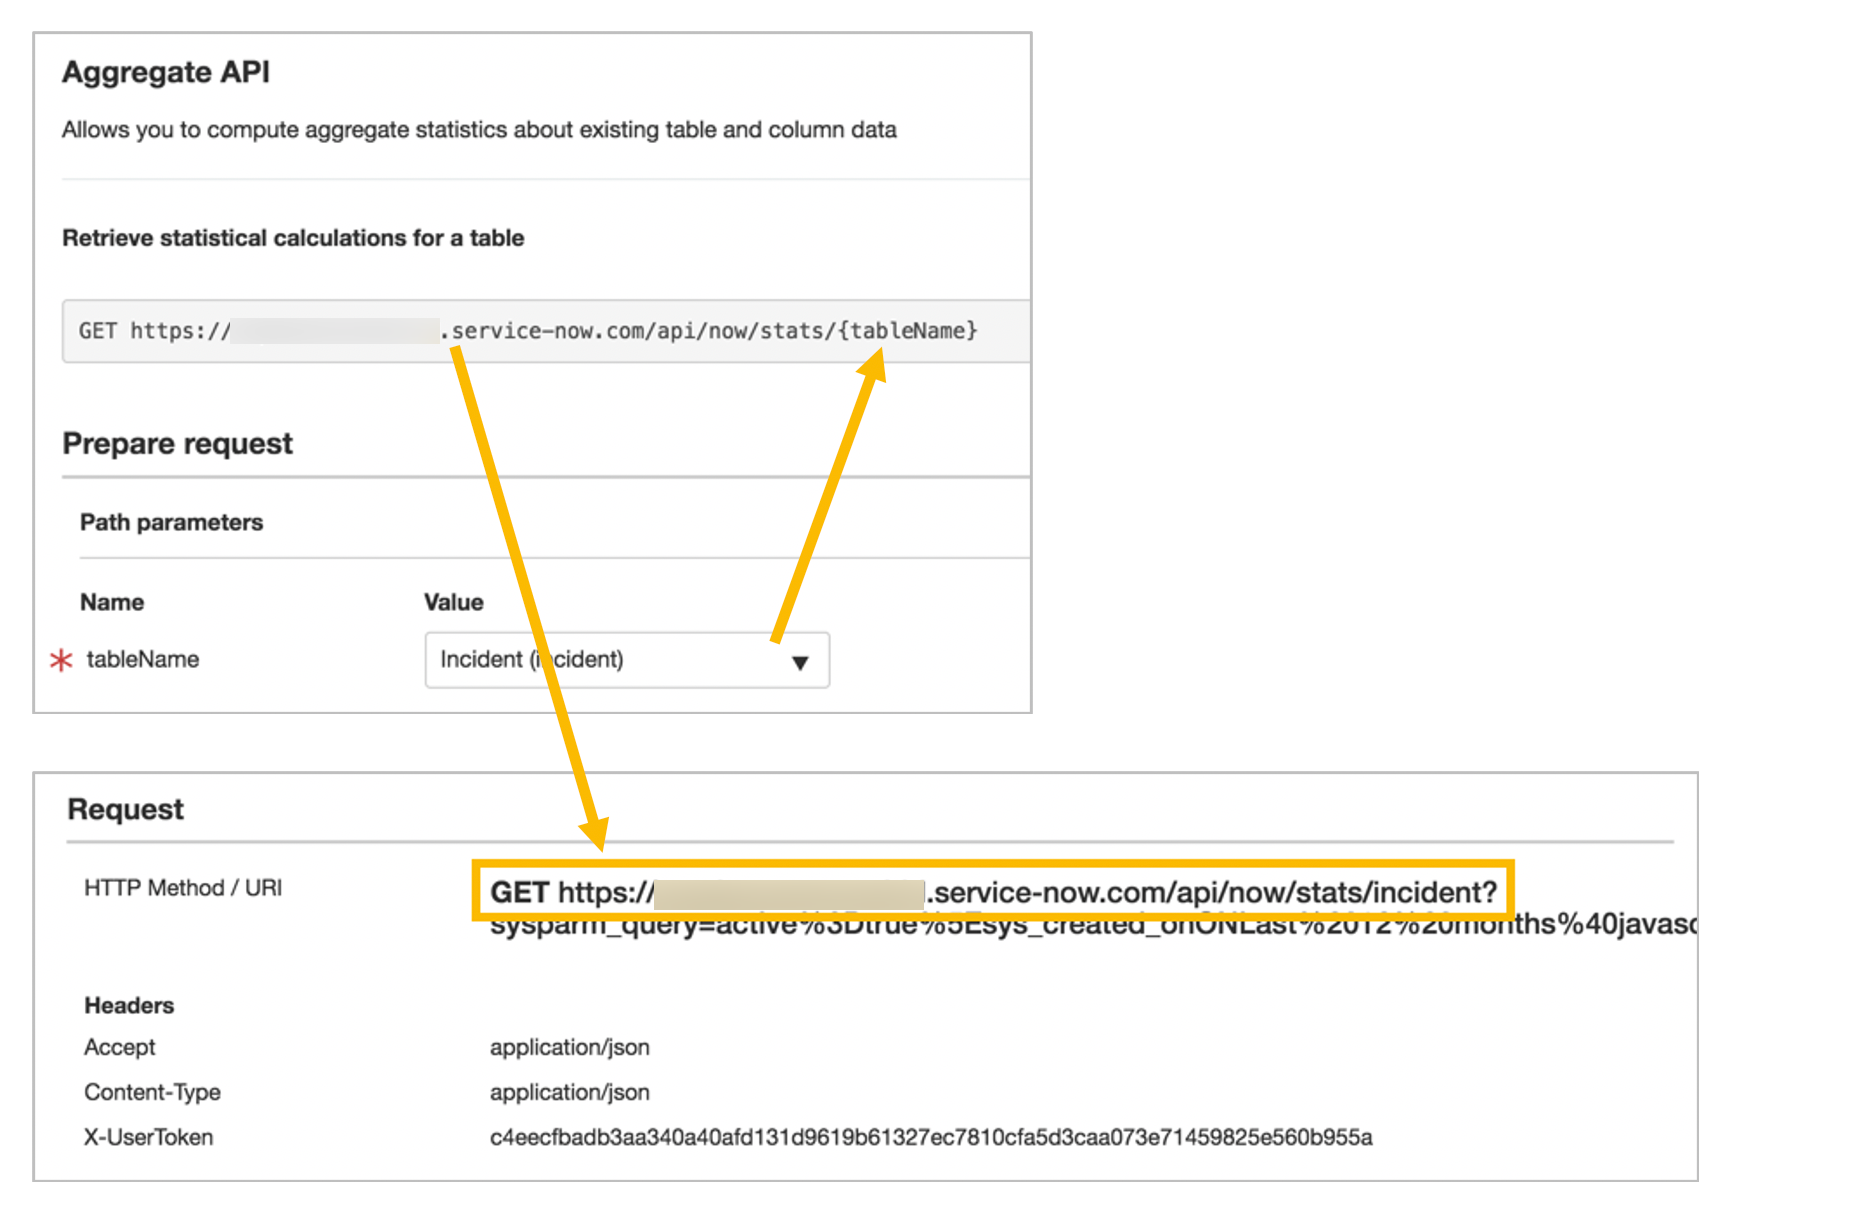
The Request section displays the HTTP Method / URI to send to the ServiceNow web service. The method is from the selected API.
-
The path parameter values are set when configuring the request.
-
The REST API Explorer limits queries to 10 records at a time. Only the first 10 incident records appear. However, you can also limit the maximum number of records returned in response when implementing a REST API using "Query parameters", sysparm_limit. Let us change it to return only one record and click send to observe new response.
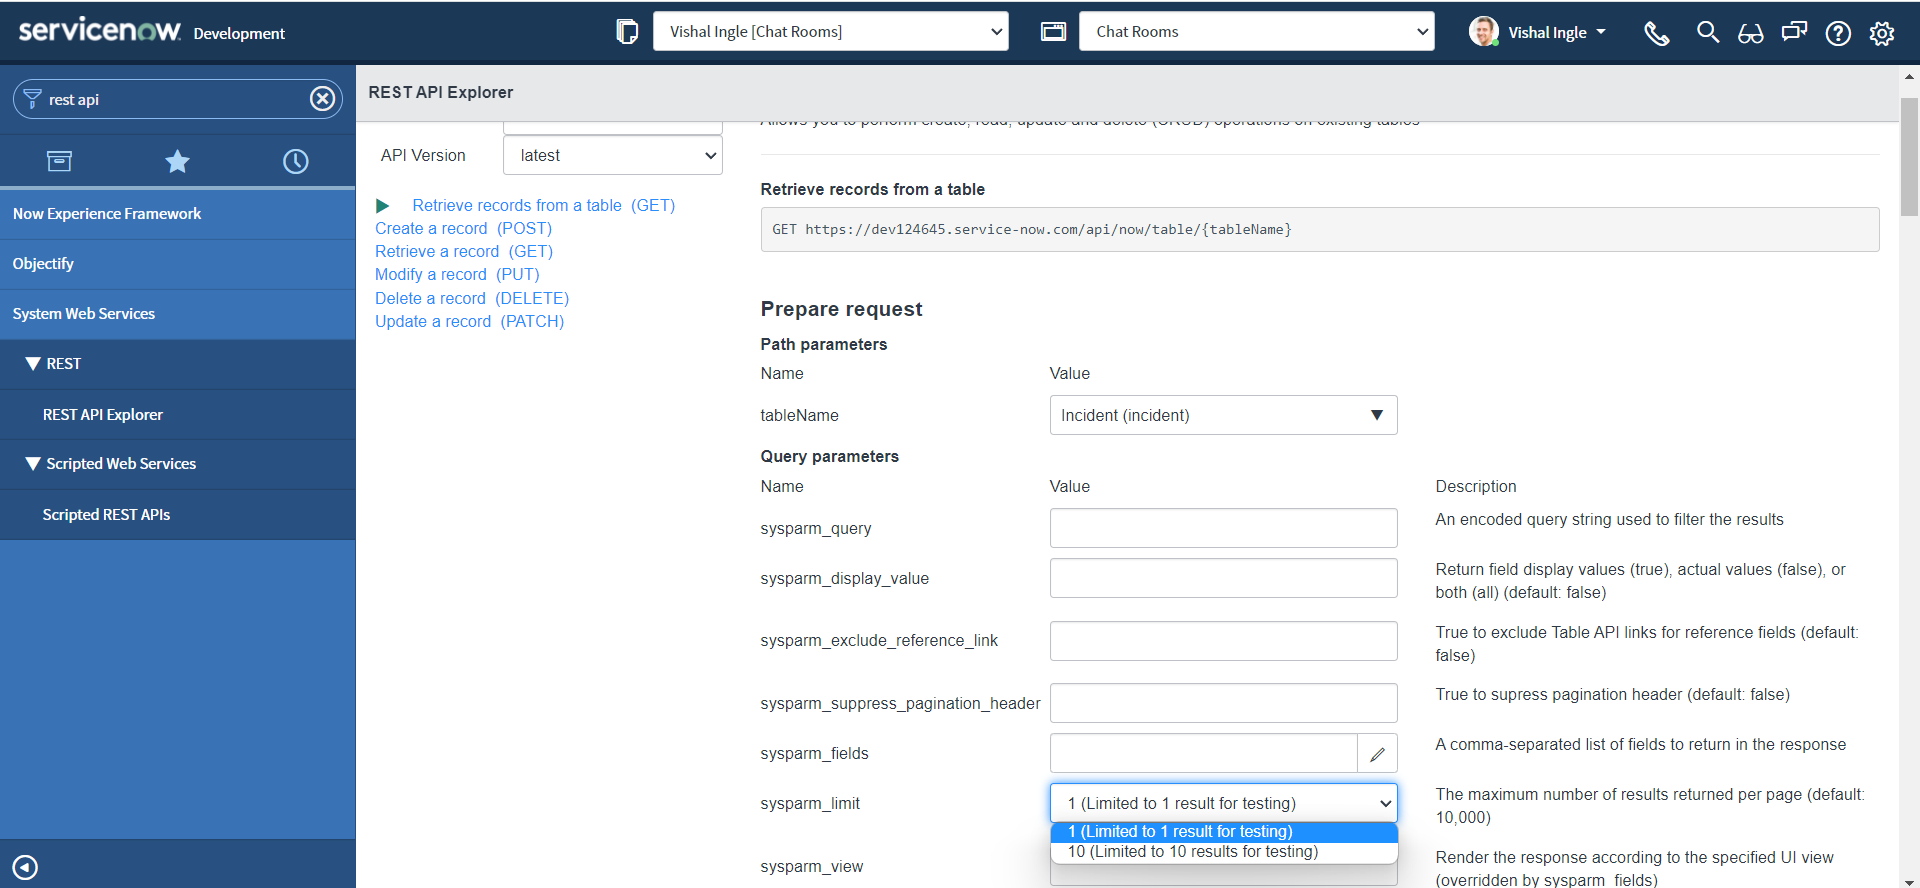
As you have noticed, we have only one incident information returned in the response.
Lets set our sysparm_limit Query parameters back to 10, click send again and again we should get information about 10 incidents. The response by default will return all the incident fields, but we will only need a couple of the fields back in our response, We can specify those in the sysparm_fields parameter.
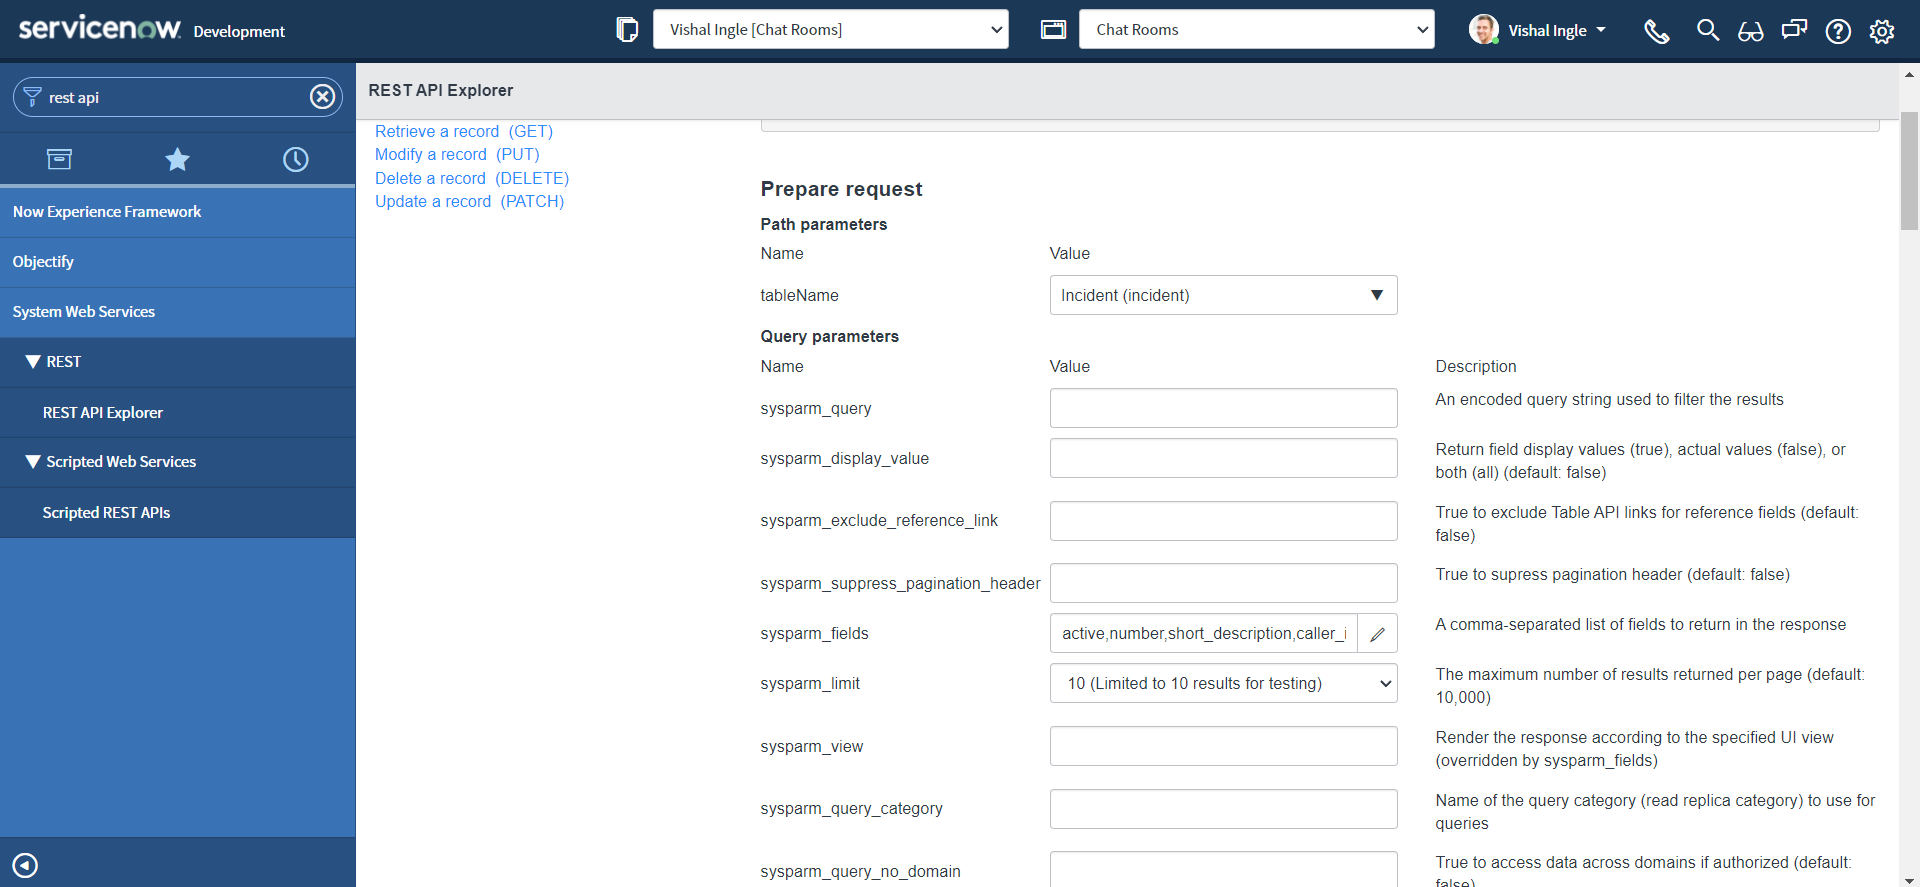
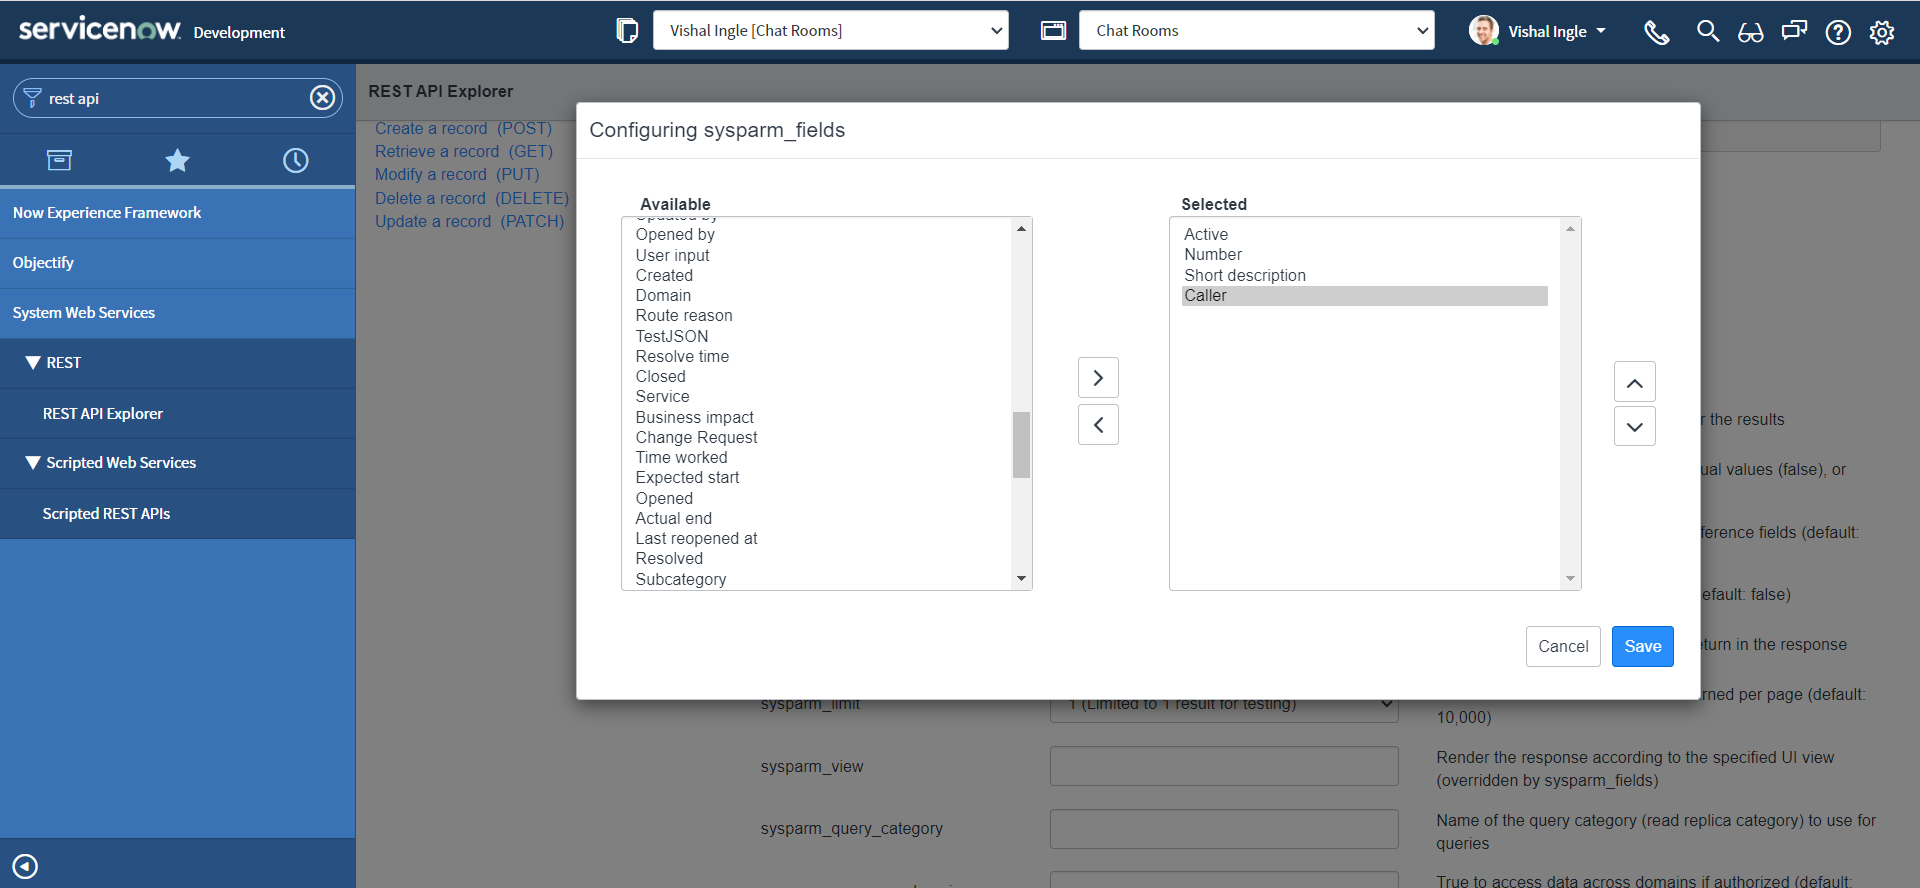
Also, we want to return only active incidents. we can fetch the filtered records based on specified encoded query for parameter sysparm_query.
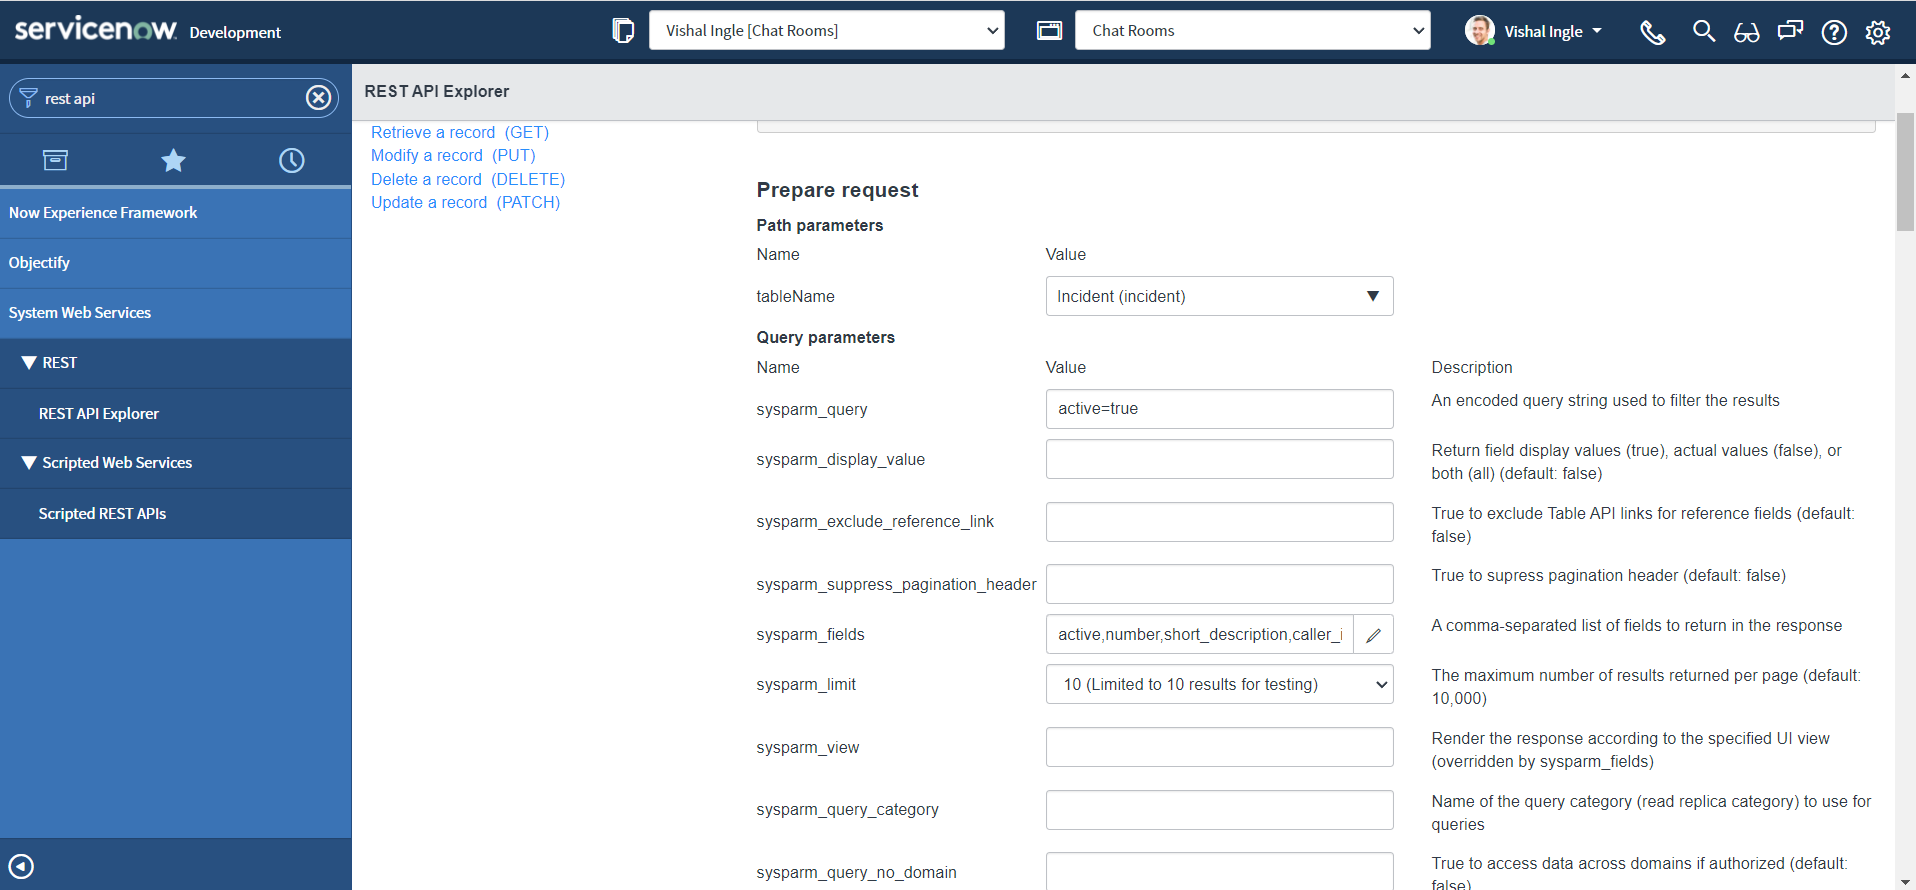
Click send, the new request response should have only active incidents and specified four fields information returned :
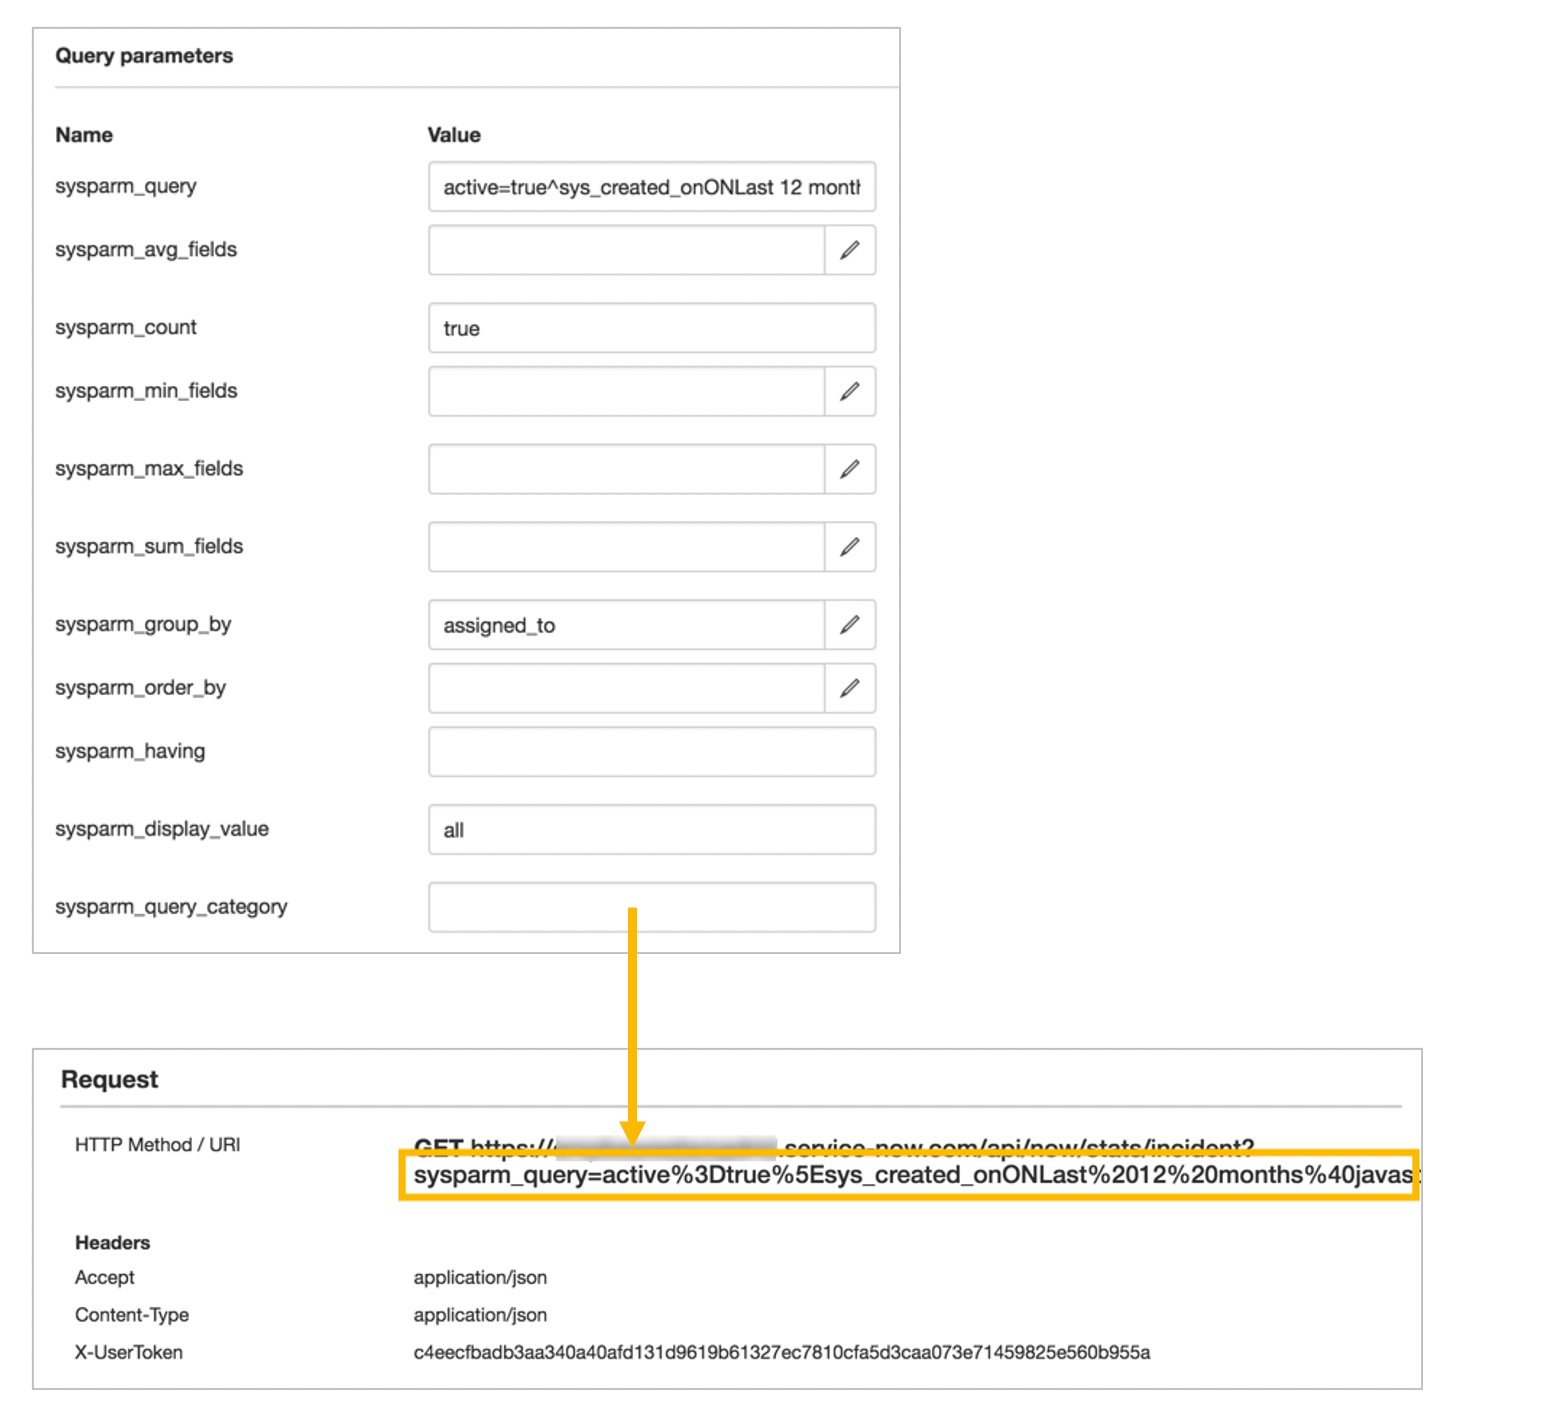
Qury parameters are added to the endpoint URL by the REST API Explorer when the request is sent. The query parameters are specific to the selected API method. A default set of query parameters are displayed for the API. The query parameters are added to the URI in the Request after '?'.
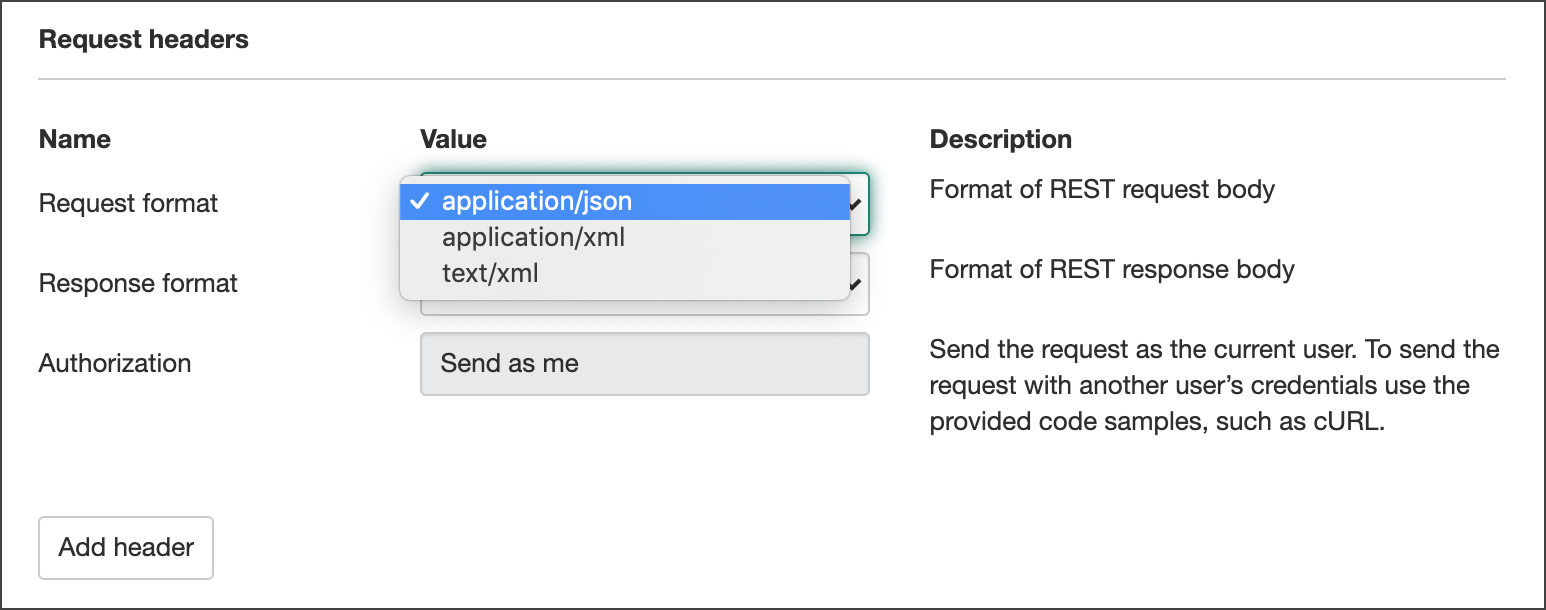
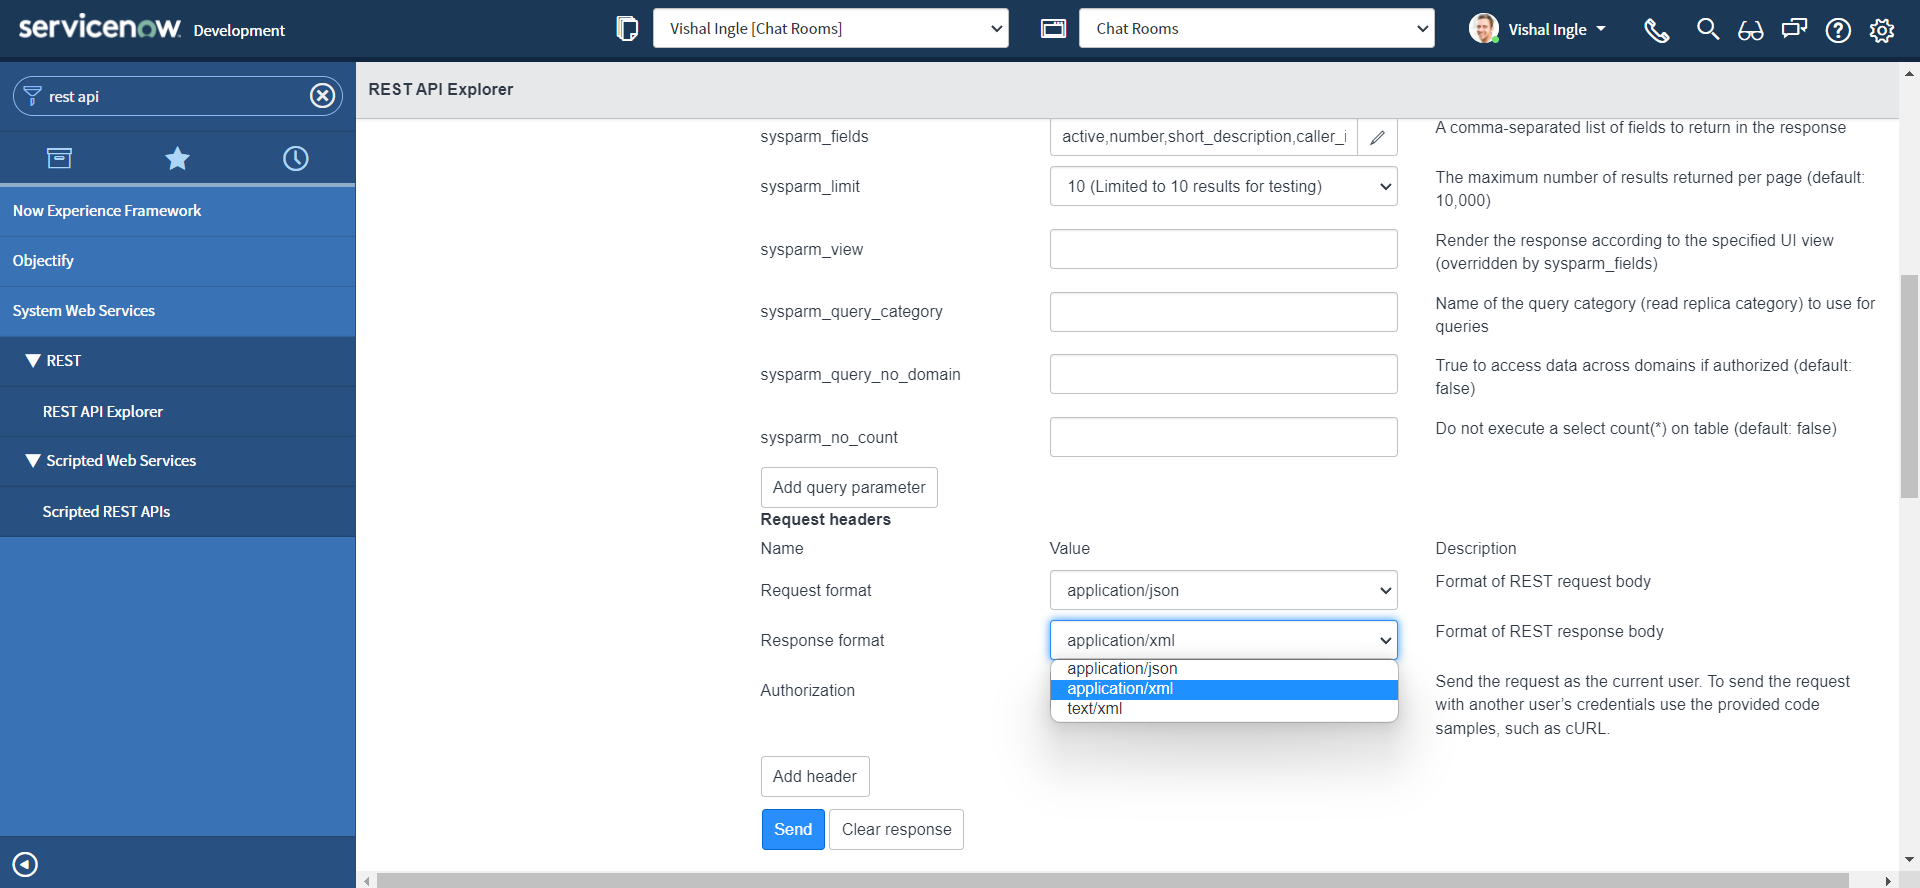
REST headers are the meta-data associated with an API request and response E.g. format of the Request and Response.
The Request Header settings appear in the request.
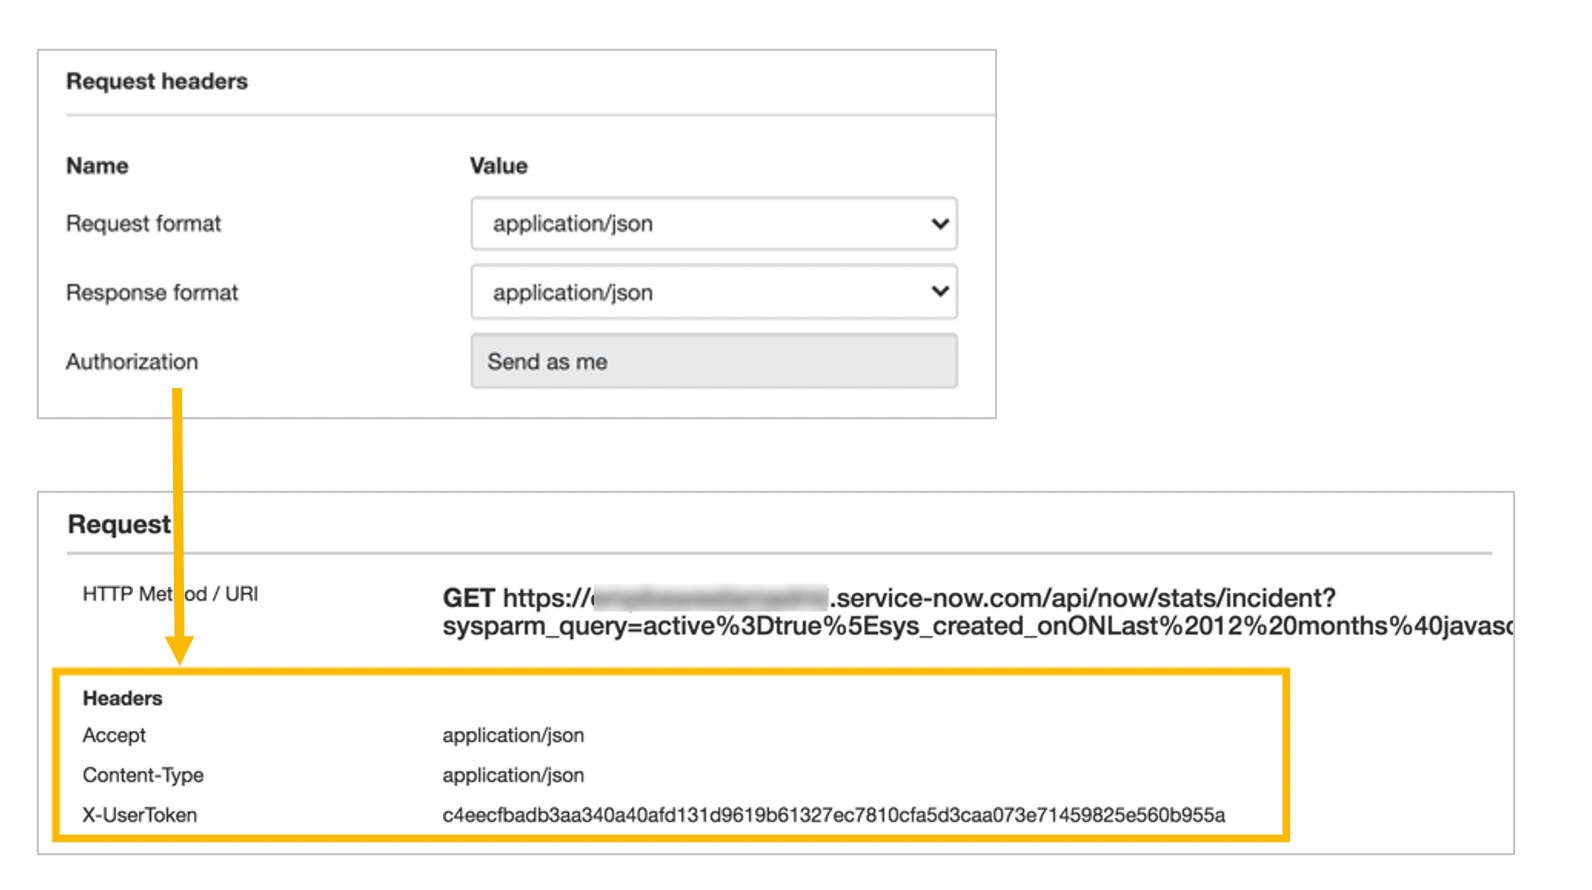
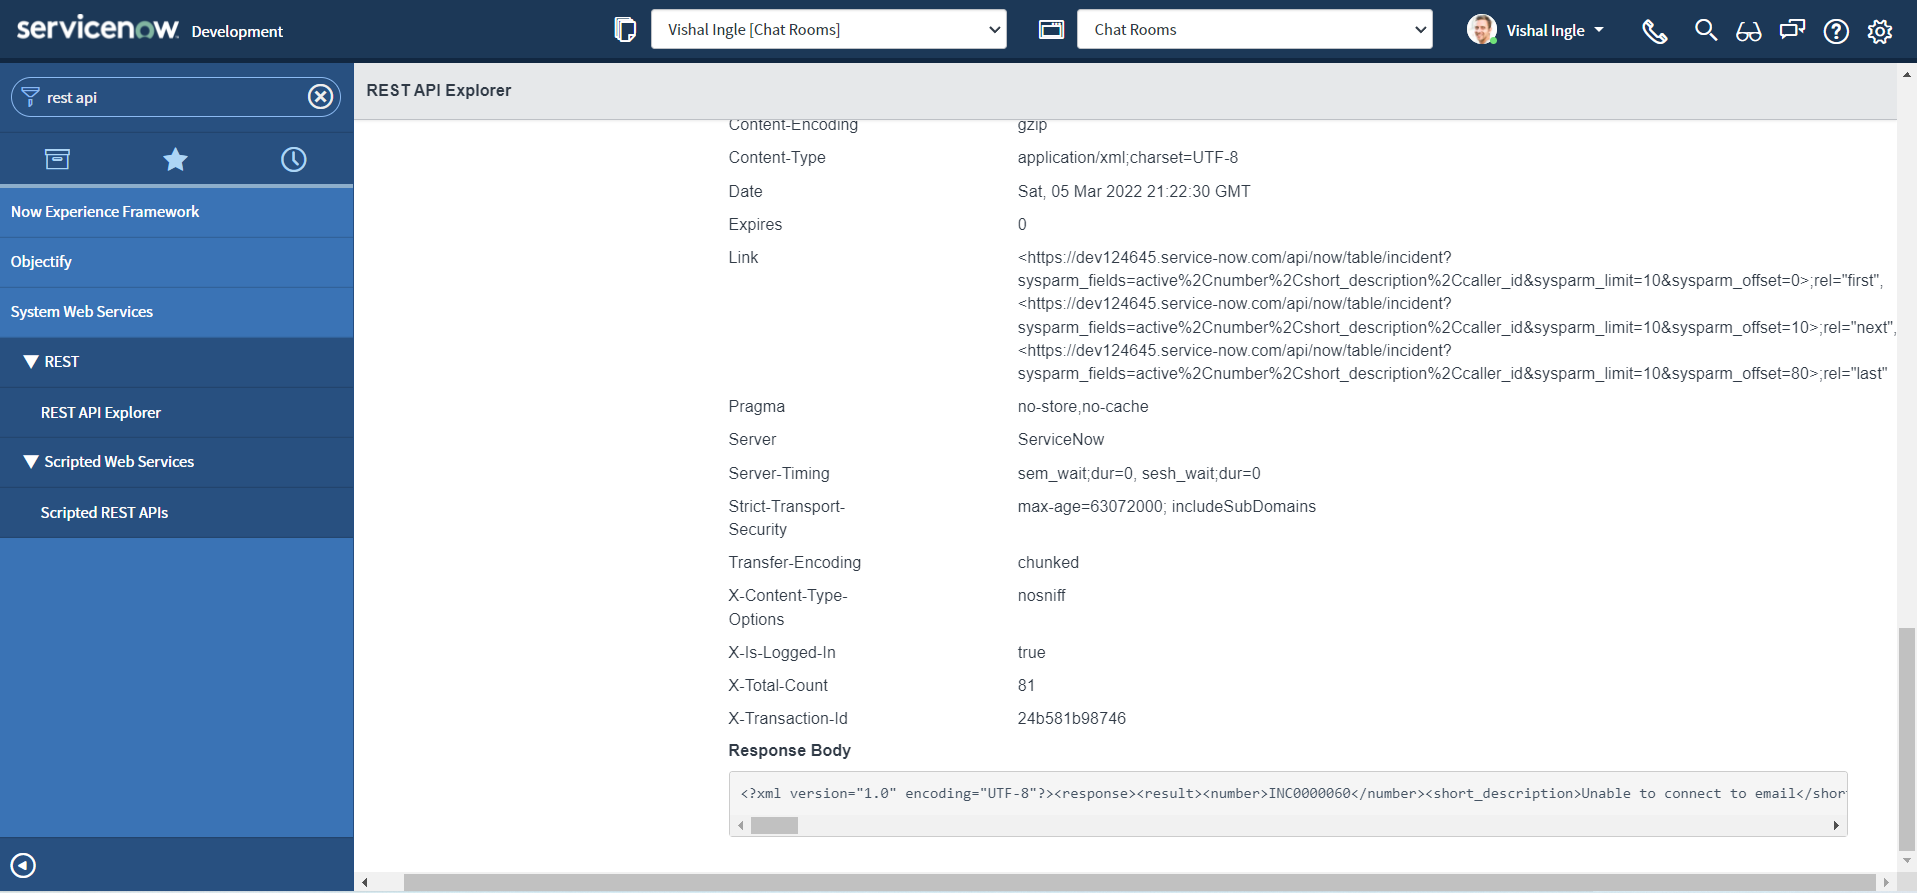
As you have noticed from the screenshot above, The request format corresponds to Accept header and similarly, the response format corresponds to the Content-Type header. If you can recall from first chapter, Accept or request format is the format in which client sends the data to the server or to be precise, the format in which server is expecting the data. Similarly, Content-Type or request format is the format in which server returns the data. Both the headers are expressed as the MIME Types e.g. application/json. You can read more about the MIME types here.
Let us do one more test, by changing the Reesponse format to application/xml and observe the response by clicking send :
POST request
Requirements gathering
Now, we have reached the point from where we can think of the complete business use case. But before technical implementation, we need to gather the information of what needs to be done from business based on their need. This process of understanding what you are trying to build and why you are building it is known as "Requirements gathering". Requirements gathering is very very essential in any project. Don't worry, If you are just a developer you do not need to do all that stuff. Let me tell you what is the requirement. Just for the desclaimer, The actual use case is bi-directional and involves some complex logic, So I am going to explain just a part of it here to not complicate things right away.
Business use case
This use case is to integrate two servicenow instances, so that when the incident is created on one instance, the incident will automatically be created on another instance. Why so? Let us say, Instance 1 is a Customer instance for "A" company & Instance 2 is a Vendor instance of company "B" that provides services to company "A", And business want to have incident created on Vendor instance to be also replicated to customer instance. Now, using bi-directional integration, the incident can be handled by either side or can be updated on both the side, and as you can sense it can get complicated real fast. Though, later you will realise it was not so complicated as it seems now.
Prapare the pre-requisites
For above use case, we are going to use OOTB Table APIs again and REST API explorer to perform test.
- Navigate to System Web Services > REST > REST API Explorer.

- In the top-left of the REST API Explorer, select Namespace as now, API Name as Table API & API Version as latest.


-
Click Create a record (POST)
- "Create a record" is a HTTP POST method that Inserts one record in the specified table.

-
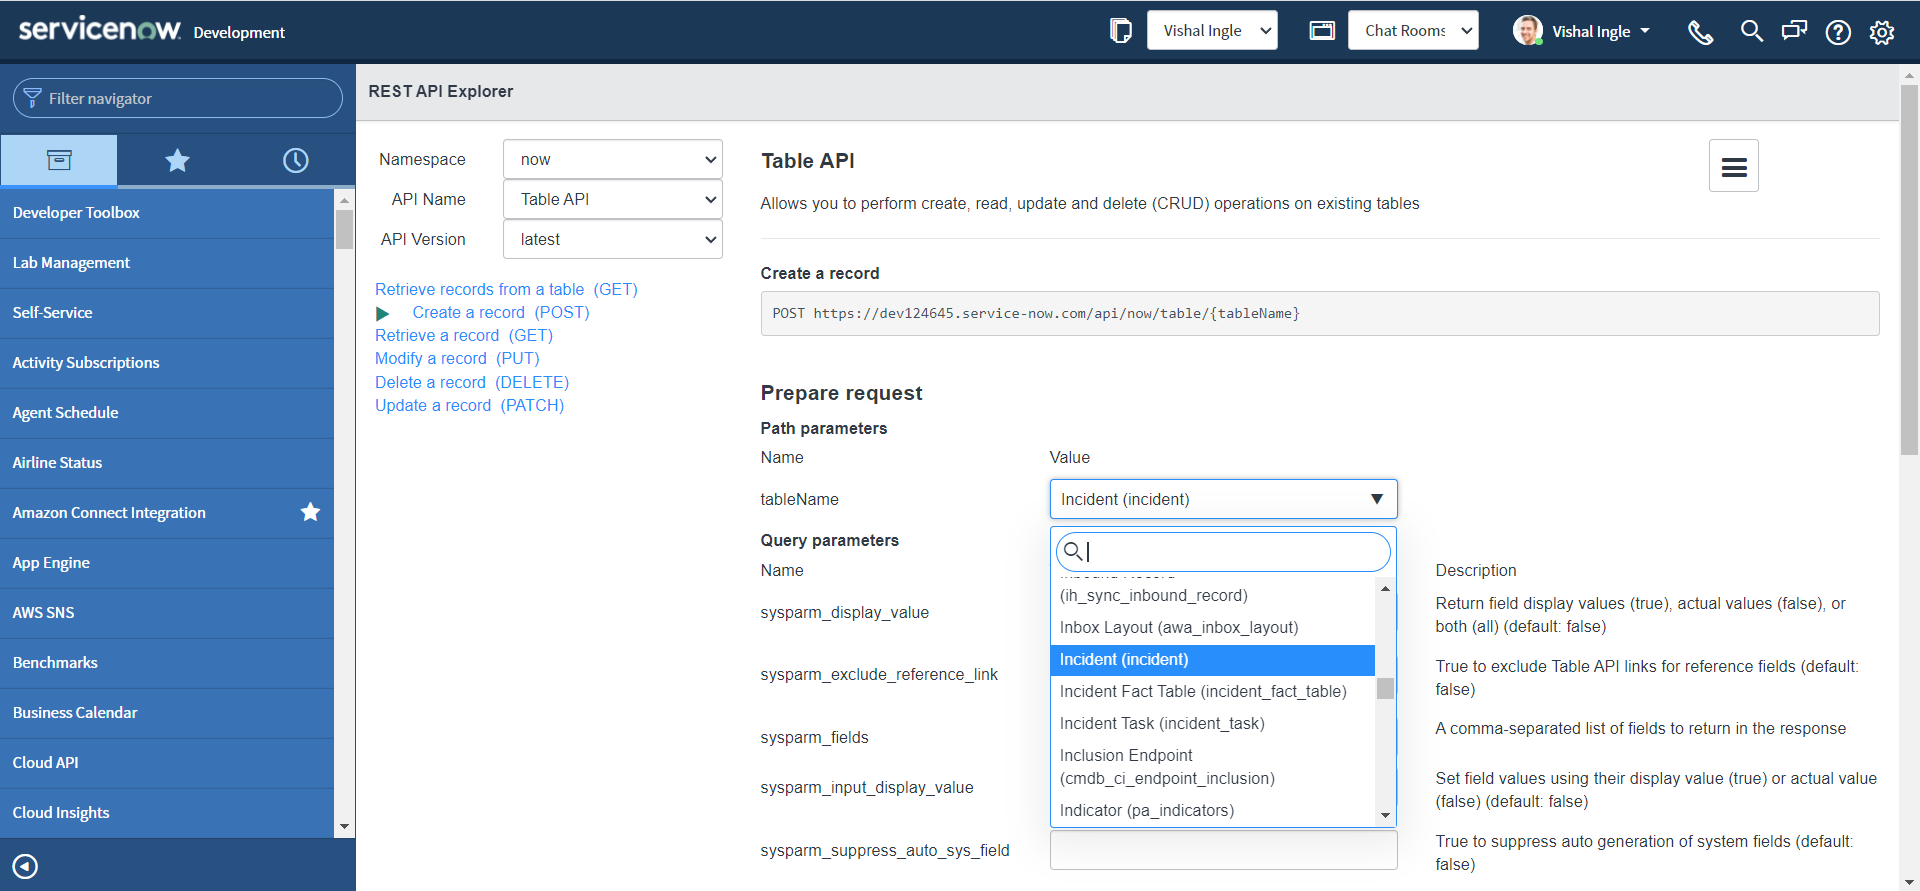
In the Path Parameters section, set the "tableName" parameter as Incident (incident) table.
-
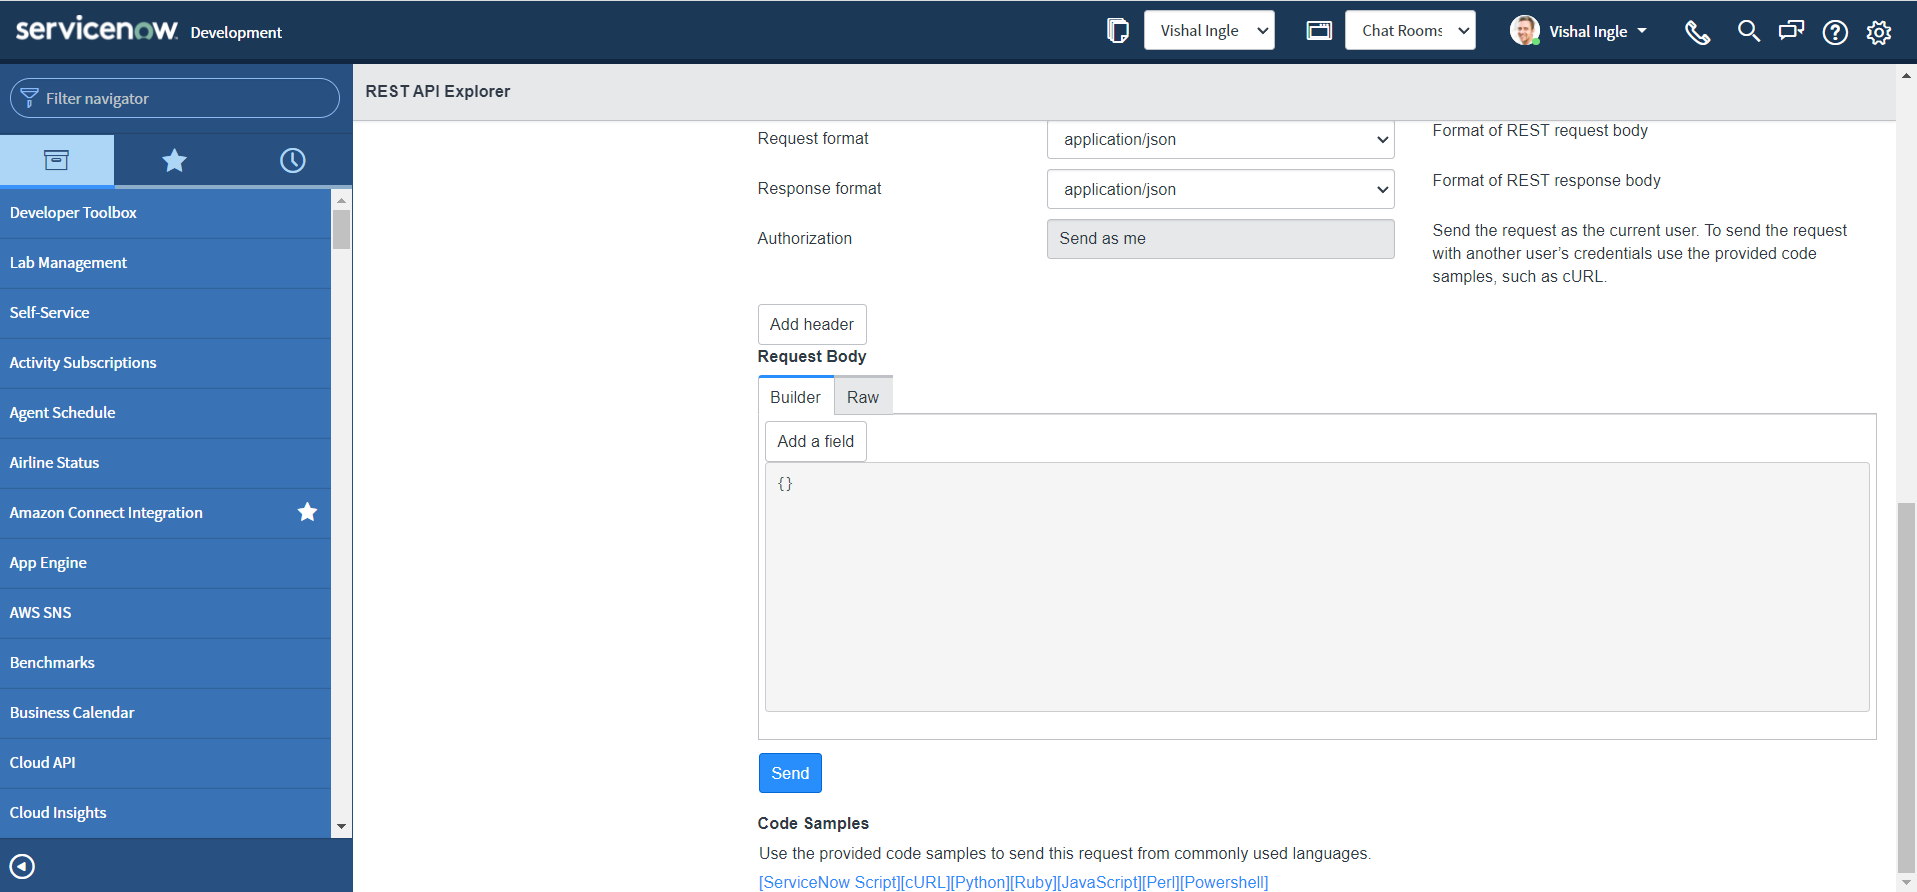
In the Request Body section, click Add a field.
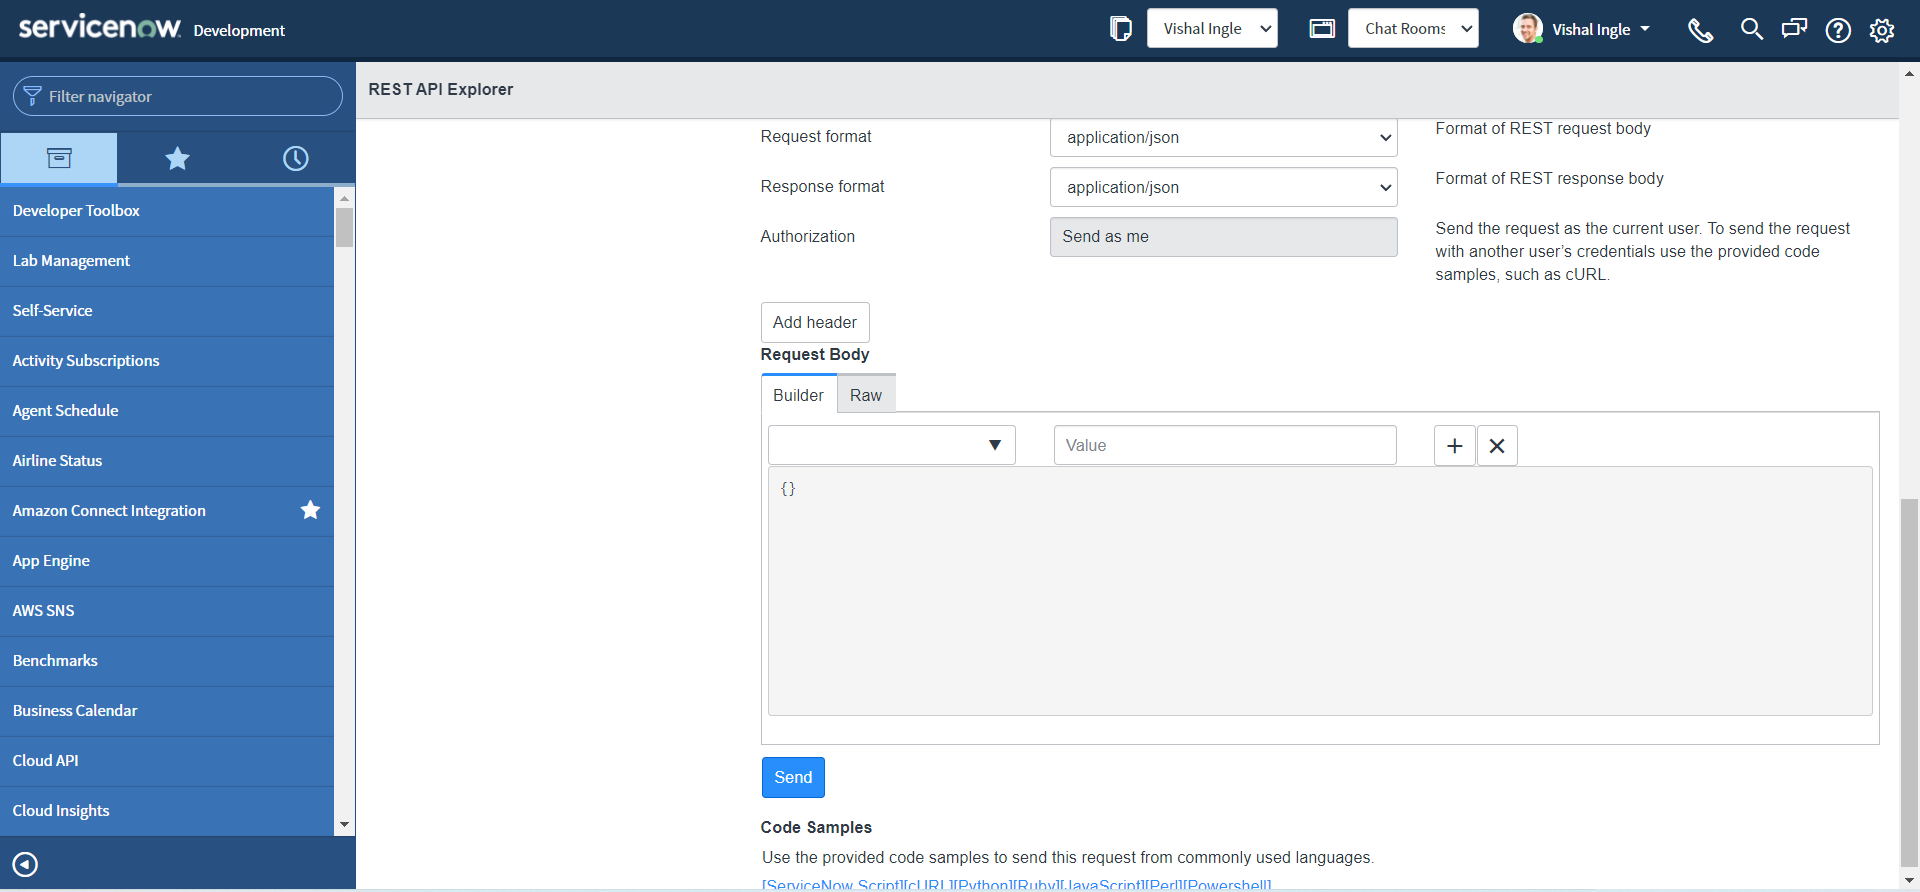
-
Select a field and specify a value for that field. The request body updates automatically based on your entries.
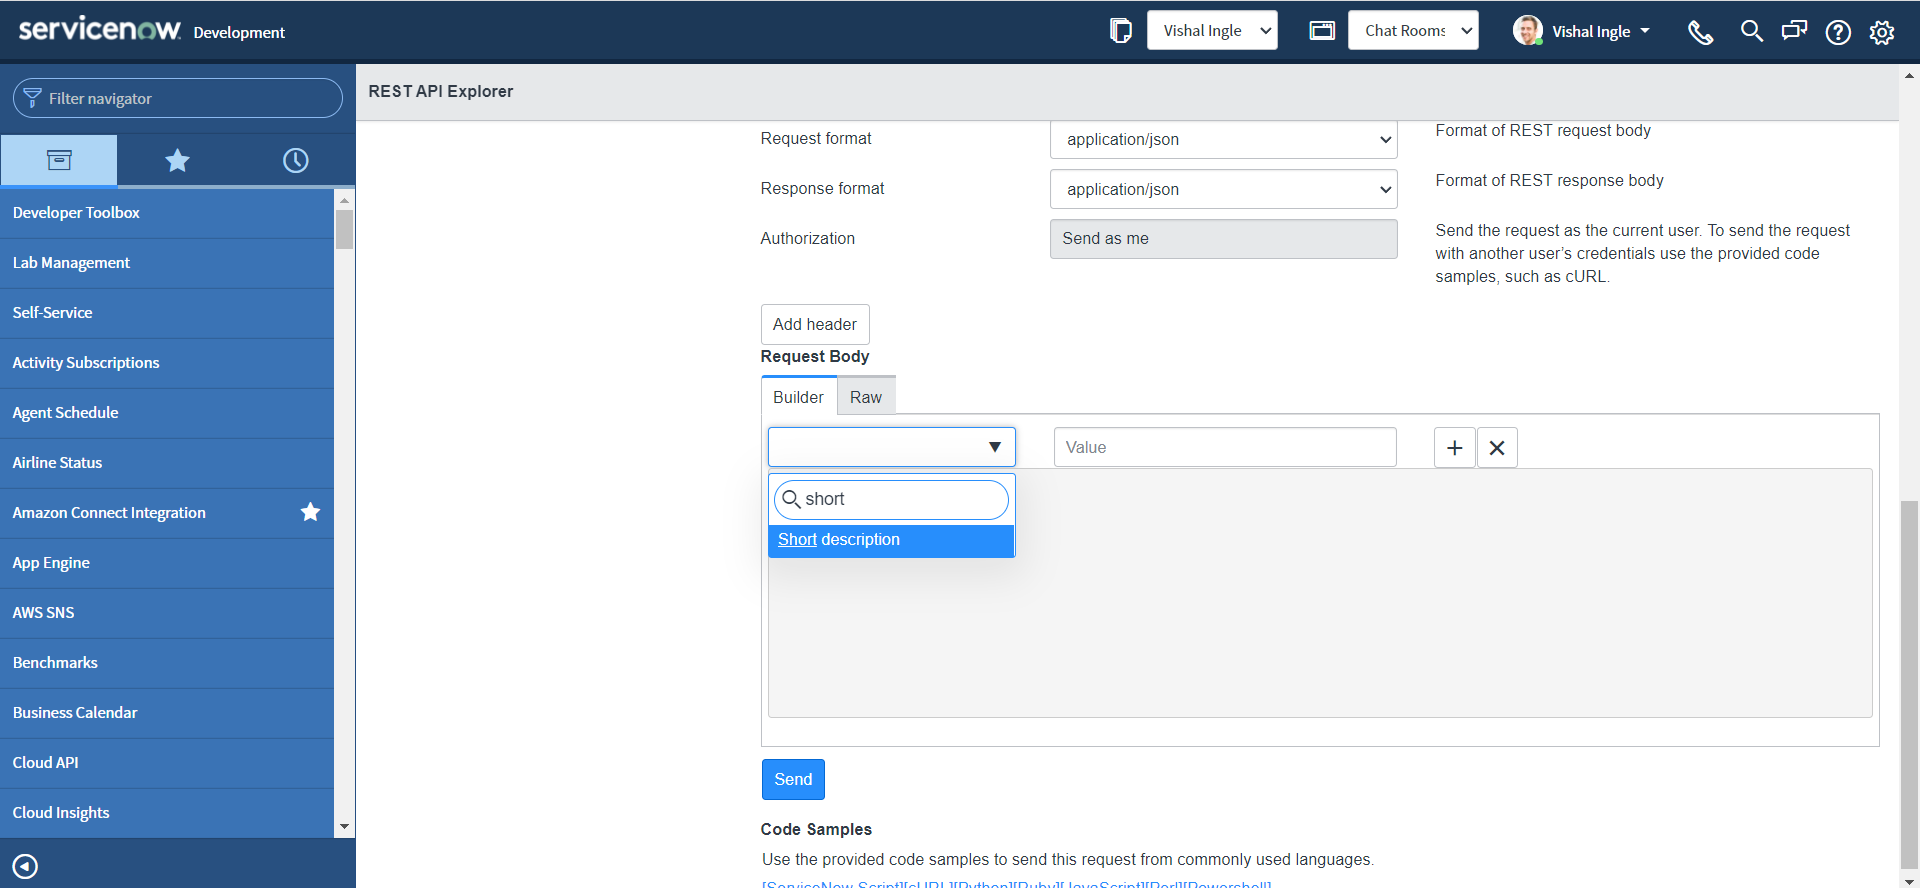

-
Click the plus sign (+) and specify any additional field to assign a value to.
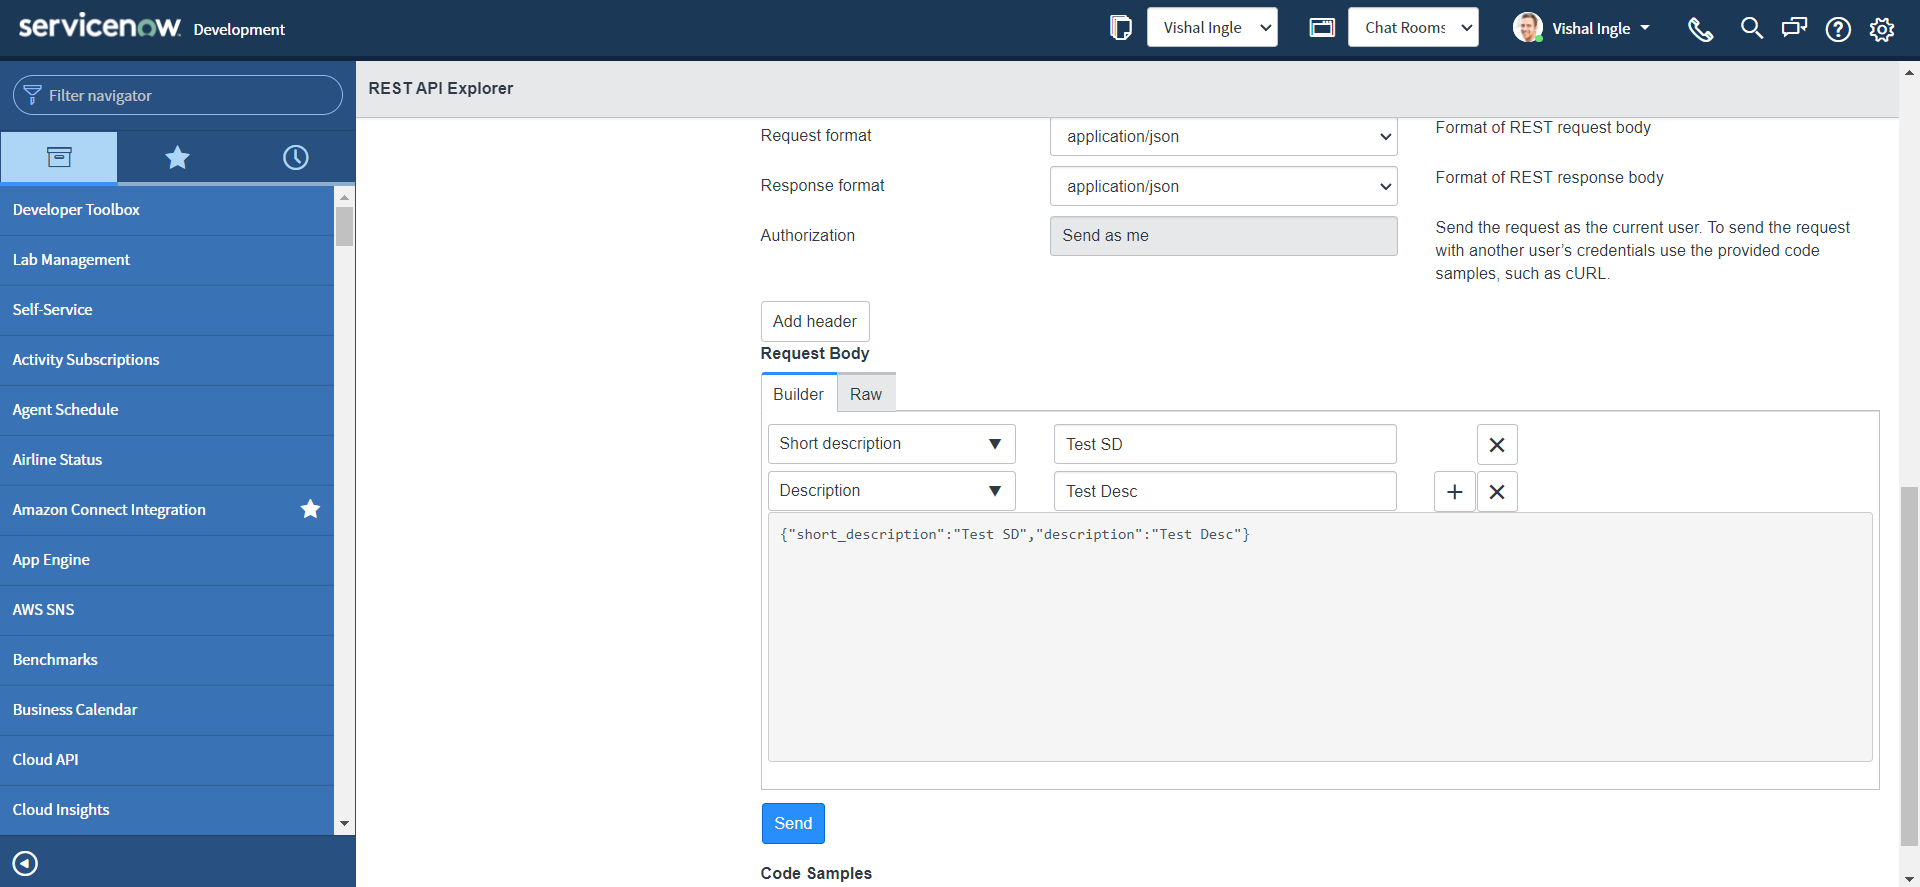
-
After constructing the request, click Send & Select OK for the popup.
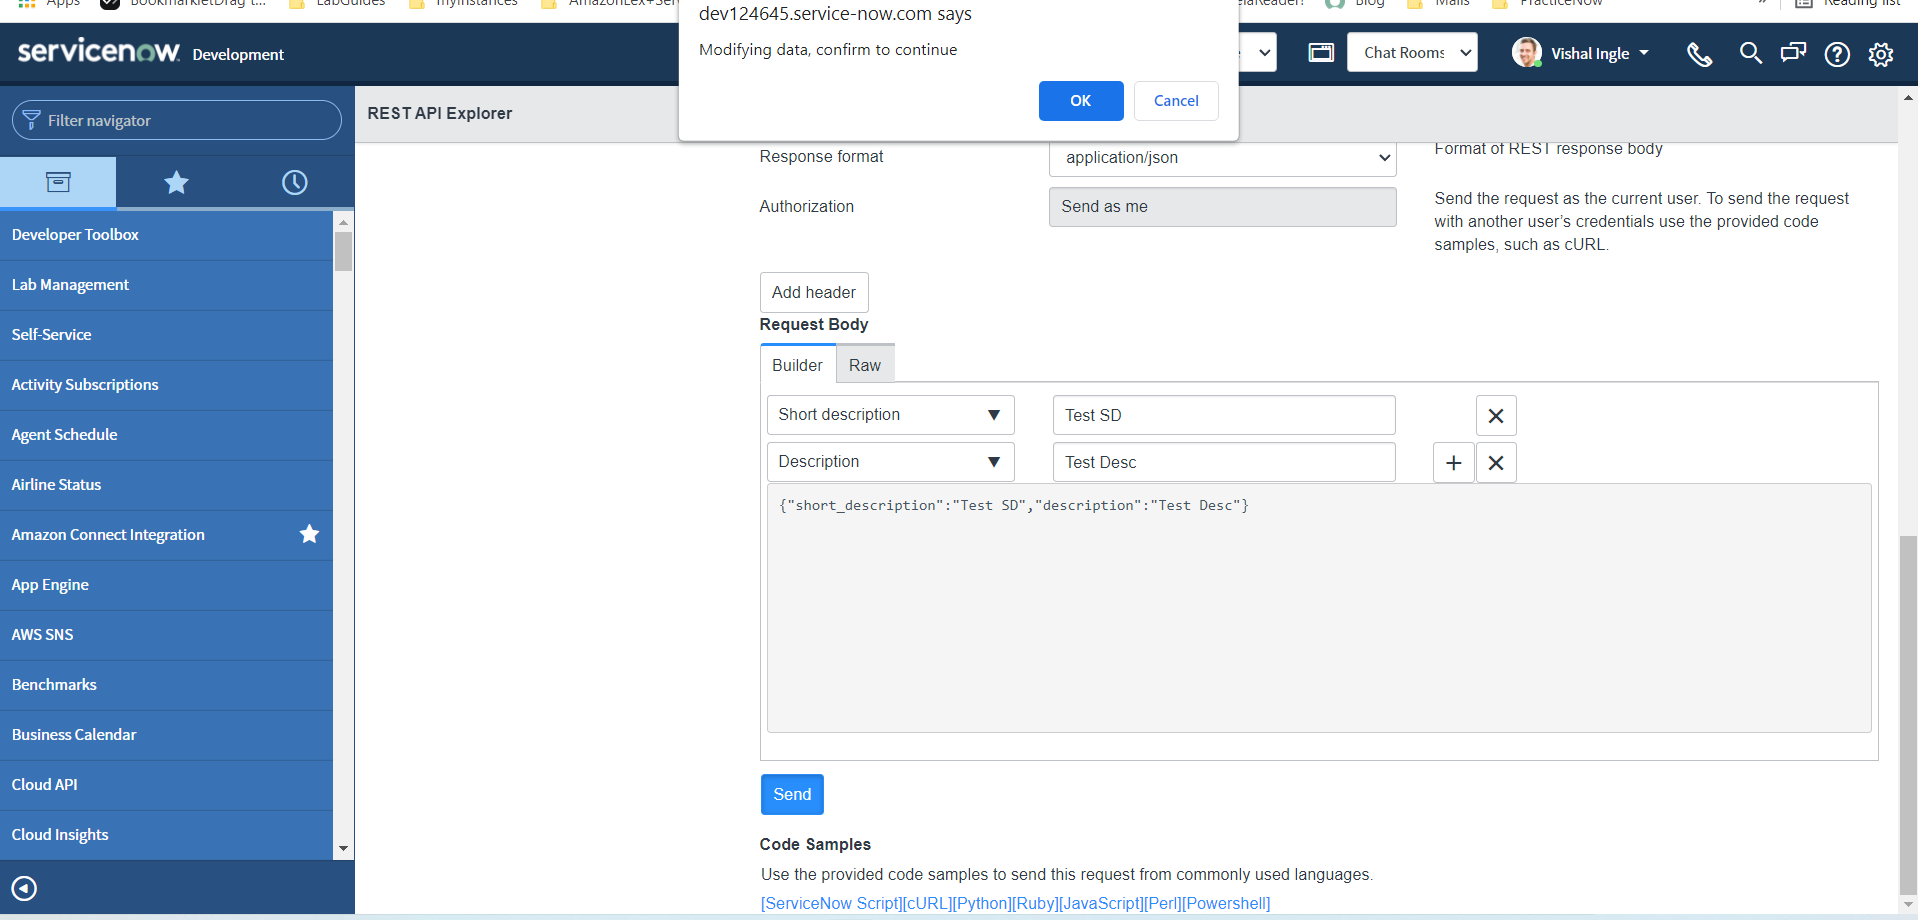
-
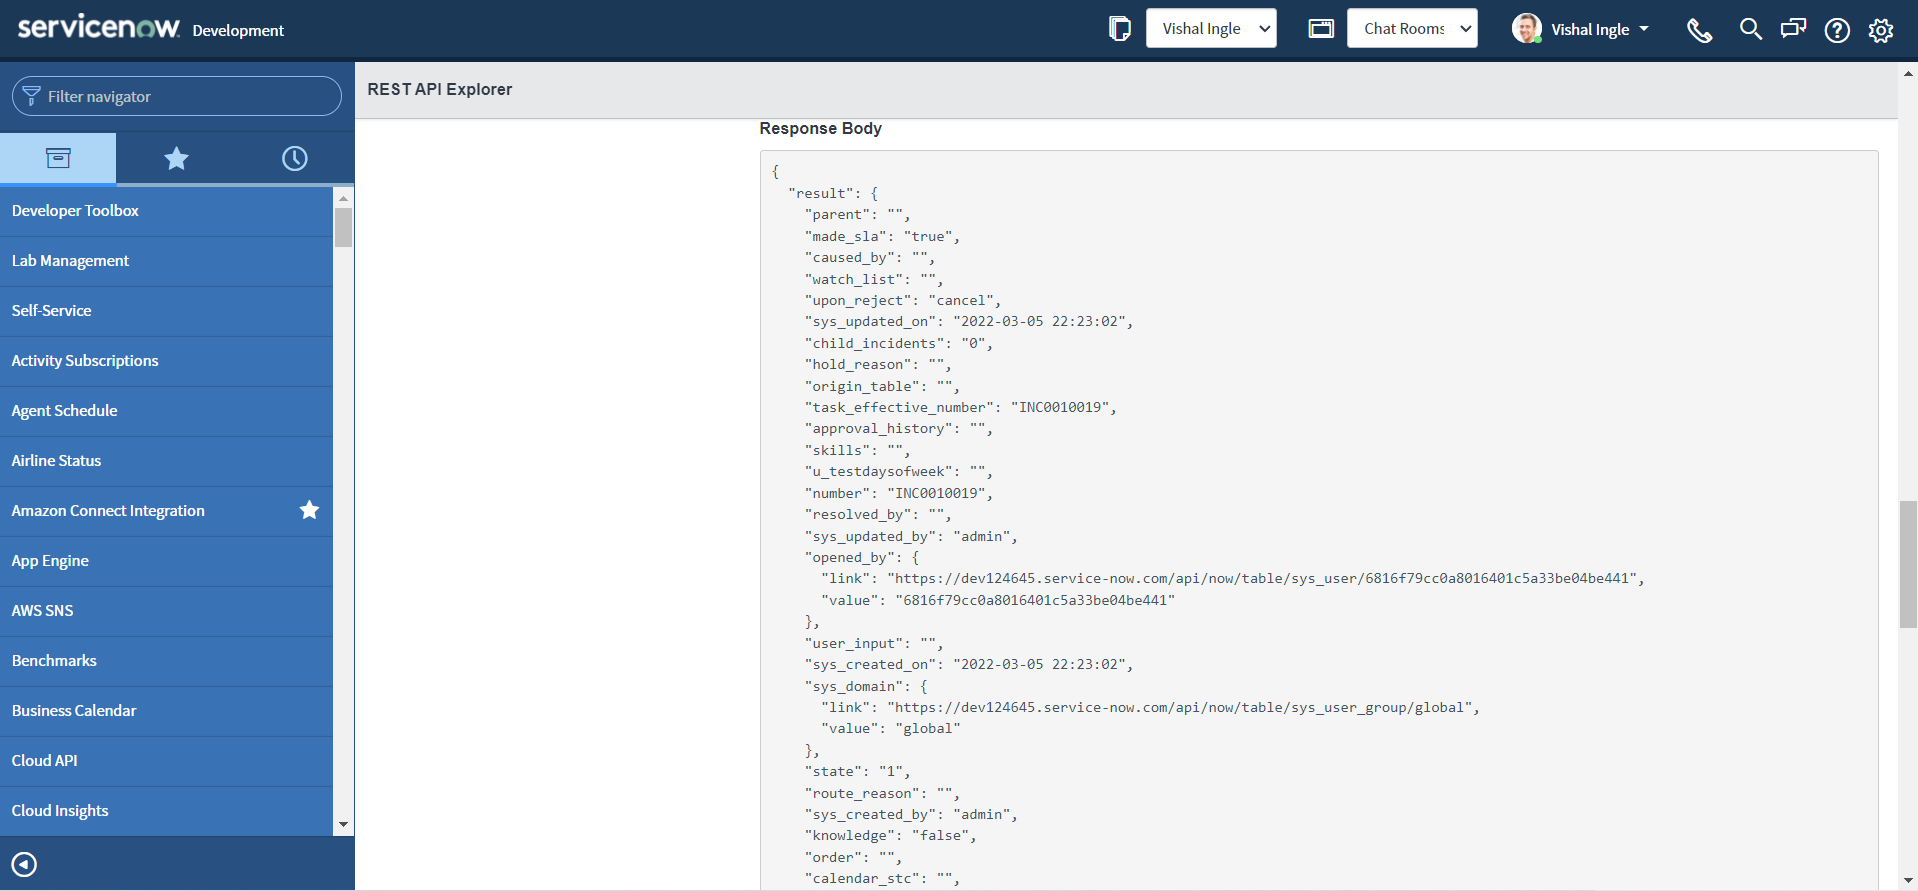
Observe the response from the server, It returnes the information of newely created incident.
Okay, we are not done yet with REST API explorer, But that's it for this chapter. I am going to let you guys experiment with REST API explorer for now and in next chapter we will look at the other missing pieces. ServiceNow documentation is still the best way to learn about REST API explorer. Two of the best resources can be found here & here.
what about other web services?
Some of you might be thinking, why we are only talking about REST and not SOAP or GraphQL? Remember, I did promise you to be able to do any kind of integrations! It is a foundation and we are starting with the most widely used and easiest web service. But bear with me, we will be there and be soon.
What's next?
In next chapter, we are going to build on top of information that we did gathered today, extract the useful information from the response, cover some of the missing pieces that we did not cover yet, and implement our first use case by old-school approach of script, point out some of the concerns, and start the quest for better solutions.